
How To Host Your Website: 12 Practical Steps
Learning how to host your website is an essential step toward building a successful online presence. Whether you’re starting a blog, launching an online store, or creating a business website, reliable hosting helps keep your content accessible to visitors.
Choosing the right hosting solution can feel overwhelming when you’re just getting started. However, understanding the basics makes the process much easier.
From selecting a trustworthy hosting provider to connecting your domain and publishing your pages, each step brings you closer to launching your website.
This beginner-friendly guide explains 12 practical steps to help you host your website with confidence. You’ll also discover different hosting options so you can choose the solution that best suits your needs.
What Does It Mean To Host A Website?
Website hosting is a service that stores your website’s files, images, databases, and other content on a server connected to the internet. When someone visits your domain, the server delivers the information needed to display your website in their browser.
Think of your website as a physical shop. Your domain name represents the shop’s address, while web hosting provides the space and infrastructure where your website operates.
Just as a shop needs a suitable location, your website needs reliable hosting to remain accessible. Without a hosting service or another suitable server setup, visitors cannot access your website online.
Hosting providers offer different plans based on storage space, performance, security features, and expected website traffic. Exploring low-cost web hosting services can help beginners understand their available options.
Some hosting solutions are ideal for personal blogs, while others support growing businesses and demanding applications. Comparing the best WordPress hosting services can help you identify features suited to your website.
Choosing the right hosting plan also depends on your technical experience, budget, and future needs. Learning how to choose a web hosting provider can make this decision easier.
Understanding these basics makes learning how to host your website much simpler. With the right hosting solution, you can build a reliable online presence and expand your website as your goals evolve.
How To Host Your Website In 12 Practical Steps
Learning how to host your website becomes easier when you understand the process from beginning to end. You don’t need to own a server or have advanced technical skills to get started.
Most beginners use a web hosting provider that manages the physical servers and essential infrastructure. Your responsibility is to select a suitable plan, configure your website, and keep its content updated.
Before purchasing hosting, consider your website’s purpose, expected visitors, and technical requirements. Comparing web hosting providers for WordPress can help you understand the available options.
Your domain name is another important consideration because it gives visitors an address to find your website. If you’re still choosing a name, explore these domain name generators for inspiration.
Budgeting also matters, especially when launching your first blog or online business. Learning how to save money on web hosting can help you identify unnecessary expenses and compare long-term costs.
Once you’ve selected your hosting provider, you’ll need to connect your domain, install your website software, configure essential settings, and test everything before publishing.
The following 12 practical steps explain how to complete this process using a hosting provider. They will help you make informed decisions, avoid common mistakes, and prepare your website for future growth.
1. Select The Appropriate Form Of Web Hosting
Choosing the right hosting type is the foundation of a reliable website. Different hosting solutions offer varying levels of performance, flexibility, technical control, and maintenance responsibilities.
Shared hosting is an affordable option for beginners, personal blogs, and small business websites. Multiple websites share server resources, making it economical but potentially limiting performance during busy periods.
If you’re starting with a limited budget, exploring low-cost web hosting services can help you understand the advantages and limitations of entry-level hosting.
Virtual Private Server (VPS) hosting provides an isolated virtual environment with allocated resources and greater control over server settings. It suits website owners who need more flexibility than shared hosting offers.
Managing a VPS also involves additional technical responsibilities. Our Hostinger VPS tutorial explains important steps for securing a virtual server.
Cloud hosting uses cloud infrastructure to provide flexible resources and accommodate changing website demands. Its scalability makes it attractive to growing businesses and websites with fluctuating traffic.
Managed cloud solutions can reduce the technical work involved. Our Cloudways Review explores a platform designed to simplify cloud hosting management.
Dedicated hosting provides an entire physical server for one customer, offering substantial resources and administrative control. It is generally suited to established websites with demanding applications or high traffic.
For websites requiring advanced hosting capabilities, our Liquid Web Review explores features offered by a provider serving businesses with more demanding requirements.
Managed WordPress hosting simplifies technical maintenance through services such as updates, backups, security features, and WordPress-specific support. It can be particularly useful for website owners who prefer concentrating on content rather than server administration.
Understanding the differences between WordPress and Managed WordPress can help you decide how much technical responsibility you want to handle yourself. You can also explore our WP Engine Review to learn about WordPress-focused hosting features and services.
Before deciding, consider your budget, technical experience, expected website traffic, and future growth. Choosing a suitable hosting type helps you avoid unnecessary expenses while leaving room for expansion.
For another perspective, our GreenGeeks Review explores an environmentally focused hosting provider that may interest website owners who value sustainability.
2. Select A Reliable Web Hosting Provider
Your hosting provider plays an important role in website performance, uptime, security, and technical support. A dependable service helps keep your website accessible while providing the resources needed for future growth.
Start by comparing established providers such as Hostinger, SiteGround, DreamHost, and Cloudways. Each offers different hosting plans, features, and levels of technical assistance.
For example, our Hostinger Review explores its hosting features, advantages, and limitations. You can also examine our Bluehost Review when comparing beginner-friendly hosting options.
Look beyond basic storage and bandwidth allowances. Check whether each provider includes SSL certificates, automatic backups, security monitoring, and responsive customer support.
Server location can also influence website loading times, particularly when visitors are far from your hosting infrastructure. Choosing a provider with suitable data centre locations or CDN support can improve accessibility.
For Canadian website owners, our WHC Web Hosting Canada Review explores another hosting option worth considering.
Pricing deserves careful attention because introductory offers may differ significantly from renewal rates. Compare long-term costs, resource limits, and any additional charges before committing to a plan.
Our Wealthy Affiliate Hosting vs Bluehost Review provides another perspective on comparing hosting solutions and their available features.
Customer support is equally important, especially when technical problems interrupt your website’s operation. Look for accessible support channels, helpful documentation, and recent customer feedback.
You can also explore our Liquid Web vs GoDaddy comparison to see how two hosting providers approach different business requirements.
Before making your final decision, review the 15 essential factors for choosing a web hosting provider. This can help you evaluate your options without overlooking important considerations.
Ultimately, the right provider should balance reliability, security, performance, and affordability. Choose a service that supports your current website while allowing room for future expansion.
3. Register A Domain Name
A domain name gives your website a recognizable address that visitors can enter into their browsers. For example, example.com represents a domain name that directs people to a particular website.
Choosing a memorable domain is an important part of establishing your online identity. Your name should reflect your brand, be easy to spell, and remain relevant as your website grows.
For example, Close To Nature uses a domain name that reflects its focus on gardening, wildlife, and connecting with nature. Visitors can immediately recognize the website’s general theme.
Similarly, Living The Vegan Lifestyle communicates its focus on plant-based living, vegan recipes, and lifestyle advice. Its descriptive name helps establish a clear connection with its intended audience.
Another example is PawReiki, which combines references to pets and Reiki in a distinctive brand name. This creates a memorable identity for a website exploring Reiki-inspired practices and holistic animal wellness.
If you’re struggling to find the right name, explore these domain name generators. They can help you discover creative combinations and identify possible names for your website.
Before registering a domain, check its availability through a reputable domain registrar. You should also investigate potential trademark conflicts to avoid choosing a name that infringes on another business’s rights.
Consider the domain extension carefully. While .com is widely recognized, country-specific extensions such as .ca or .co.uk may be appropriate for websites targeting particular regions.
Domain registration is usually available through independent registrars or web hosting providers. Some hosting companies include introductory domain registration with selected plans, although renewal charges may apply.
Understanding registration terms is essential because purchasing a domain does not normally mean owning it permanently. Our guide on how to buy a domain forever explains the limitations of long-term domain registration.
Compare initial registration costs, renewal rates, privacy protection, and transfer policies before committing. A low introductory price may not represent the most economical option over several years.
If you already own a domain, you generally don’t need to purchase another one when changing hosting providers. Instead, you can update its DNS settings to connect it to your new hosting account.
For website owners planning a larger move, our website migration checklist covers important preparations that can help reduce disruptions during the transition.
Finally, protect your domain registrar account with a strong password and two-factor authentication whenever available. Enable automatic renewal if appropriate, and keep your contact and payment information current.
Your domain name is a valuable part of your online identity. Choosing it carefully and maintaining control over its registration will help protect your website as your business develops.
4. Purchase A Suitable Hosting Plan
Once you’ve selected a hosting provider, the next step is choosing a plan that matches your website’s requirements. The goal is to find the right balance between performance, essential features, and long-term affordability.
A personal blog generally needs fewer resources than a busy online store with product databases, customer accounts, and payment processing. Your website’s purpose should guide your hosting decisions.
For example, an online store built with WooCommerce may require additional storage, processing resources, and security features. Our WooCommerce Guide explains the platform’s capabilities and what running an online store involves.
Start by reviewing the storage capacity, traffic allowances, database support, and number of websites included in each plan. Check whether the provider imposes resource limits that could affect performance as your traffic increases.
Website speed is another important consideration because hosting resources can influence loading times. Our guide to improving website speed explores additional ways to improve performance.
Look for essential features such as SSL certificates, automatic backups, email hosting, and security monitoring. Some providers include these services, while others charge additional fees.
If you’re planning to use WordPress, check whether the plan includes a user-friendly control panel and a straightforward installation process. Our WordPress tutorial for beginners can help you become familiar with the platform.
Pay particular attention to subscription periods and renewal conditions. Introductory discounts can make a hosting plan attractive, but renewal rates may be considerably higher.
You should also check whether the advertised price requires a long-term commitment. Monthly billing offers flexibility, while longer subscriptions may reduce the effective monthly cost.
Avoid purchasing advanced resources before your website needs them. A small blog rarely requires the same hosting capacity as an established eCommerce business.
However, future growth is worth considering. Our guide to eCommerce scaling strategies explores challenges that growing online stores may encounter as their operations expand.
Before purchasing, confirm that your provider offers a straightforward upgrade process. Moving to a more suitable plan should not require rebuilding your entire website.
Start with a hosting plan that meets your present needs, monitor resource usage, and upgrade when traffic or technical requirements justify the additional investment.
5. Connect Your Domain To Your Hosting Account
After purchasing your hosting plan, connect your domain name to your hosting account. This connection allows visitors to reach your website by entering its address into their browsers.
If you registered your domain through the same hosting provider, the connection may already be configured. However, domains purchased from separate registrars usually require additional setup.
The process involves updating your domain’s Domain Name System (DNS) settings. DNS directs visitors to the correct server when they enter your website address.
1. Update Your Nameservers
One common method involves changing your domain’s nameservers to those supplied by your hosting provider. Nameservers identify which DNS service manages your domain’s records.
Log in to your domain registrar account, locate the nameserver settings, and enter the details provided by your host. Follow the instructions carefully to avoid configuration errors.
For an example of working with a hosting account, our WHC Web Hosting Canada tutorial explores the setup process for a Canadian hosting service.
2. Configure Your DNS Records
Alternatively, you can keep your existing nameservers and update individual DNS records. An A record connects a hostname to an IPv4 address, directing visitors to the appropriate server.
Some configurations also use AAAA records for IPv6 addresses or CNAME records to point one hostname toward another. Your hosting provider should explain which records are required.
Different hosting platforms may provide their own account dashboards and setup instructions. Our Ultimate Guide To GreenGeeks offers another resource for exploring hosting features and management.
3. Allow Time For DNS Changes
DNS updates are not always immediate. Changes may become visible within a few hours, although some configurations can take 24–48 hours or longer to update across DNS caches.
During this period, some visitors may reach your previous server while others access the new one. Avoid deleting an existing website until the new connection is working correctly.
4. Protect Your Business Email
If your domain supports business email, check its existing MX records before changing DNS settings. These records direct incoming email to the appropriate mail servers.
You may also need to preserve TXT records used for SPF, DKIM, DMARC, or other domain verification services. Missing records can interrupt email delivery or affect authentication.
5. Verify Your Domain Connection
Once the DNS changes have taken effect, enter your domain name into a browser to confirm that it reaches the correct website. Test both the www and non-www versions if you intend to support them.
Hosting dashboards can also help you check whether your website is associated with the correct domain. Our HostGator WordPress installation tutorial provides a related example of setting up a website through a hosting service.
If you’re using a WordPress-focused hosting plan, our WordPress hosting services guide offers further information about the hosting options available for WordPress websites.
If you’re transferring an existing website, verify that its pages, images, and email services continue working. Keep a backup available in case you need to restore your previous configuration.
Connecting your domain correctly is essential for making your website accessible. Taking time to verify DNS settings can help prevent unnecessary disruptions and prepare your website for the next installation steps.
6. Install WordPress Or Upload Your Website Files
Once your domain is connected to your hosting account, you’re ready to install your website. The process depends on whether you’re using a content management system like WordPress or uploading a custom-built website.
1. Install WordPress Using Your Hosting Control Panel
WordPress is a popular content management system that allows you to create blog posts, manage pages, and customize your website without advanced coding skills.
Its flexibility makes it suitable for personal blogs, business websites, and online stores. Our article on why WordPress is a popular website platform explores its features and advantages.
Many hosting providers include a one-click or guided WordPress installer within their control panels. This simplifies the installation process by handling much of the initial technical setup.
Log in to your hosting account and locate the WordPress installation option. Select your domain, enter the requested website information, and create secure administrator credentials.
For a beginner-friendly introduction to managing your new website, explore our easy-to-follow WordPress tutorial.
After installation, sign in to your WordPress dashboard to confirm everything works correctly. You can then begin configuring your website’s appearance, navigation, and essential settings.
2. Choose And Install A WordPress Theme
Your WordPress theme controls much of your website’s visual presentation. Choosing a responsive, well-supported theme can help create a professional appearance across different devices.
Before making your selection, read our guide on how to choose a WordPress theme. It explains important considerations when evaluating themes for your website.
Once you’ve selected a suitable design, follow our tutorial on how to install a WordPress theme to begin customizing your website.
3. Upload A Custom-Built Website
If you’ve developed a website using HTML, CSS, JavaScript, or another framework, you may need to upload its files manually. The correct method depends on your hosting environment and application requirements.
Many hosting providers offer a file manager that allows you to upload website files directly. Alternatively, you can use Secure File Transfer Protocol (SFTP) to transfer files securely.
Place your files in the appropriate website directory specified by your hosting provider. For traditional shared hosting, this may be a folder named public_html, although directory structures vary.
Ensure that your website’s main entry file and supporting assets are in the correct locations. Incorrect file paths can prevent pages, images, or scripts from loading properly.
4. Configure Databases And Server Requirements
Websites that rely on databases or server-side applications may require additional configuration. This can include creating databases, setting environment variables, or installing application dependencies.
Before installing any software, confirm that your hosting environment supports its required programming languages, database systems, and recommended versions.
WordPress installations also depend on compatible PHP and database versions. Keeping these components updated helps maintain compatibility, performance, and security.
5. Verify Your Website Installation
After installing WordPress or uploading your files, open your domain in a browser. Check that the homepage loads correctly and that important pages, images, and navigation links function as expected.
If you’re using WordPress, confirm that you can access the administration dashboard. Keep your login credentials secure and avoid using easily guessed administrator usernames or passwords.
A successful installation provides the foundation for building and maintaining your website. Once everything is working, you can move on to configuring the essential settings that support its functionality and security.
7. Configure Your Website Settings
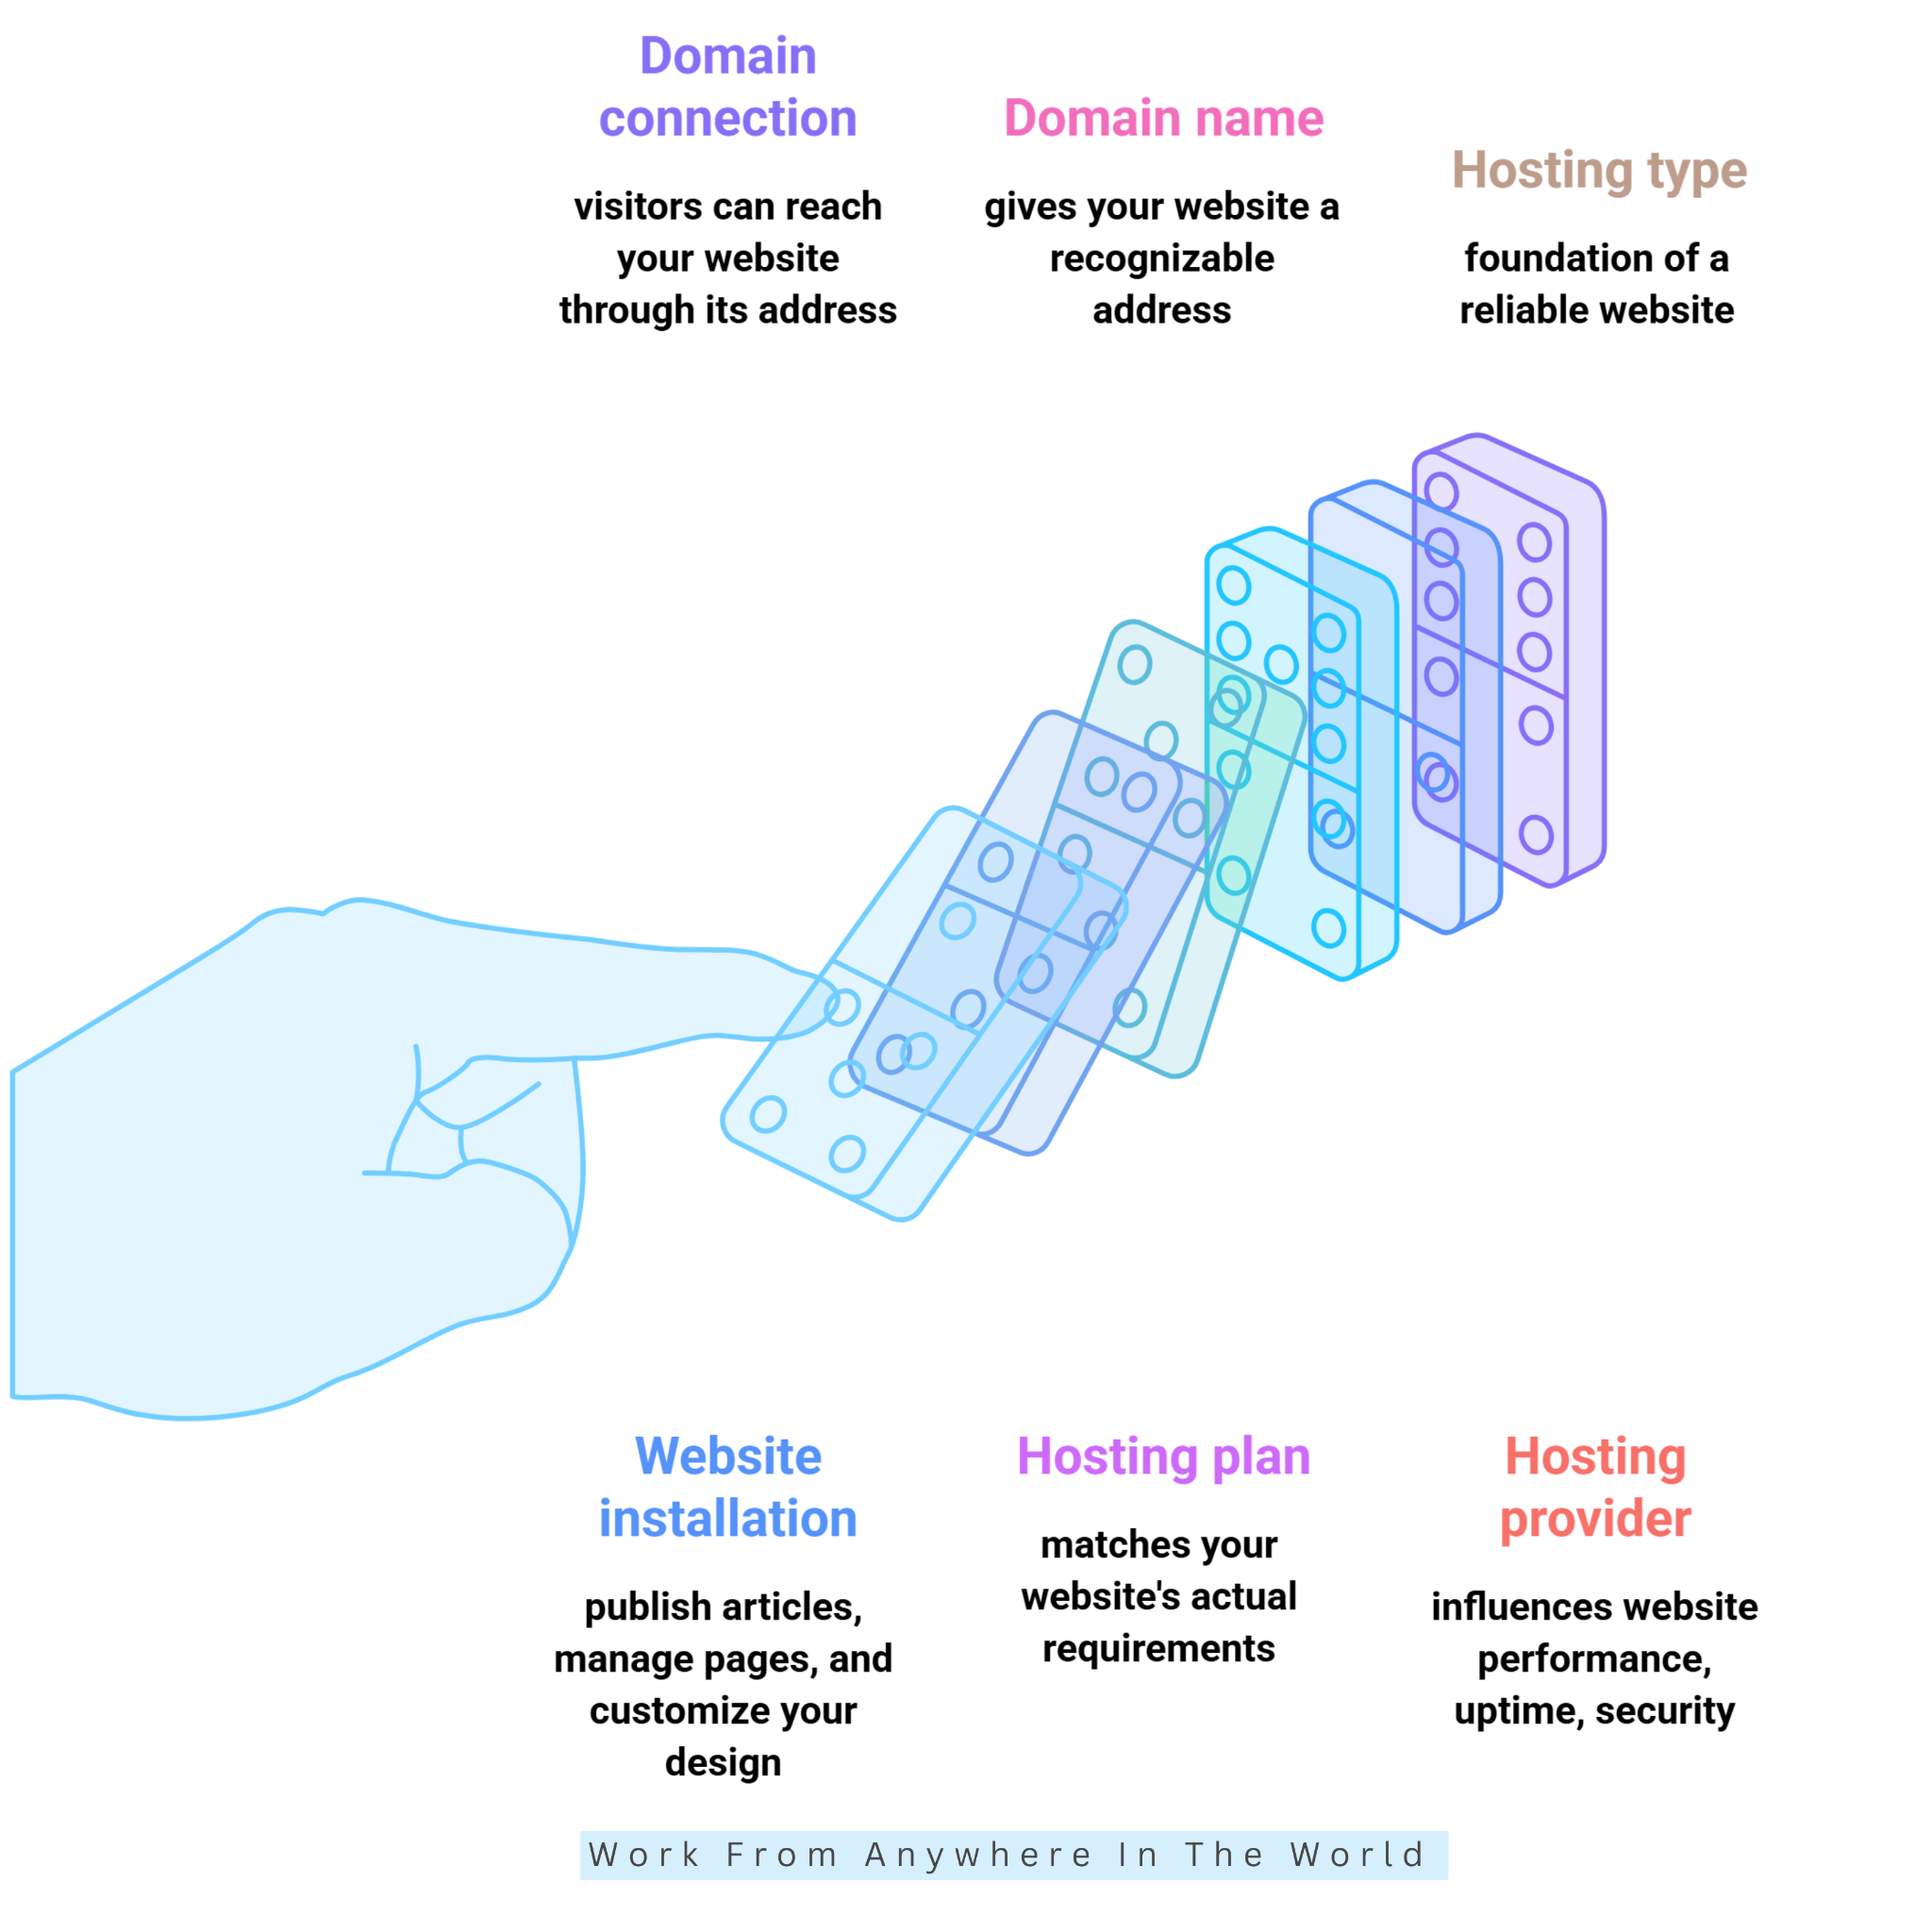
After installing your website, review its settings to create a consistent and user-friendly experience. Some hosting platforms automate much of the initial setup, allowing you to concentrate on personalizing your website.
For example, Wealthy Affiliate’s SiteBuilder simplifies WordPress installation and hosting configuration. Our guide explaining how Wealthy Affiliate works provides more information about its website-building approach.
Even with automated installation, you should review your website’s settings to ensure they match your goals. These include your site title, language, time zone, and preferred URL structure.
1. Configure Your WordPress Settings
In WordPress, open the Settings menu to review your website’s basic information. Choose an appropriate site title and tagline that reflect your brand and the content you intend to publish.
Next, check your permalink structure. Descriptive URLs help visitors understand what individual pages contain and make your content easier to share.
If you’re unfamiliar with WordPress settings, our WordPress tutorial for beginners offers additional guidance for learning the platform.
2. Customize Your Website’s Appearance
Choose a responsive theme that suits your website’s purpose and provides a consistent appearance across desktop computers, tablets, and smartphones.
Pay attention to readable typography, accessible navigation, appropriate colours, and mobile-friendly layouts. A well-organized design makes it easier for visitors to explore your content.
3. Create Essential Website Pages
Most websites benefit from an About page that introduces their purpose and a Contact page that provides a suitable way to get in touch.
Depending on your activities and applicable laws, you may also need a Privacy Policy, Terms and Conditions, or other legal disclosures. These are particularly important when collecting personal information or operating an online business.
4. Install Only Necessary Plugins
WordPress plugins extend your website’s functionality without requiring extensive programming knowledge. Common examples include tools for SEO, security, backups, contact forms, and performance optimization.
However, installing too many unnecessary plugins can complicate maintenance and potentially affect performance. Choose reputable, regularly maintained plugins that serve a clear purpose.
For search optimization, explore our comparison of AIOSEO vs Yoast to learn about two popular WordPress SEO plugins.
If your website allows visitor comments, our guide to WordPress comment plugins explores additional tools for managing discussions and engagement.
5. Review Security And User Permissions
Check administrator accounts and assign appropriate permissions to anyone helping manage your website. Avoid granting full administrative access when a lower permission level is sufficient.
Remove unused themes and plugins when appropriate, and keep active components updated. Review your backup arrangements before making major changes to your website.
6. Prepare Your Website For Regular Publishing
Once your settings are configured, test your navigation menus, contact forms, and important pages. Confirm that everything displays correctly on different screen sizes.
A properly configured website provides a dependable foundation for publishing content and managing future updates. Whether your hosting provider automates the initial setup or you configure it manually, regular maintenance remains essential.
8. Enable SSL And Secure Your Website
Website security should be part of your hosting setup from the beginning. Protecting your website helps safeguard visitor information, reduce security risks, and maintain a dependable online presence.
Many hosting providers include basic security features, but the level of protection varies. Even when your host manages certain safeguards automatically, you should understand how your website is protected.
1. Enable SSL And HTTPS
A TLS certificate, commonly called an SSL certificate, enables HTTPS connections. HTTPS encrypts information exchanged between a visitor’s browser and your website.
Many hosting providers offer free certificates through services such as Let’s Encrypt. Some activate certificates automatically, while others require you to enable them through your hosting dashboard.
Once activated, confirm that your website loads correctly using HTTPS. Configure redirects from HTTP to HTTPS so visitors consistently reach the secure version of your website.
Check for mixed content warnings if certain images, scripts, or other resources still load through HTTP. Updating these references helps prevent browser security warnings.
2. Protect Your WordPress Website
WordPress security involves more than installing an SSL certificate. Strong passwords, updated software, and carefully managed user permissions all contribute to a safer website.
Enable two-factor authentication whenever possible, particularly for administrator accounts. This adds another verification step when someone attempts to access your dashboard.
For additional protection, explore our Wordfence Security Plugin Review. Wordfence provides security features designed specifically for WordPress websites.
Keep WordPress core files, themes, and plugins updated. Outdated components may contain vulnerabilities that attackers can exploit.
3. Prevent Spam And Unwanted Activity
Spam comments, suspicious registrations, and automated form submissions can create unnecessary work. They may also expose visitors to misleading links or harmful content.
Our guide to anti-spam plugins for WordPress explores tools that can help reduce unwanted activity.
If your website accepts comments or user submissions, review moderation settings and remove suspicious content promptly. Limit unnecessary registrations and permissions whenever possible.
4. Create Regular Website Backups
Backups provide an important recovery option if your website experiences a technical failure, unsuccessful update, or security incident.
Check whether your hosting provider includes automatic backups and how frequently they occur. Confirm how long copies are retained and whether restoration is included.
Whenever possible, keep additional backups in a separate, secure location. This reduces your dependence on a single hosting account if something goes wrong.
Test your restoration process periodically rather than assuming every backup will work. A backup is most valuable when you know how to recover your website successfully.
5. Consider Additional Security And Maintenance Tools
Some WordPress plugins combine security-related features with other website management functions. However, their capabilities vary, and they should complement rather than replace essential hosting safeguards.
Our Jetpack For WordPress Plugin Review explores another tool that offers website management and protection features.
Before installing additional plugins, check which security services your hosting provider already supplies. Avoid unnecessary duplication that could complicate website maintenance.
6. Monitor Your Website Regularly
Review administrator accounts, update notifications, and security alerts as part of your maintenance routine. Remove unused accounts and plugins when they are no longer needed.
Website security is an ongoing responsibility rather than a one-time installation task. Combining reliable hosting, HTTPS, sensible access controls, and dependable backups helps protect your website as it grows.
9. Optimize Your Website For Speed
Website speed plays an important role in creating a positive visitor experience. Faster-loading pages make it easier for people to explore your content, navigate between sections, and access information without unnecessary delays.
A slow website can frustrate visitors and discourage them from exploring additional pages. Our guide to making your WordPress site faster explores practical improvements that can help your website perform more efficiently.
1. Optimize Your Website Images
Large image files are a common cause of slow-loading pages. Compressing images before uploading them can reduce file sizes without noticeably affecting their visual quality.
Modern image formats such as WebP and AVIF often provide efficient compression. Choose a format that suits your images and works with your website’s publishing tools.
Upload images at appropriate dimensions rather than relying on browsers to resize unnecessarily large files. This reduces data transfer and improves loading performance.
For WordPress websites, our guide to WordPress image optimizer plugins explores tools that can simplify image compression and optimization.
2. Enable Website Caching
Caching helps reduce the time needed to load website pages. Instead of processing every request from scratch, caching systems can reuse previously generated content when appropriate.
Page caching is particularly useful for websites that display similar content to many visitors. Browser caching lets compatible files be stored temporarily and reused on later visits.
Many hosting providers include caching features within their hosting plans. Check which options are already available before installing additional optimization plugins.
3. Consider Using A Content Delivery Network
A content delivery network (CDN) distributes supported website resources across multiple servers in different geographic locations. Visitors can receive cached content from servers closer to them.
This can reduce loading delays, particularly when your website attracts an international audience. CDNs may also help manage traffic demands and reduce the workload on your primary server.
However, not every website requires a separate CDN subscription. Evaluate your hosting provider’s existing features before adding another service.
4. Choose Compatible WordPress Optimization Tools
WordPress offers numerous plugins designed to improve website performance. These may provide caching, file compression, image optimization, or other useful features.
Avoid installing multiple plugins that perform the same optimization tasks. Overlapping features can create conflicts, complicate troubleshooting, or produce unexpected results.
For additional strategies, explore our article on improving website speed. It covers other considerations that can contribute to a smoother browsing experience.
5. Measure Your Website’s Performance
Use Google PageSpeed Insights to evaluate your website’s performance on mobile and desktop devices. The tool provides recommendations based on its analysis.
Pay particular attention to Core Web Vitals, which measure important aspects of the visitor experience.
These include Largest Contentful Paint (LCP), Interaction to Next Paint (INP), and Cumulative Layout Shift (CLS). Together, they assess loading performance, responsiveness, and visual stability.
Not every recommendation requires immediate action. Prioritize improvements that address significant problems affecting real visitors.
6. Maintain Good Performance As Your Website Grows
Website optimization should continue after your initial setup. New plugins, large images, design changes, and additional features can affect loading times.
Review your website’s performance periodically and test important pages after making substantial changes. This helps you identify potential problems before they become more serious.
A fast, well-maintained website creates a more enjoyable browsing experience and supports your long-term publishing goals.
Wealthy Affiliate – Mini Review
If you’ve ever thought about turning your blog, passion, or niche into an online business,
Wealthy Affiliate (WA) is one of the most beginner-friendly platforms I’ve used.
It combines step-by-step training, website hosting, AI-powered tools,
keyword research, and an active community all in one place.
What I like most is that you can start for free (no credit card needed), explore the platform,
test the tools, and connect with other entrepreneurs before upgrading.
WA isn’t a “get rich quick” scheme — success comes from consistent effort
and applying what you learn over time.
10. Test Your Website Before Launching
Before launching your website, take time to examine it from a visitor’s perspective. A thorough review helps identify technical problems, confusing navigation, and missing content before your audience encounters them.
Even when your hosting provider handles the technical installation, you should personally test your website’s appearance and functionality. Automated setup cannot guarantee that every page works exactly as intended.
1. Check Your Website’s Navigation
Start by opening your homepage and exploring the main navigation menu. Make sure visitors can easily find important pages and understand how your website is organized.
Test your About, Contact, Privacy Policy, and other essential pages. Check that menus, buttons, and internal links direct visitors to the correct destinations.
Look for broken links, missing images, and unfinished content. Remove placeholder text or temporary pages that should not appear on your published website.
2. Test Your Website On Different Devices
Your website should be easy to navigate on desktop computers, tablets, and smartphones. Responsive design helps content adjust to different screen sizes.
Our comparison of mobile websites vs desktop websites explores important differences between these browsing experiences.
Check whether headings, paragraphs, images, and navigation menus display correctly. Watch for overlapping elements, unreadable text, or buttons that are difficult to select.
Test your website using more than one browser when possible. This helps identify compatibility issues that might not appear in your usual browser.
3. Verify Forms And Interactive Features
Submit a test message through your contact form and confirm that it reaches the intended email address. Check that confirmation messages display correctly.
If your website includes newsletter subscriptions, search features, or other interactive elements, test them individually. Visitors should receive clear feedback when completing an action.
Also check that important links open the intended pages. External links should lead to relevant, trustworthy destinations.
4. Test Your Online Store
If you’re launching an eCommerce website, examine product descriptions, images, prices, and category navigation. Make sure customers can find products and understand their purchasing options.
Test the shopping cart, checkout process, shipping calculations, and payment workflows using your payment provider’s test environment. Avoid processing unnecessary real transactions.
Our guide to eCommerce website best practices explores additional considerations for creating a user-friendly online store.
If you’re building your store with WooCommerce, our article on creating a WooCommerce store offers further guidance on setting up its essential features.
5. Review Website Security And Accessibility
Confirm that your website uses HTTPS and that browsers do not display certificate warnings. Check whether important pages load through the secure version of your domain.
Review your text contrast, image descriptions, heading structure, and keyboard navigation. These details can make your website more accessible to people with different needs. Make sure visitors can identify clickable elements and navigate your content without unnecessary difficulty.
6. Check Your Website’s Search Visibility
Review your page titles, descriptions, and permalink structure before launching. These elements help organize your website and communicate what individual pages contain.
If you’ve used a maintenance mode plugin or password protection during development, confirm whether those restrictions should be removed.
Also check that any temporary setting discouraging search engines from indexing your website is disabled when you’re ready for public indexing.
7. Complete Your Final Pre-Launch Review
Visit your most important pages one final time and check that their content, images, and links work correctly. Fix significant problems before announcing your website.
Keep a record of any minor improvements you can complete after launch. Not every design adjustment needs to delay publication. A careful pre-launch review gives you greater confidence that visitors will find a functional, accessible, and professional website.
11. Set Up SEO And Website Analytics
Once your website is functioning correctly, establish the foundations for search engine optimization (SEO) and performance tracking. These tools help search engines understand your content and provide valuable information about your visitors.
SEO involves improving your website’s structure, content, and technical settings to support search visibility. Our Ultimate On-Page SEO Guide explores essential optimization techniques for website owners.
1. Optimize Your Website’s Pages
Start by writing descriptive page titles and useful meta descriptions that accurately reflect your content. Organize each page with clear headings and readable URLs.
Include relevant keywords naturally in your titles, headings, and body text. Avoid unnecessary repetition that makes your writing difficult to read.
Our guide to writing SEO-friendly content explains how to create useful articles while incorporating important optimization practices.
2. Install And Configure An SEO Plugin
WordPress SEO plugins can simplify many optimization tasks, including managing metadata, generating XML sitemaps, and reviewing content.
Popular options include Rank Math, Yoast SEO, and All in One SEO. Choose a plugin that suits your needs rather than installing several tools that perform overlapping functions.
If you’re considering Rank Math, our Rank Math guide explores its optimization features and how they can support your SEO efforts.
After installation, review the plugin’s settings carefully. Confirm that your preferred page titles, sitemap options, and indexing settings are configured correctly.
3. Set Up Google Search Console
Google Search Console is a free service that helps website owners monitor their presence in Google Search.
Add your website, complete the ownership verification process, and submit your XML sitemap through the Sitemaps section. This helps Google discover URLs, although submission does not guarantee indexing.
Search Console also provides information about search queries, impressions, clicks, and indexing issues. Review these reports regularly to identify opportunities for improvement.
4. Connect Google Analytics
Google Analytics helps you understand how visitors find and interact with your website. It can provide information about traffic sources, popular pages, and visitor engagement.
For WordPress users, our tutorial on how to set up Google Analytics in WordPress explains the installation process.
After configuring Google Analytics 4 (GA4), confirm that data collection is working correctly. Review the reports to understand which content attracts visitors and how people navigate your website.
Our article about Google Analytics website metrics explores useful measurements for evaluating website performance.
Remember to configure analytics in accordance with applicable privacy requirements. Depending on your location and audience, consent management may be necessary.
5. Review Your Website’s Indexing Settings
Before launching, confirm that important pages are accessible to search engines. Check for accidental noindex directives or restrictive robots.txt rules that could interfere with crawling.
In WordPress, review the Search Engine Visibility setting under Settings and Reading. Make sure the option discouraging search engines from indexing your website is not enabled unintentionally.
Some pages, such as private account areas or internal administration screens, should remain restricted. Focus on making your intended public content discoverable.
6. Build A Strong Internal Linking Structure
Internal links help visitors discover related information and allow search engines to understand relationships between your pages.
Link naturally between relevant articles, guides, and important website sections. Our article on building internal links for SEO explains strategies for organizing these connections.
Avoid adding links simply to increase their number. Each link should provide useful context or direct readers toward information that supports their interests.
7. Monitor Your SEO Performance
SEO requires ongoing attention rather than a one-time setup. Review Search Console and Google Analytics reports periodically to understand how your website develops.
Look for changes in search visibility, popular content, traffic sources, and visitor engagement. Use these insights to improve existing pages and plan future articles.
A well-configured SEO and analytics system provides valuable information for making informed website decisions. Over time, consistent monitoring can help you identify opportunities for sustainable growth.
12. Publish Your Website And Maintain It Regularly
Once you’ve completed your final checks, you’re ready to publish your website. Confirm that visitors can access your homepage, important pages, and navigation menus without encountering errors.
Remove temporary maintenance restrictions, disable unnecessary password protection, and verify that your website is publicly accessible. Your website is now ready to welcome its first visitors.
1. Announce Your Website Launch
Share your website with people who may be interested in your content, products, or services. Social media, email newsletters, and relevant online communities can help introduce your new website.
Our guide to sharing content on social media explores practical ways to introduce your articles and engage with potential readers.
You can also promote your website through relevant online discussions, collaborations, and helpful content. Focus on reaching people who are genuinely interested in your topic.
For additional ideas, explore our article on free ways to drive traffic to your website.
2. Create A Website Maintenance Routine
Launching your website is only the beginning. Regular maintenance helps protect your content, preserve functionality, and reduce the risk of unexpected technical problems.
Check for WordPress updates, review installed plugins, and confirm that your hosting services are functioning correctly. Apply updates carefully and maintain reliable backups.
Review security alerts and investigate unfamiliar activity. Remove unnecessary user accounts, outdated plugins, and unused website components when appropriate.
3. Monitor Hosting Performance And Resources
As your website attracts more visitors, its resource requirements may change. Monitor storage usage, bandwidth allowances, server performance, and any limits imposed by your hosting provider.
If your website becomes noticeably slower, investigate possible causes before upgrading your hosting plan. Large images, inefficient plugins, caching problems, or database activity may contribute to poor performance.
Consider upgrading when monitoring data indicates that your website consistently requires additional resources. Choosing the right time can help you avoid unnecessary hosting expenses.
4. Keep Your Website Content Updated
Regularly review your published articles to ensure their information remains accurate and useful. Update outdated references, replace broken links, and improve content when necessary.
If you’re managing a blog, our guide to essential blogging tools explores resources that can help simplify content creation and website management.
A consistent publishing schedule can also encourage returning visitors. However, prioritize useful, well-researched content rather than publishing simply to meet a deadline.
5. Build Relationships With Your Audience
Encourage visitors to explore related articles, subscribe to your newsletter, or follow your social media channels. These connections can help you develop a returning audience.
Email newsletters provide a direct way to share updates and new content with interested subscribers. Our email marketing guide for beginners explains how to develop an effective email marketing approach.
Respond to genuine questions and feedback whenever possible. Understanding your readers’ interests can help you improve your website over time.
6. Evaluate Your Website’s Growth
Use your analytics reports to monitor traffic trends, popular pages, and visitor engagement. Look for opportunities to improve content, navigation, and overall website performance.
As your website develops, explore additional strategies for attracting relevant visitors. Our guide to driving traffic to a website provides ideas for supporting long-term growth.
Remember that sustainable growth usually requires patience and consistent effort. Focus on creating value for your audience while improving your website’s technical foundation.
7. Plan For Long-Term Success
Your website may eventually become a larger blog, an online store, or a business that supports your lifestyle. Regularly review whether your hosting, content strategy, and available resources still match your goals.
Our article on building a sustainable online business explores how to develop an online venture that supports your priorities.
Publishing your website is an exciting milestone, but its long-term success depends on what happens afterward. Consistent maintenance, useful content, and thoughtful improvements can help your website remain reliable as it grows.
10 Different Types Of Website Hosting
Choosing the right hosting service is an important part of learning how to host your website. Different hosting options offer varying levels of performance, flexibility, security, and technical control.
Some hosting solutions are designed for beginners who want a simple setup. Others provide advanced resources for growing businesses, online stores, or websites with demanding technical requirements.
Understanding the differences can help you select a hosting environment that matches your website’s needs without paying for unnecessary features.
Let’s explore the 10 different types of website hosting and discover which options may be suitable for your online project.
1. Shared Hosting
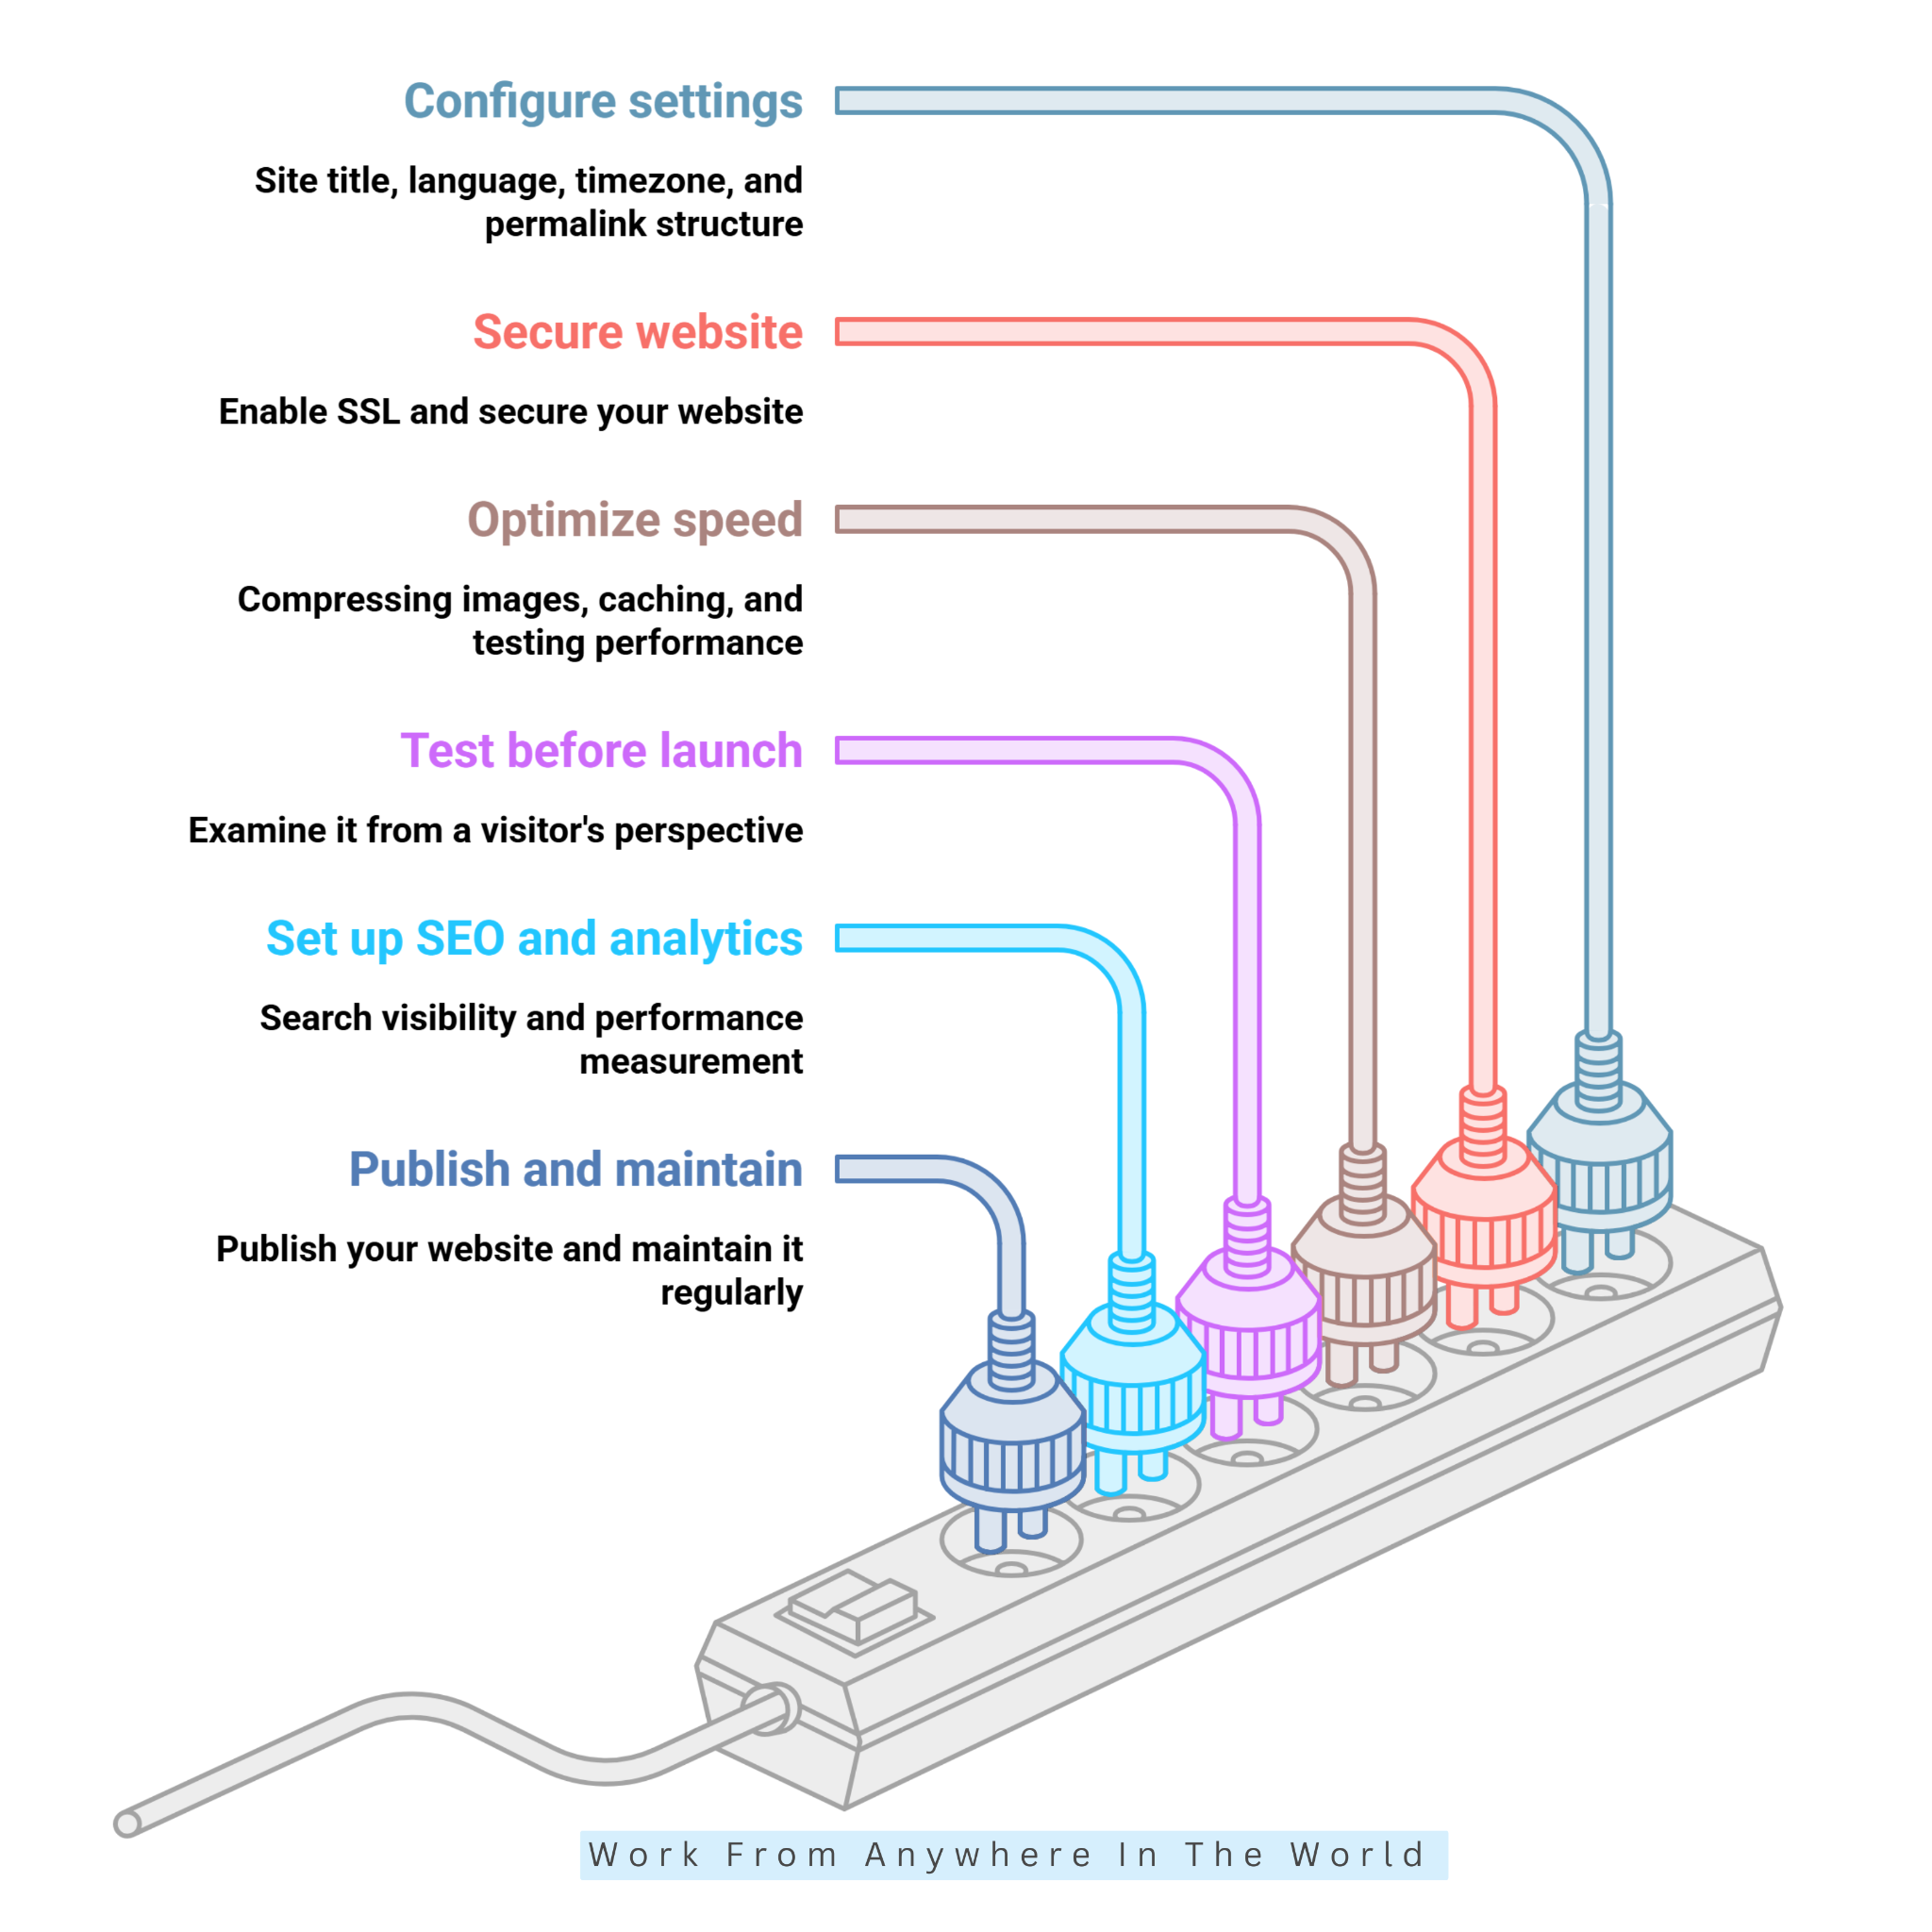
Shared hosting is one of the most affordable and beginner-friendly ways to host a website. Multiple websites share the same physical server, including its processing power, memory, and storage resources, making it a practical choice for smaller online projects.
Most shared hosting plans include a user-friendly control panel, SSL support, email accounts, and one-click WordPress installation. These features allow beginners to create and manage websites without extensive technical knowledge or complicated server configurations.
Shared hosting is particularly suitable for personal blogs, portfolio websites, startups, and small businesses with moderate traffic. It provides an economical starting point for website owners who want reliable basic features without investing in expensive infrastructure.
However, sharing server resources can affect performance when neighbouring websites experience heavy traffic or consume excessive resources. Customization options are also limited, making shared hosting less suitable for demanding applications or websites requiring specialized server configurations.
Before choosing a plan, explore our guide to selecting a reliable web hosting provider. Understanding resource limitations, technical support, and available features can help you find a hosting service that meets your requirements.
2. VPS Hosting
Virtual Private Server (VPS) hosting divides a physical server into separate virtual environments, each with allocated computing resources. Unlike traditional shared hosting, VPS environments provide greater independence, allowing website owners to customize their server configurations and manage resources more effectively.
VPS hosting commonly includes root access, customizable operating systems, flexible resource allocations, and advanced security options. These features make it attractive to businesses and developers who require more control than standard shared hosting provides.
Our Hostinger VPS tutorial explains important steps involved in configuring and securing a virtual server. Understanding these responsibilities can help you decide whether VPS hosting matches your technical experience.
VPS hosting suits growing businesses, high-traffic blogs, development projects, and websites requiring specialized software. It offers a useful middle ground between shared hosting and dedicated servers, especially when you need more flexibility.
However, unmanaged VPS hosting requires technical knowledge to maintain server security, install updates, and troubleshoot potential problems. Managed VPS plans reduce these responsibilities by providing professional assistance, although they generally cost more.
Resource allocations, scalability options, and performance guarantees vary between providers. Compare these details carefully to ensure your selected VPS plan can accommodate your website’s current requirements and future growth.
3. Cloud Hosting
Cloud hosting uses virtualized computing resources and cloud infrastructure to deliver websites and online applications. Depending on the provider’s architecture, resources may be distributed across multiple physical servers, allowing websites to access flexible computing capacity.
Common cloud hosting features include scalable resources, automated backups, distributed infrastructure, and usage-based billing. These capabilities make cloud hosting attractive to growing businesses that need flexibility when website traffic or resource demands change.
Our Cloudways review explores a managed cloud hosting platform and its available services. Managed solutions can simplify cloud hosting for website owners who prefer professional assistance with technical administration.
Cloud hosting is particularly suitable for expanding online businesses, SaaS applications, and websites experiencing unpredictable traffic patterns. Its flexible infrastructure can make it easier to increase resources during busy periods without moving to an entirely different hosting environment.
Depending on the system design, cloud hosting can also improve availability through redundant infrastructure and distributed resources. However, uninterrupted service is not guaranteed, and reliability depends on the provider’s architecture, configuration, and recovery arrangements.
Another consideration is cost predictability, particularly when providers charge according to resource consumption. Monitor your usage carefully and review billing arrangements to avoid unexpected expenses as your website grows.
4. Dedicated Hosting
Dedicated hosting provides an entire physical server for a single customer, offering extensive control over computing resources and server configurations. Unlike shared hosting, the server’s processing power, memory, and storage are not divided among unrelated hosting customers.
Dedicated hosting commonly includes customizable hardware, advanced security configurations, operating system flexibility, and substantial computing capacity. These features suit businesses with demanding workloads or specialized technical requirements.
For an example of a provider offering advanced hosting services, explore our Liquid Web review. Comparing hosting providers can help businesses evaluate technical support, infrastructure options, and available management services.
Dedicated servers are particularly useful for large businesses, resource-intensive applications, and high-traffic websites requiring consistent access to computing resources. They may also be appropriate when specific compliance or software requirements influence infrastructure decisions.
However, dedicated hosting generally costs considerably more than shared hosting or entry-level VPS plans. Unmanaged services also require technical expertise to handle server administration, operating system updates, security monitoring, and troubleshooting.
Hardware maintenance, technical assistance, and upgrade arrangements vary between providers, so reviewing service agreements is essential. Dedicated hosting is most appropriate when your website’s requirements justify the additional investment and management responsibilities.
5. Managed WordPress Hosting
Managed WordPress hosting is designed specifically for WordPress websites, with providers handling selected technical responsibilities. This arrangement allows website owners to spend less time managing server-related tasks and more time developing their content, services, or online businesses.
Our comparison of WordPress vs Managed WordPress explains the differences between standard WordPress hosting arrangements and managed services. Understanding these distinctions can help you determine which level of support is right for you.
Managed WordPress hosting often includes automated backups, WordPress updates, server-level caching, security monitoring, and specialized technical assistance. Some providers also offer staging environments, allowing website owners to test changes before applying them to their live websites.
This hosting option is particularly attractive to bloggers, publishers, agencies, and small businesses that want a simplified website management experience. It can be especially useful when website owners prefer to focus on content creation rather than technical maintenance.
For example, our WP Engine review examines a hosting service focused on WordPress websites. Comparing specialized providers can help you understand the available features and support options.
However, managed WordPress hosting may cost more than basic shared hosting, and some providers restrict certain plugins or server configurations. Storage allowances, visitor limits, backup policies, and included services can also differ considerably between hosting companies.
Managed WordPress hosting is a practical choice for website owners who value convenience, specialized support, and simplified maintenance. Nevertheless, review each provider’s limitations before committing to a hosting plan.
6. Reseller Hosting
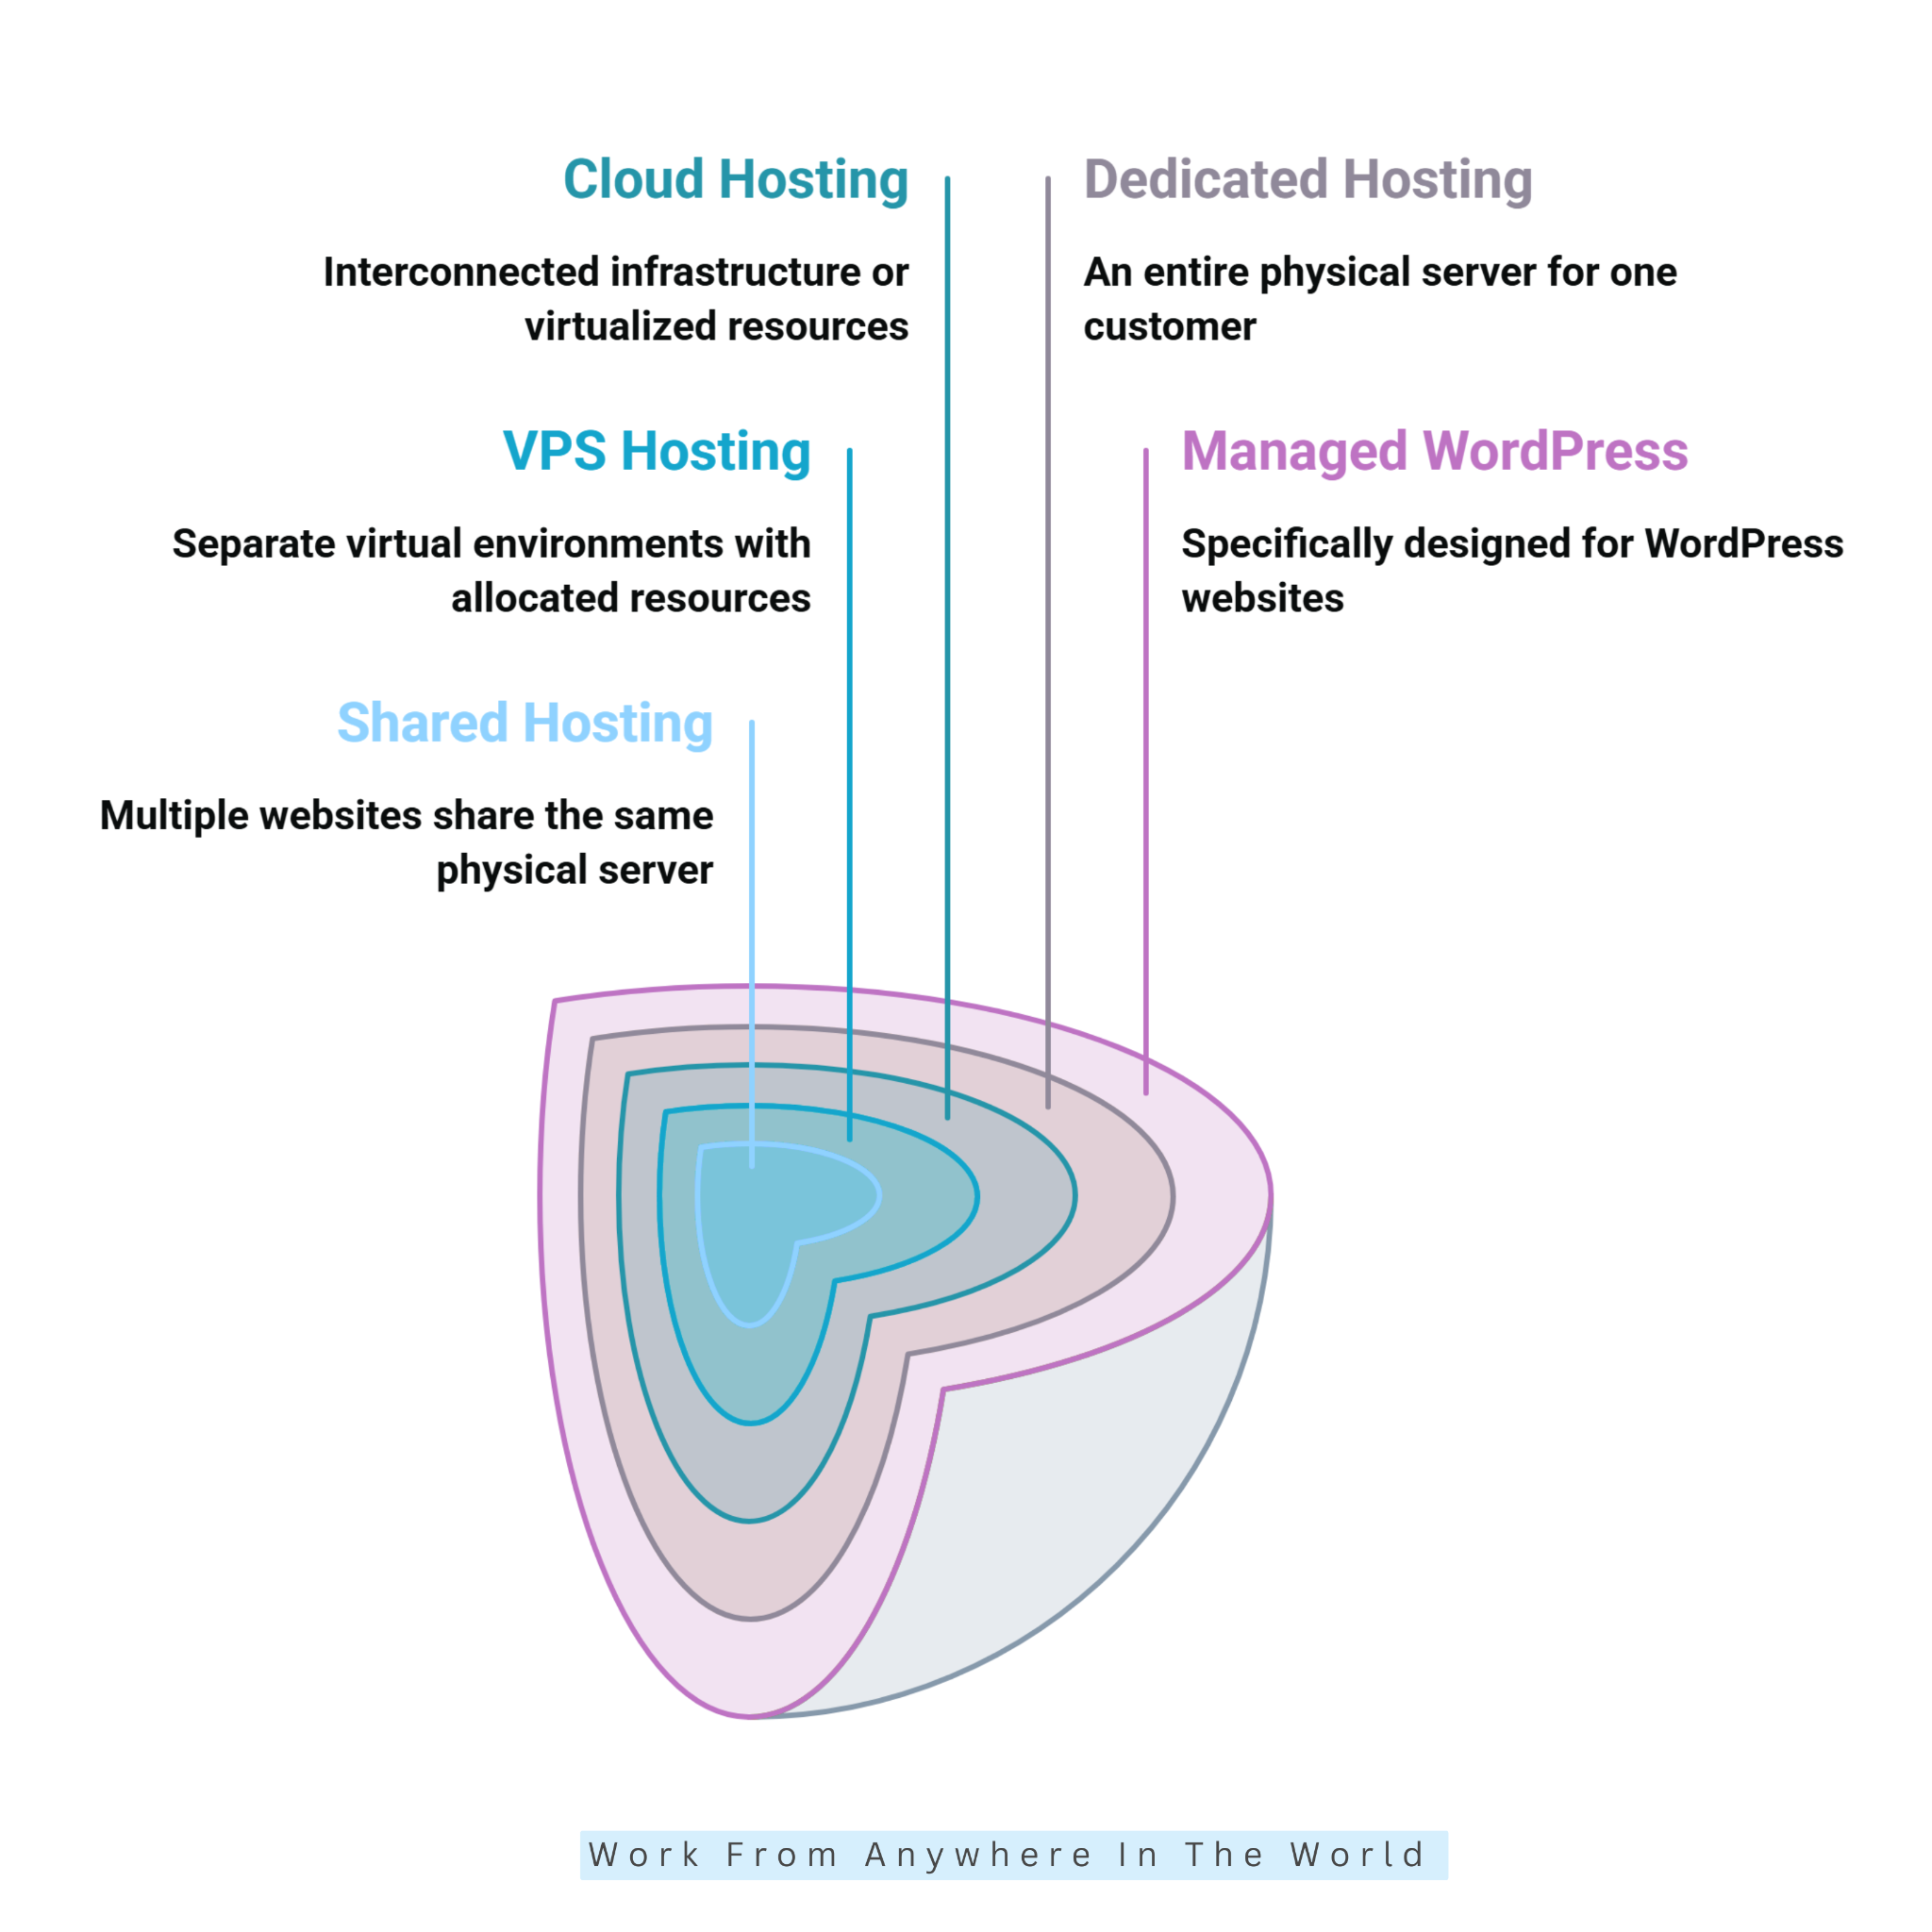
Reseller hosting lets individuals, developers, and agencies buy hosting resources from a provider and resell them to their own customers. It lets you offer hosting services without owning or maintaining physical server infrastructure.
Common features include separate customer hosting accounts, resource allocation controls, account management dashboards, and sometimes integrated billing systems. These tools help resellers manage multiple websites while maintaining separate environments for their clients.
Reseller hosting is particularly well-suited for web design agencies, freelance developers, and digital businesses that offer website maintenance services. It can provide an additional revenue stream alongside website development and ongoing technical support.
However, profitability depends on customer demand, competitive pricing, and the cost of providing reliable support. Resellers must also understand their provider’s resource limitations, service agreements, and technical responsibilities.
The underlying infrastructure remains under the hosting provider’s control, which can limit customization and troubleshooting options. Technical support arrangements also vary, making it important to understand who handles customer problems before launching a reseller business.
7. Colocation Hosting
Colocation hosting allows businesses to place their own physical servers inside a third-party data center. Instead of operating a private server facility, companies rent space within an established environment designed to accommodate computing equipment.
Typical colocation services include rack space, power, cooling, network connectivity, and physical security. These facilities provide essential infrastructure while allowing businesses to retain ownership and control of their server hardware.
Colocation is particularly suitable for enterprises with specialized hardware requirements, existing server investments, or specific infrastructure needs. It can also appeal to organizations that require greater control over equipment configurations and software environments.
However, businesses remain responsible for purchasing, configuring, and maintaining their servers. Operating system updates, hardware replacements, software management, and technical troubleshooting generally remain their responsibility.
Initial equipment costs can be substantial, and arranging physical repairs may involve additional expenses. Colocation is therefore best suited to organizations with technical expertise and a clear reason to maintain their own server infrastructure.
8. Free Hosting
Free hosting allows individuals to publish websites without paying a regular hosting subscription. It provides an accessible starting point for experimenting with website creation, learning technical skills, or developing simple online projects.
Available features vary between providers but may include limited storage, basic website-building tools, static-file hosting, or a free subdomain. Some services also offer templates that simplify the initial website setup process.
Free hosting is particularly suitable for student portfolios, personal projects, experimental websites, and beginners exploring web development. It allows users to gain practical experience before committing to a paid hosting service.
However, free plans often include restrictions on storage, bandwidth, customization, and technical support. Some providers display advertisements or require their branding to remain visible on published websites.
Custom domain connections, advanced server features, and reliable backup options may also be unavailable. Businesses should carefully review service terms, reliability, and migration options before relying on free hosting for important commercial activities.
9. Static Website Hosting
Static website hosting delivers prebuilt files such as HTML, CSS, JavaScript, and images directly to visitors. Unlike traditional server-generated websites, static pages generally do not require a database query or server-side processing for every page request.
Common features include content delivery networks, HTTPS support, version-control integration, and automated deployment workflows. These capabilities can simplify website publishing while supporting efficient content delivery.
Static hosting is particularly suitable for portfolios, documentation websites, landing pages, and small business websites with relatively simple functionality. It can deliver excellent performance when pages don’t require frequent server-side processing.
However, interactive features such as user accounts, database operations, and complex checkout systems usually require additional backend services. Integrating these services can increase development complexity and ongoing maintenance requirements.
Some static hosting platforms also impose limits on bandwidth, build processes, or deployment activity. Static hosting works best when simplicity, performance, and low maintenance are more important than advanced dynamic functionality.
10. E-commerce Hosting
E-commerce hosting provides the infrastructure and features needed to operate an online store. Depending on the service, it may include product management, shopping carts, checkout functionality, SSL support, and payment gateway integrations.
Our comparison of Shopify vs WooCommerce explores two popular approaches to building online stores. Understanding their differences can help you select a platform that matches your technical skills and business requirements.
Additional features may include inventory management, order tracking, automated backups, and integrations with shipping or marketing services. These tools help online retailers manage transactions and everyday business operations more efficiently.
E-commerce hosting suits retailers, direct-to-consumer brands, and businesses selling physical or digital products. Our guide to the best eCommerce sites for small businesses explores additional platforms worth considering.
However, operating costs can increase through transaction fees, premium applications, payment processing charges, or higher-tier hosting plans. Self-hosted stores also require ongoing security updates, backups, and technical maintenance.
Businesses should evaluate payment options, scalability, customer support, recovery features, and total operating costs before choosing a solution. Choosing the right eCommerce hosting can support reliable transactions and leave room for future growth.
Frequently Asked Questions
Q1: Can I Host My Website For Free?
Yes. Several platforms offer free website hosting for personal projects, student portfolios, and simple static websites. However, these plans may restrict storage, bandwidth, custom domains, and technical features.
Free hosting is useful for learning, but paid hosting generally provides greater flexibility, technical support, and resources for growing business websites.
Q2: Can I Host A Website Without WordPress?
Yes. WordPress is only one option for creating a website. You can build a website using HTML, CSS, and JavaScript or choose another content management system or website-building platform.
The key is choosing a hosting service that supports your website’s technologies, software requirements, and expected functionality.
Q3: Do I Need To Buy A Domain And Hosting Separately?
No. Many hosting companies allow you to register a domain name and purchase hosting through the same account. This arrangement can simplify billing and initial website setup.
However, you can also register your domain with one company and host your website elsewhere. You’ll need to configure the appropriate DNS settings to connect the two services.
Q4: Can I Change My Hosting Provider Later?
Yes. You can move your website to another hosting provider when your requirements change. The process may involve transferring website files, databases, email configurations, and DNS records.
Our website migration checklist explains important steps to consider. Keeping backups current and testing your migrated website before switching traffic can help minimize disruptions.
Q5: Does Website Hosting Affect SEO?
Yes, website hosting can influence factors such as server response times, uptime, and overall website performance. These can affect visitor experience and aspects of technical SEO.
However, choosing an expensive hosting provider does not guarantee higher search rankings. Useful content, effective optimization, and reliable website performance all contribute to a stronger online presence.
Q6: What Distinguishes Web Hosting From A Domain Name?
A domain name is the web address visitors enter into their browsers, while web hosting provides the infrastructure needed to store and deliver your website’s content.
Together, they make your website accessible online. Our guide to choosing a web hosting provider can help you understand what to look for when selecting a hosting service.
Conclusion
Learning how to host your website becomes much easier when you follow a clear, step-by-step process. From choosing a reliable hosting provider and registering your domain to installing WordPress and configuring security settings, each step helps establish a strong foundation for your online presence.
Before launching, take time to test your website, optimize its performance, and configure essential SEO tools. Once your website is live, regular updates, reliable backups, and ongoing maintenance will help keep it secure, functional, and accessible to visitors.
Remember that your hosting needs may change as your website grows. By selecting a suitable hosting solution and making thoughtful improvements over time, you can build a reliable website that supports your long-term online business goals.
I trust you enjoyed this guide on How to Host Your Website: 12 Practical Steps. Please stay tuned for more insightful articles about affiliate marketing, online business, and working from anywhere in the world.
Take care!
— JeannetteZ 🌍✨
💬 Your Opinion Is Important To Me
Do you have thoughts, ideas, or questions? I’d love to hear from you. Please leave your comments below or email me directly at Jeannette@WorkFromAnywhereInTheWorld.com.
📚 More Work From Anywhere Reads
🚀 Ready to Build a Business You Can Run from Home
Or from Anywhere in the World?
Imagine earning income on your terms — from home, a cozy café, or wherever life takes you.
With the right tools, training, and community support, it’s entirely possible.
Start your own online business for free — no credit card needed.
Disclosure
This post may contain affiliate links. As an Amazon Associate and participant in other affiliate programs, I earn from qualifying purchases at no extra cost to you. Please read my full affiliate disclosure.