The Ultimate WooCommerce Guide To Online Selling
WooCommerce simplifies and adapts the process of starting an online store, which can sometimes feel intimidating. As one of the most popular eCommerce platforms, it integrates seamlessly with WordPress, giving you complete control over design, payments, and growth.
This WooCommerce guide will help beginners and experienced users navigate every step of building a successful online store. To help you launch your business with confidence, this guide will lead you through setup, features, and best practices.
What Is WooCommerce?
One of the most often used platforms for online sales is WooCommerce. It’s a free WordPress plugin that transforms any website into a full online store. The best part? It’s flexible, beginner-friendly, and customizable.
You can sell almost anything—physical goods, digital products, services, or even subscriptions. Adding products is easy, and you can include images, descriptions, and variations like size or colour.
Payments are secure with options like PayPal, Stripe, or bank transfers. Shipping is simple too, with flat rates, free shipping, or advanced integrations.
Because WooCommerce runs on WordPress, it’s SEO-friendly and helps your store rank better on Google. You can extend features with plugins for marketing, memberships, or bookings.
It works with free and premium themes, so the design is in your control. The platform is open-source, so developers improve it constantly.
Whether you’re just starting or growing a large store, WooCommerce scales with you. It’s affordable, powerful, and gives you complete ownership of your business.
The Ultimate WooCommerce Guide
1. Get The Basics
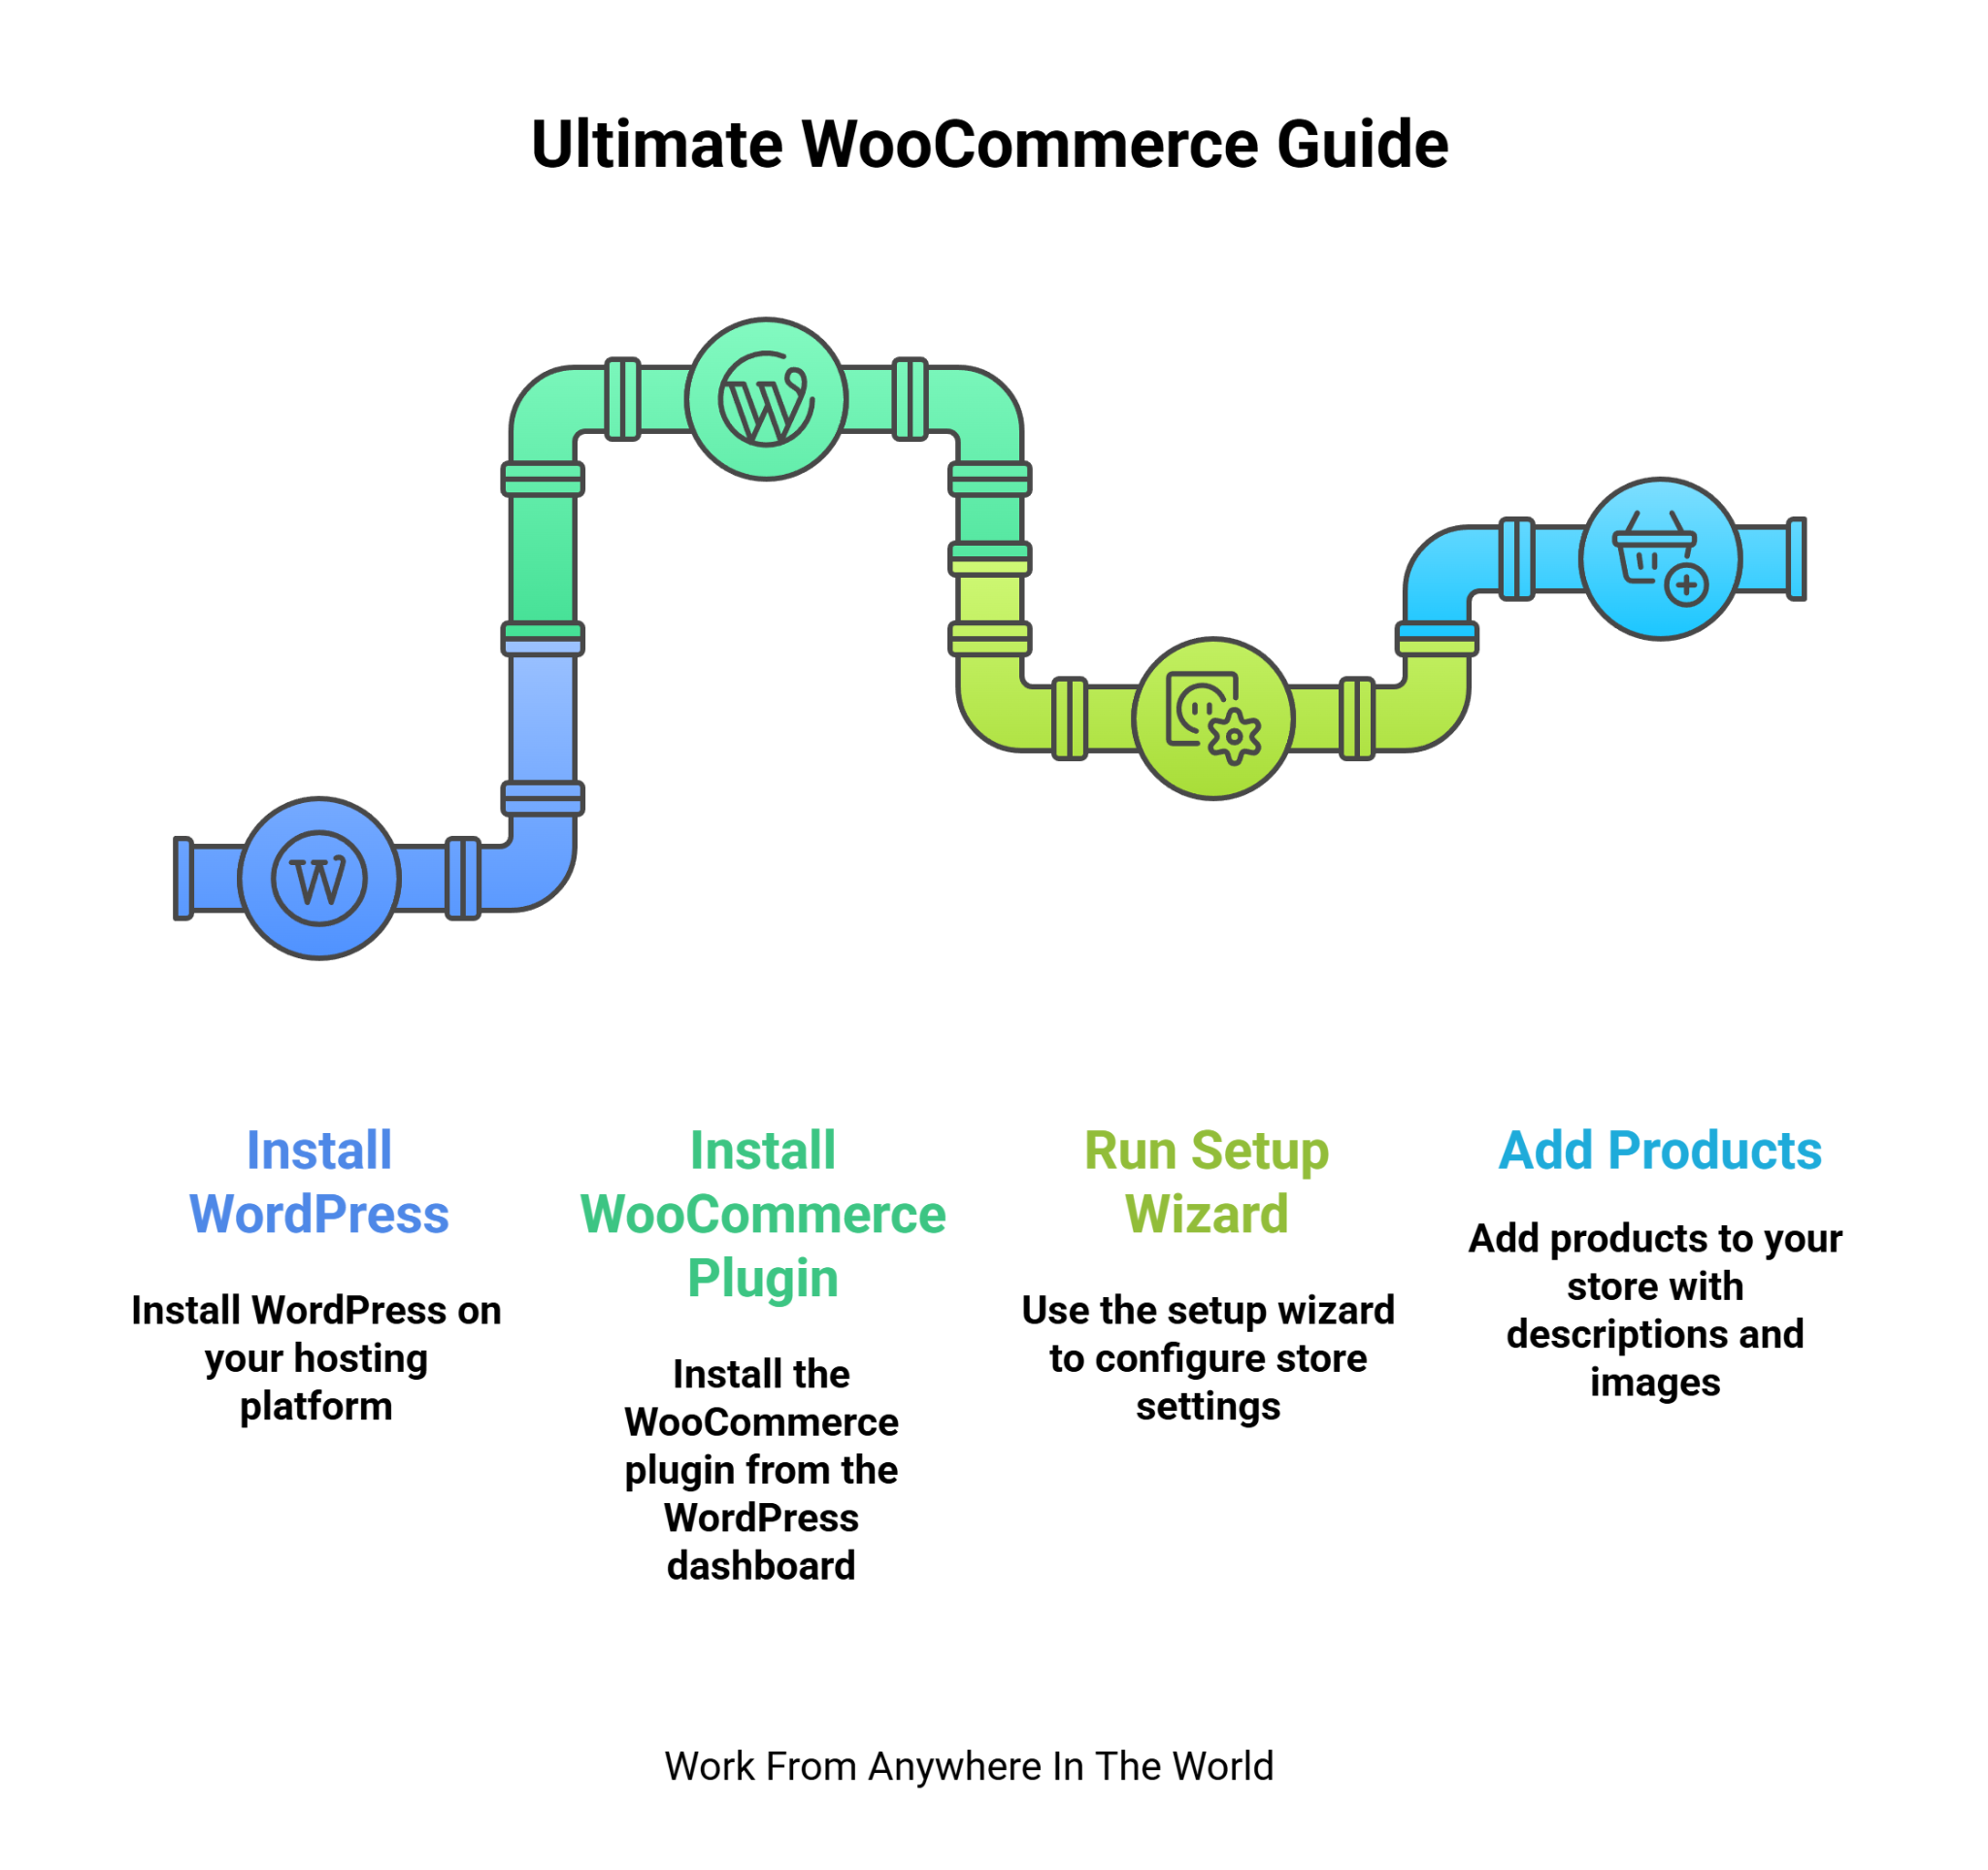
Before you start with WooCommerce, you need the proper setup. WooCommerce is a free WordPress plugin, but it only works if you already have WordPress installed.
That means you first need a domain name (your web address), hosting (where your website lives), and WordPress itself. Hosting providers often offer one-click WordPress installations, making setup simple even for beginners.
WooCommerce powers over 6 million active stores worldwide, so you’ll be in good company. Costs vary: domains usually cost $10–20 per year, while hosting ranges from $5–30 per month, depending on the plan.
WooCommerce itself remains free, and premium themes or plugins are optional. Think of these basics as your store’s foundation—the essentials that let WooCommerce work smoothly and securely.
Key Points
- A domain name is your store’s online identity.
- Hosting keeps your WooCommerce store live.
- WordPress is required for the WooCommerce plugin.
- The WooCommerce plugin itself is entirely free.
2. Install WooCommerce
Once WordPress is running, installing WooCommerce is your next move. This plugin transforms your website into a store. To set it up, log into your WordPress dashboard, go to Plugins > Add New, and search for “WooCommerce.”
Click Install Now, then Activate. The setup wizard will guide you through store details like location, currency, and product type. WooCommerce has more than 6 million active installations, proving its reliability.
The plugin itself is free, though advanced extensions may cost extra. Hosting providers often bundle WooCommerce pre-installed, saving time. Within minutes, your site is ready to showcase products and accept payments.
Key Points
- WooCommerce installs directly from WordPress plugins.
- The setup wizard makes configuration simple for beginners.
- Free plugin with optional paid extensions.
- Used by millions for trusted online stores.
3. Run The Setup Wizard
After activation, WooCommerce launches a setup wizard. This tool guides you step by step. You’ll enter your store’s name, address, and business details. Then, choose your currency, product type, and industry.
WooCommerce uses these settings to configure features automatically. You can also pick a theme here, which sets the design of your store. Don’t worry if you change your mind later—you can update everything anytime.
The wizard saves beginners from feeling overwhelmed and ensures the store runs correctly. It’s quick, simple, and a vital step before adding products.
Key Points
- The setup wizard asks for store basics quickly.
- Helps configure currency and product type.
- WooCommerce lets you choose a theme immediately.
- All settings are editable later anytime.
4. Add Products
Your store needs products to go live. To add one, head to Products > Add New. Write a product name, description, and upload images. Set a price and, if needed, mark it as physical, variable, or downloadable.
For example, clothes use variations like size or colour, while eBooks are downloadable. You can also add stock levels, SKU numbers, and product categories for better organization.
A well-written description and high-quality image increase sales dramatically. Once you click Publish, your product is live. Customers can see it, add it to the cart, and check out.
Key Points
- Add products under Products > Add New.
- Include name, description, price, and images.
- Choose product type: simple, variable, or digital.
- Publish the product to make it live.
5. Set Up Payments
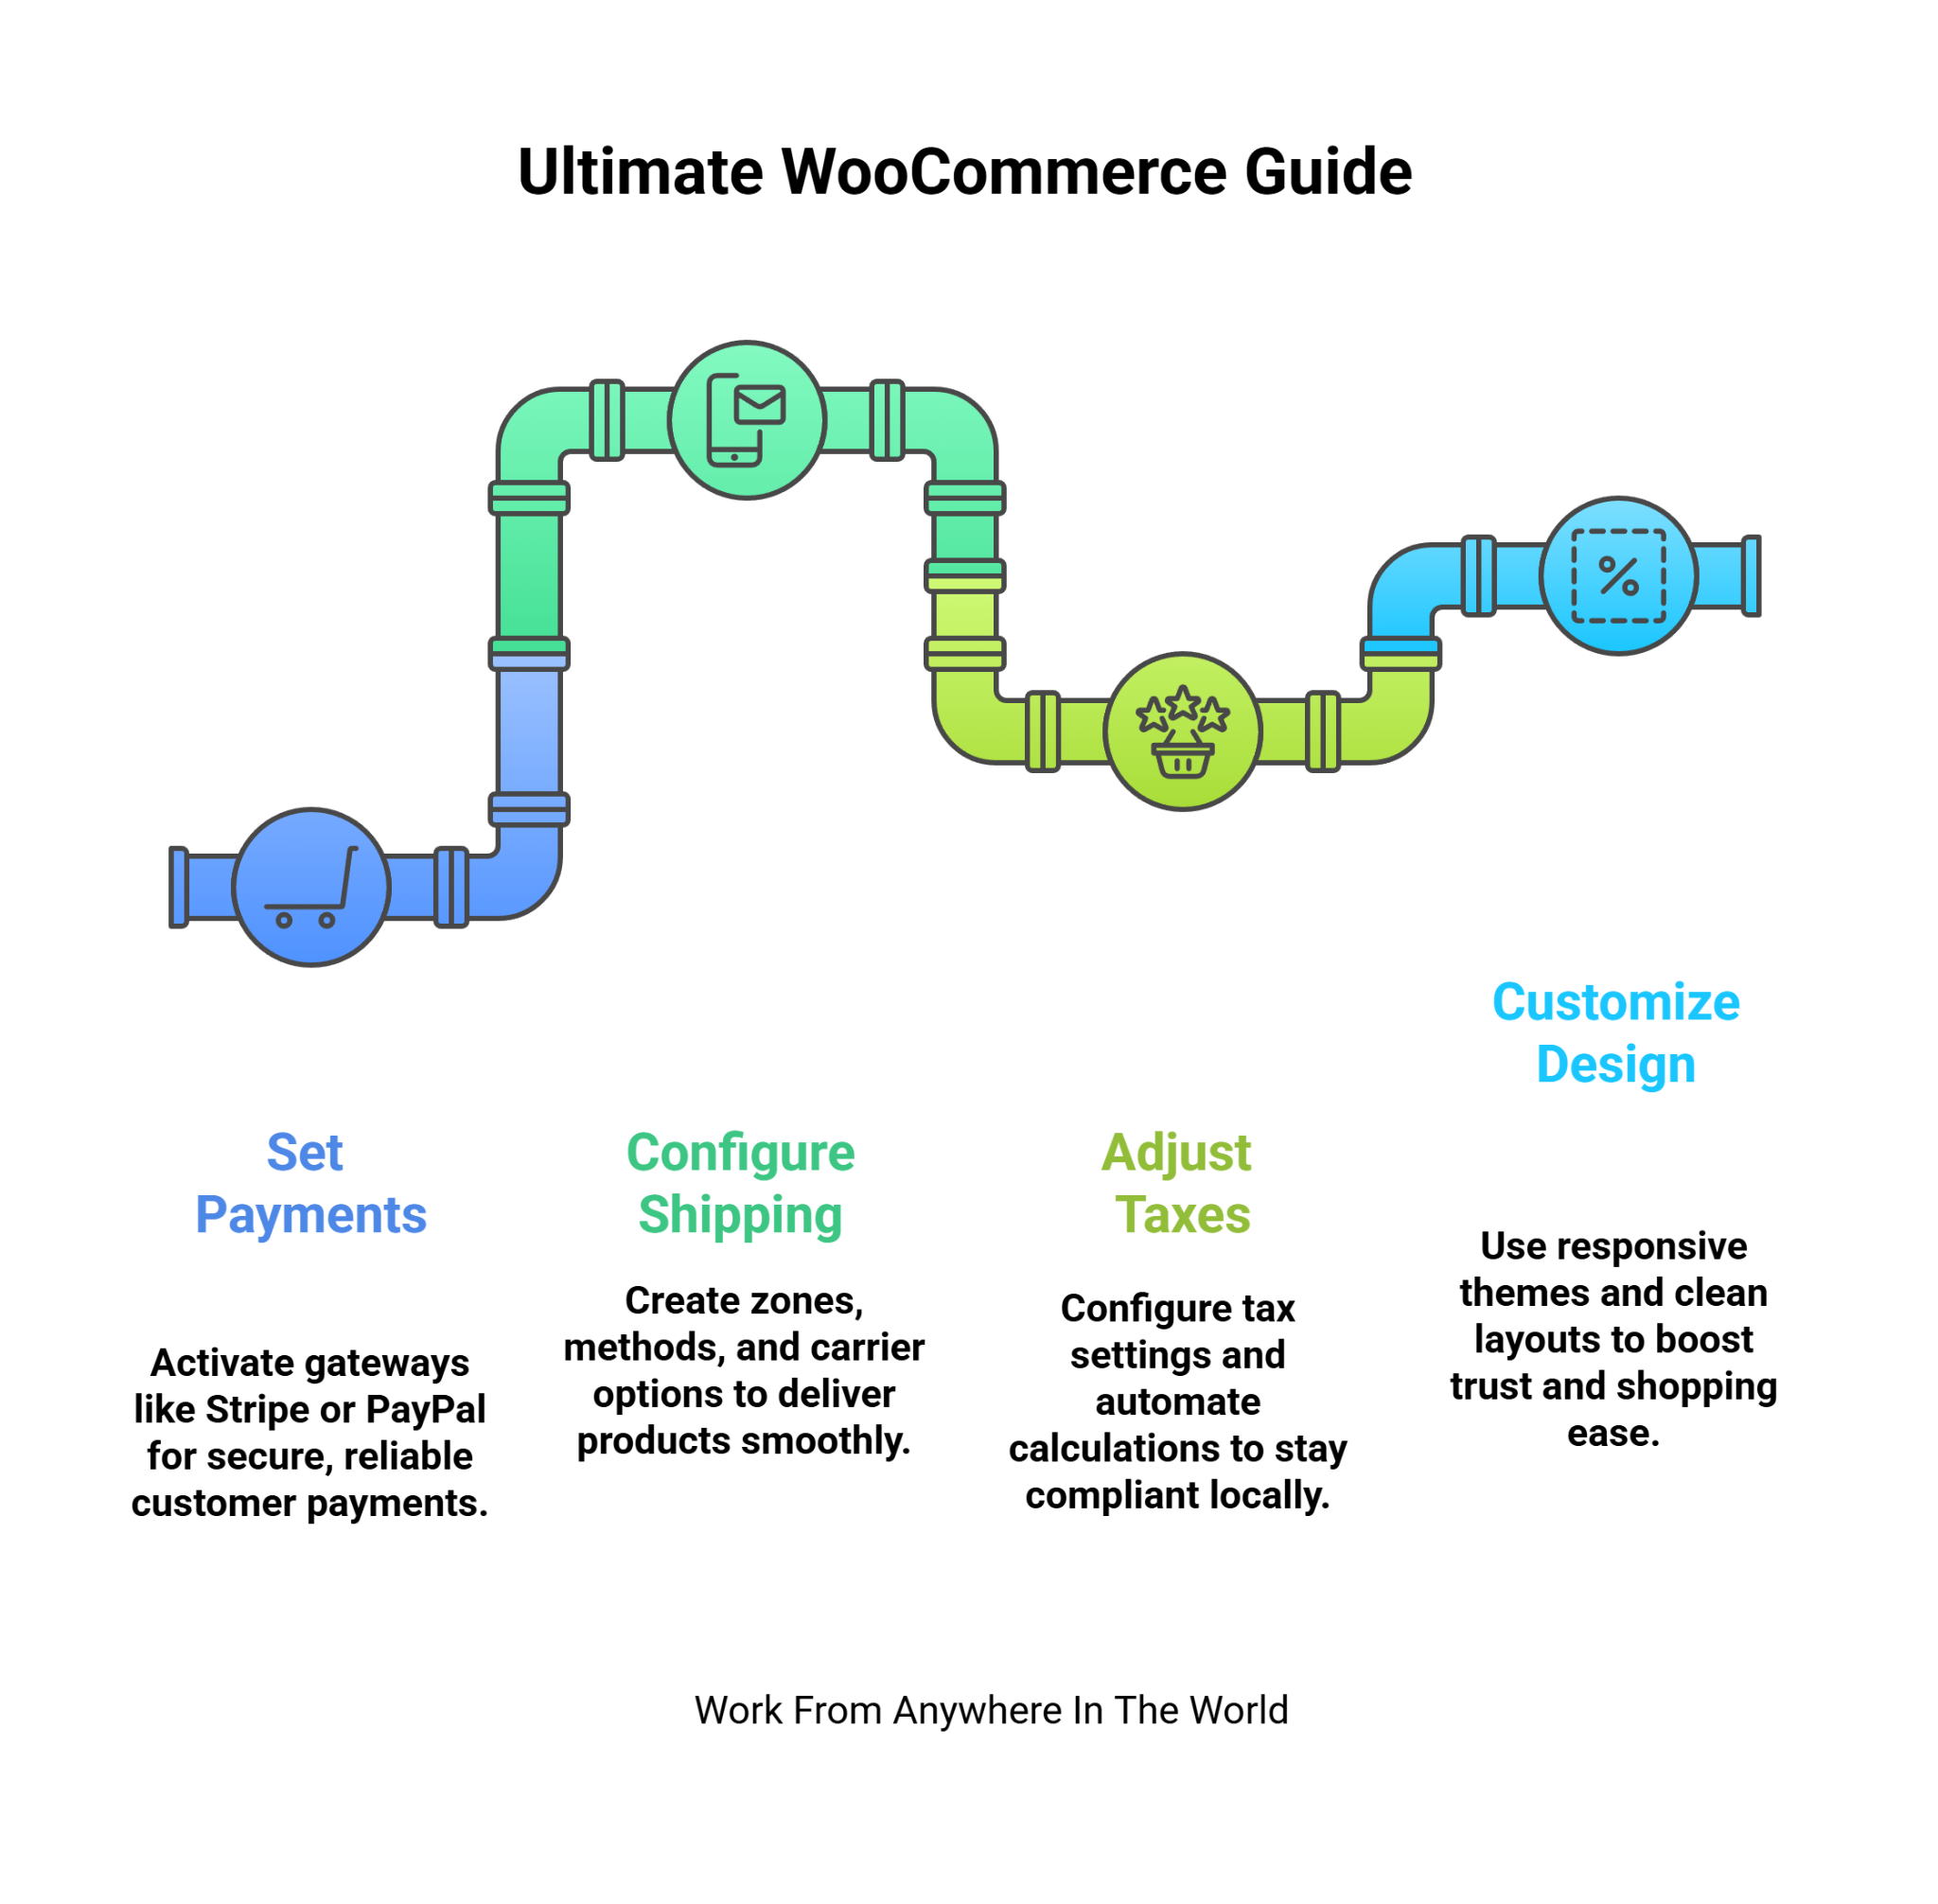
Getting paid is crucial. WooCommerce supports multiple payment gateways. During setup, you can activate Stripe or PayPal, the most popular options. Stripe allows customers to pay with cards directly on your site.
PayPal is fast, trusted, and widely used. You can also enable cash on delivery or bank transfers for local customers. Adding new gateways is easy with plugins.
Most gateways charge transaction fees, but are free to integrate. Setting them up ensures you can start selling immediately without technical barriers. Payments are encrypted, so customer details stay secure.
Key Points
- WooCommerce supports multiple payment gateways.
- Stripe and PayPal are the easiest to start with.
- Transaction fees apply per order processed.
- Payments are secure and encrypted.
6. Configure Shipping
Shipping determines how your products reach customers. WooCommerce lets you set shipping zones by country or region. Each zone can have its own method, like flat rate, free shipping, or local pickup.
You can also add real-time shipping through carriers like UPS, FedEx, or DHL using extensions. Customers see shipping costs at checkout, making transactions transparent. Offering free shipping for specific orders can boost sales.
Keep your shipping rules simple at first, then expand as your store grows. WooCommerce gives you flexibility while staying user-friendly.
Key Points
- Create shipping zones by country or region.
- Choose free, flat rate, or local pickup.
- Use carrier integrations for real-time shipping.
- Offer free shipping to attract customers.
Wealthy Affiliate – Mini Review (2025)
If you’ve ever thought about turning your blog, passion, or niche into an online business,
Wealthy Affiliate (WA) is one of the most beginner-friendly platforms I’ve used.
It combines step-by-step training, website hosting, SEO research tools,
and an active community all in one place.
What I like most: you can start free (no credit card needed),
explore lessons, test the tools, and connect with other entrepreneurs
before upgrading. WA isn’t a “get rich quick” scheme — it’s a platform where success comes
from consistent effort and applying what you learn.
7. Adjust Taxes
Handling taxes can be tricky, but WooCommerce makes it easier. In WooCommerce > Settings > Tax, you can decide whether prices include or exclude tax. The system automatically calculates tax rates if you enable geolocation.
WooCommerce Tax and Avalara extensions simplify regional compliance. For small stores, you may only need to set basic tax percentages.
Remember, tax rules differ between countries, states, or even cities. Always check your local requirements before going live. With WooCommerce, once taxes are set, they apply automatically at checkout.
Key Points
- Configure taxes under WooCommerce settings.
- Choose inclusive or exclusive product pricing.
- Enable automatic tax calculations for accuracy.
- Always follow local tax regulations.
8. Customize Design
Your store’s design is your brand’s face. WooCommerce works with almost all WordPress themes, both free and paid. Choose one that’s clean, responsive, and mobile-friendly. Customization options let you edit colours, fonts, and layouts.
Highlight featured products, add banners, and simplify menus. Great design improves trust and keeps customers shopping longer.
Mobile optimization is critical since most users shop on phones. Even with a free theme, you can create a professional look. Paid themes usually add more flexibility and support.
Key Points
- WooCommerce supports free and premium themes.
- Store design should be responsive and mobile-friendly.
- Clean navigation improves the customer shopping experience.
- Paid themes offer advanced design flexibility.
9. Add Extensions
Extensions give WooCommerce superpowers. The core plugin is free, but extensions add extra features. For example, WooCommerce Subscriptions allows recurring payments. WooCommerce Bookings lets clients schedule appointments.
You can connect with email marketing tools like Mailchimp or generate PDF invoices automatically. Some extensions are free, while others cost $50–$300 per year.
Pick only what your store needs to avoid slowing down your site. Extensions let you scale without limits, making WooCommerce suitable for almost any business model.
Key Points
- Extensions expand WooCommerce features easily.
- Subscriptions allow recurring product payments.
- Bookings enable customer appointment scheduling.
- Some extensions are free, others are premium.
10. Launch And Market
Once your store is ready, it’s launch time. Test checkout, payments, and shipping to make sure everything works. Then, announce your store to the world.
Share it on social media, send email newsletters, or run small ad campaigns. Focus on SEO so your products rank on Google. To draw in first-time customers, run promotions like free delivery or discounts.
Analytical tools can help you track results and improve your approach. Remember, launching is only the start—consistent marketing and updates help your store grow.
Key Points
- Test your store before public launch.
- Use social media to promote products.
- Optimize store pages for SEO ranking.
- Growth needs continuous marketing efforts.
11. Optimize For Speed
A slow-loading store can drive customers away, so speed matters. Start with caching plugins like WP Rocket or W3 Total Cache to store temporary data and reduce load times.
Optimize all product images using tools like Smush or ShortPixel, compressing them without losing quality. Select a reputable hosting company with SSD storage to get faster server response times.
Avoid installing too many heavy plugins, which can slow your site. Regularly test your site’s performance with Google PageSpeed Insights or GTmetrix. A fast WooCommerce store enhances user experience, increases conversions, and boosts search engine rankings.
Key Points
- Use caching plugins for faster page load.
- Compress images for quicker display times.
- Choose hosting with SSD storage.
- Avoid heavy plugins that slow performance.
12. Set Up Analytics
Analytics help you make informed decisions for your WooCommerce store. Start with WooCommerce’s built-in reports to track sales, revenue, top-selling products, and customer behaviour.
For deeper insights, integrate Google Analytics or MonsterInsights to monitor traffic, conversion rates, and user journeys. Track which marketing campaigns bring the most sales and identify pages where visitors drop off.
Regularly reviewing analytics allows you to optimize product listings, improve marketing strategies, and boost revenue. Knowing your store’s performance in real-time ensures smarter decisions and long-term growth.
Key Points
- WooCommerce provides built-in sales and customer reports.
- Use Google Analytics for deeper insights.
- Track conversions and marketing performance.
- Optimize the store based on real data.

13. Enable Customer Accounts
Customer accounts make shopping faster and more convenient. Allowing users to create accounts at checkout is possible with WooCommerce.
Accounts let customers save addresses, track orders, and manage subscriptions. You can also enable guest checkout for buyers who prefer not to register.
Encouraging accounts helps build loyalty and repeat purchases while providing valuable customer data. Store owners can analyze user behaviour, personalize offers, and improve marketing campaigns.
Accounts also streamline communication, making it easier to notify customers about new products, promotions, or order updates. Overall, account functionality enhances user experience and long-term engagement.
Key Points
- Accounts speed up the checkout process.
- Save addresses and manage subscriptions easily.
- Guest checkout offers flexibility for buyers.
- Builds loyalty and repeat customer purchases.
14. Implement Email Marketing
Email marketing is a powerful tool for WooCommerce stores. Use plugins like Mailchimp, Klaviyo, or ActiveCampaign to collect subscriber emails and send campaigns.
You can send newsletters, product launches, seasonal promotions, or abandoned cart reminders. Personalized emails increase engagement and conversions, encouraging repeat purchases.
To make messages more relevant, divide up your audience into groups according to their geography, past purchases, or behaviour. Automating emails saves time while keeping customers connected.
Regular communication builds trust, promotes your brand, and drives sales. Even small stores can see significant results with consistent, well-planned email marketing.
Key Points
- Collect emails using signup forms and popups.
- Send newsletters, promotions, and product updates.
- Automate abandoned cart and follow-up emails.
- Personalize campaigns for higher conversions.
15. Add Product Reviews
Product reviews are essential for building trust in your WooCommerce store. Enable the review feature for all products so customers can leave feedback. Positive reviews increase credibility, while constructive feedback helps you improve products or services.
Display reviews prominently on product pages to influence buying decisions. Encourage customers to leave reviews after purchase through follow-up emails or incentives.
Additionally, reviews give your website new content, which improves SEO. Reacting to reviews builds relationships, promotes repeat business, and demonstrates your concern for your clients.
Key Points
- Enable reviews for all products in WooCommerce.
- Positive reviews boost customer trust and sales.
- Encourage reviews via email or incentives.
- Responding improves engagement and credibility.
16. Offer Discounts And Coupons
WooCommerce allows you to create discounts and coupons to attract customers. You can set percentage-off discounts, fixed amount reductions, or free shipping promotions.
Coupons can have start and end dates, creating urgency for buyers. Use them during holidays, product launches, or special campaigns to boost sales.
You can also restrict coupons to specific products, categories, or user roles for targeted promotions. Tracking coupon usage helps you understand which offers work best.
Strategically using discounts encourages repeat purchases, increases average order value, and helps grow your store’s revenue over time.
Key Points
- Create percentage, fixed, or free shipping discounts.
- Set start and end dates for urgency.
- Restrict coupons to products or categories.
- Track usage to optimize promotional strategies.

Woocommerce Pricing Plans 2025: Which One Is Right For Your Blog?
WooCommerce itself is a free plugin, but building a fully functional store involves several costs. Here's a point-by-point guide to help you understand the expenses:
1. Hosting
Hosting is the foundation of your WooCommerce blog.
- Basic hosting starts around $8.95 per month and is ideal for small blogs with low traffic.
- Advanced plans, up to $19.95 monthly, offer better resources and speed.
- Premium hosting, costing up to $70, suits high-traffic blogs needing maximum performance, reliability, and security.
2. Domain Name
A domain name is your blog’s web address. Registration usually costs around $15 per year, and renewal fees may vary depending on the provider.
Some hosts offer the first year for free. Selecting a memorable and pertinent domain is essential for discoverability and branding, making it easy for people to locate your blog on the internet.
3. Themes
WooCommerce provides free themes suitable for basic blogs, allowing customization without extra costs. Premium themes range from $35 to $129 per year, offering enhanced features, layouts, and support.
Investing in a premium theme improves your blog’s design, user experience, and professionalism, making it more appealing to visitors and potential customers.
4. Extensions And Plugins
Plugins extend WooCommerce functionality. Free plugins cover essentials like payment gateways, shipping options, and simple features.
Premium plugins, costing $25 to $150 per year, provide advanced tools such as SEO optimization, marketing automation, memberships, or inventory management. Selecting the right plugins ensures your blog meets your specific needs efficiently.
5. Security
Security protects both your blog and customers. An SSL certificate, costing $0 to $50 annually, encrypts transactions. Security plugins, ranging from $50 to $300 per year, add protection against malware, hacks, and login attacks. Keeping your store secure builds trust, prevents data loss, and maintains smooth operations for visitors and buyers.
6. Payment Processing Fees
Payment gateways charge fees per transaction, typically around 2.9% plus $0.30. These fees apply to services like Stripe, PayPal, or credit card processors.
While necessary for secure payments, they should be factored into pricing. Choosing the right gateway can balance cost efficiency and convenience for both you and your customers.
7. Marketing And SEO Tools
Marketing and SEO are essential for blog growth. Email marketing services like Mailchimp or Klaviyo charge based on subscriber count, helping promote products or updates.
SEO plugins, such as Yoast SEO Premium at $99/year, optimize content for search engines. These tools improve visibility, attract traffic, and drive sales for your WooCommerce blog.
Conclusion
WooCommerce simplifies, adapts, and scales the process of building and running an online store. It provides tools for every stage of growth, from store setup to product addition, design optimization, and marketing strategy implementation.
With careful planning, the right plugins, and attention to security and performance, anyone can build a professional, high-performing eCommerce site. To help you create and expand a profitable online store, this WooCommerce guide offers crucial pointers and tactics.
I trust you enjoyed this article on The Ultimate WooCommerce Guide To Online Selling. Please stay tuned for more insightful blogs on affiliate marketing, online business, and working from anywhere in the world.
Take care!
— JeannetteZ
💬 Your Opinion Is Important To Me
Do you have thoughts, ideas, or questions? I’d love to hear from you. Please leave your comments below or email me directly at Jeannette@WorkFromAnywhereInTheWorld.com.
📚 More Work From Anywhere Reads
🚀 Ready to Build a Business You Can Run from Home
or from Anywhere in the World?
Imagine creating income on your terms — from home, a cozy café, or wherever life takes you.
With the right tools, training, and community support, it’s entirely possible.
Start your own online business for free — no credit card needed.
Disclosure
This post may contain affiliate links. As an Amazon Associate and participant in other affiliate programs, I earn from qualifying purchases at no extra cost to you. Please read my full affiliate disclosure.

