
How To Upload Audio To Apple Podcasts: 14 Practical Steps
How to upload audio to Apple Podcasts is a common question for new podcasters. Once you understand the process, publishing your podcast becomes much easier.
Apple Podcasts is one of the world’s most popular podcast directories. It helps creators reach listeners across Apple devices and many other supported platforms.
Before you publish your first episode, you’ll need a few essential tools and accounts. Having everything ready will make the submission process smoother and help you avoid unnecessary delays.
In this guide, you’ll learn what Apple Podcasts is, what you need to get started, and follow 14 practical steps to upload your podcast. By the end, you’ll be ready to share your episodes with listeners around the world.
What Is Apple Podcasts?
Apple Podcasts is one of the world’s most popular podcast directories, helping creators share their shows with millions of listeners. People can discover, stream, download, and subscribe to podcasts using Apple devices and other supported platforms.
Unlike a podcast hosting platform, Apple Podcasts doesn’t store your audio files. Instead, it uses your podcast’s RSS feed to display your episodes and automatically update your show when new content is published.
Publishing your podcast on Apple Podcasts can help you reach a wider audience and increase your show’s visibility. It’s also one of the first directories many new podcasters choose because of its large and established user base.
Before you can publish your podcast, you’ll need to prepare a few essential requirements. Once everything is ready, you can follow the step-by-step process to submit your podcast and start reaching listeners.
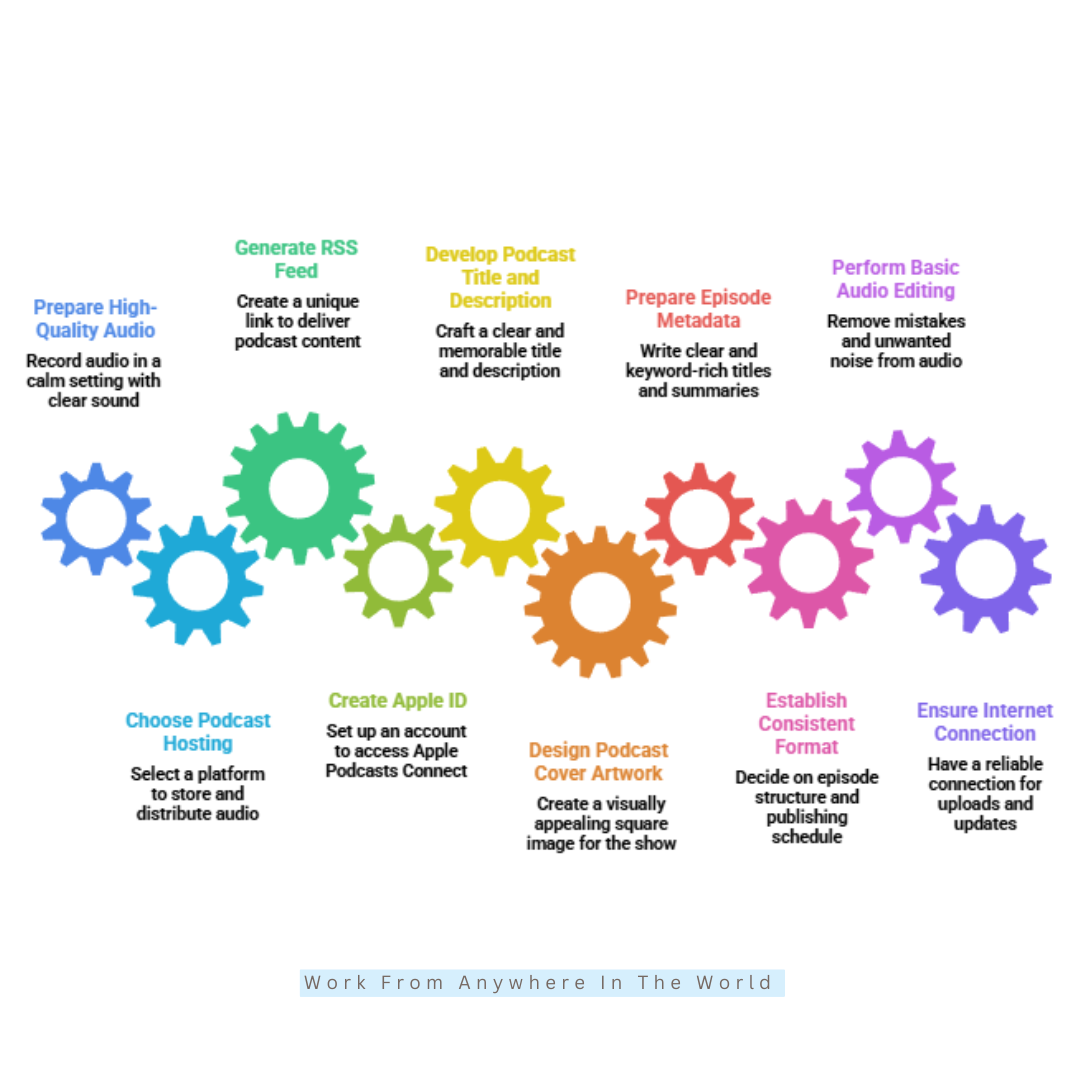
Requirements To Start A Podcast On Apple Podcasts
Before submitting your podcast to Apple Podcasts, you’ll need to prepare a few essential items. Having everything ready beforehand can make the submission process much smoother.
Some requirements are technical, while others help improve the quality and discoverability of your podcast. Taking care of them now can save you time later.
From your audio files and podcast artwork to your RSS feed and Apple ID, each requirement plays an important role. Together, they ensure your podcast is ready for review.
Once you’ve completed the checklist below, you’ll be ready to submit your podcast with confidence. You can then follow the step-by-step process to publish your show on Apple Podcasts.
1. A High-Quality Audio File
A high-quality audio file is the foundation of your podcast. Record in a quiet environment and reduce background noise to create a better listening experience.
Most podcast hosts recommend using the MP3 format because it offers good audio quality with manageable file sizes. Clear, consistent sound helps build trust and keeps listeners engaged.
2. A Reliable Podcast Hosting Platform
A podcast hosting platform stores your audio files and generates the RSS feed needed for Apple Podcasts. Without a hosting platform, you won’t be able to publish your podcast.
Choose a reliable host that offers easy uploads, analytics, and automatic RSS feed updates. This will make managing your podcast much easier over time.
3. An RSS Feed
An RSS feed is a unique link that delivers your podcast information to platforms like Apple Podcasts. It contains your podcast title, description, artwork, episode details, and audio files.
Your podcast hosting platform creates the RSS feed automatically. Once your podcast is approved, new episodes are delivered through the same feed, so you don’t need to submit them manually each time.
4. Apple ID Account
You’ll need an Apple ID to access Apple Podcasts Connect. This account allows you to submit and manage your podcast on Apple Podcasts.
Once your podcast is live, you can update your show information, monitor its performance, and manage future episodes from the same account. Keeping your account secure also helps protect your podcast and its settings.
5. Podcast Title And Description
Your podcast title and description help listeners understand what your show is about. Choose a clear, memorable title that reflects your topic and appeals to your target audience.
Write a description that explains what listeners can expect from your podcast. Including relevant keywords naturally can also improve your podcast’s visibility in Apple Podcasts search results.
6. Podcast Cover Artwork
Your podcast cover artwork creates the first impression of your show. Use a clear, high-quality square image that represents your podcast and includes easy-to-read text.
Make sure your artwork meets Apple’s current size requirements and looks professional across different devices. A strong cover can help attract listeners and make your podcast more recognizable.
7. Episode Metadata
Episode metadata includes your episode titles, summaries, and show notes. It helps listeners understand what each episode covers before they press play.
Write clear, informative descriptions for every episode and use relevant keywords naturally where appropriate. Well-written metadata can improve your podcast’s visibility and make it easier for new listeners to discover your content.
8. Consistent Podcast Format Or Plan
Choose a clear format for your podcast, such as interviews, solo episodes, or storytelling. Having a consistent style helps listeners know what to expect from each episode.
Create a realistic publishing schedule that you can maintain over time. Regular episodes help build trust with your audience and encourage listeners to keep coming back.
9. Basic Audio Editing
Basic audio editing helps improve the quality of your podcast before you publish each episode. Removing mistakes, long pauses, and background noise creates a smoother listening experience.
Beginner-friendly tools like Audacity or GarageBand make it easy to edit your recordings. Clean, polished audio helps keep listeners engaged and gives your podcast a more professional feel.
10. Internet Connection And Device
You’ll need a reliable internet connection and a computer or smartphone to upload and manage your podcast. These allow you to access your hosting platform and Apple Podcasts Connect whenever needed.
A stable internet connection helps ensure smooth uploads, timely updates, and reliable access to your podcast. It also makes managing your episodes much easier over time.
Step-By-Step Guide To Uploading Audio To Apple Podcasts
Uploading audio to Apple Podcasts is easier than many people think. Once you understand how the process works, you’ll only need to complete the setup once.
Apple doesn’t host your audio files directly. Instead, your podcast is submitted through an RSS feed provided by your podcast hosting service.
Before you begin, make sure your podcast artwork, episode details, and RSS feed are ready. Having everything prepared will make the submission process much smoother.
The following 14 practical steps walk you through everything from creating your Apple Podcasts Connect account to submitting your podcast for review. By the end, you’ll be ready to share your episodes with listeners around the world.
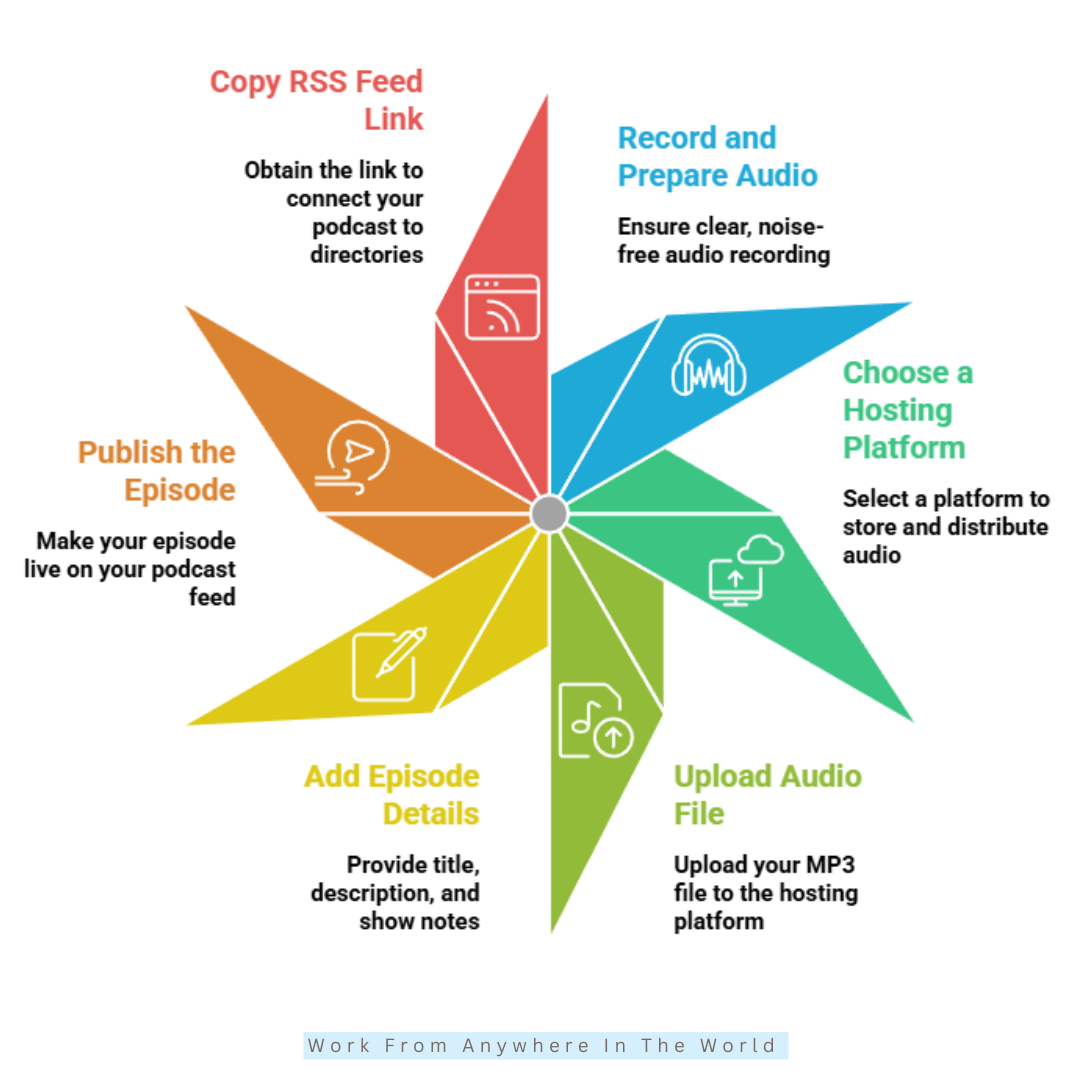
Step 1: Record And Prepare Your Audio
Start by recording your podcast in a quiet space where background noise is kept to a minimum. Clear audio makes your episodes more enjoyable and helps listeners stay engaged from beginning to end.
Use a microphone that fits your budget, but don’t feel you need expensive equipment to get started. Even a smartphone can produce good results when used in a quiet environment.
Speak clearly, maintain a steady pace, and save your recording as an MP3 file. This format is widely supported by podcast hosting platforms and works well with Apple Podcasts.
Before uploading your episode, listen to the entire recording. Remove unnecessary pauses, trim mistakes, and reduce background noise wherever possible.
A polished recording creates a better first impression and gives listeners a reason to come back for future episodes. It also helps build trust in your podcast from the very beginning.
Pro Tips
- Choose a quiet room for recording.
- Use a pop filter to improve sound quality.
- Maintain a steady speaking pace.
- Listen to the final recording before uploading it.
Step 2: Choose A Podcast Hosting Platform
Before your podcast can appear on Apple Podcasts, you need a hosting service to store your audio files and make them available online. Your podcast host also generates the RSS feed that Apple Podcasts uses to access your episodes.
Most hosting platforms let you upload episodes, organize your content, and manage your podcast from a single dashboard. Many also include analytics, scheduling tools, and automatic distribution to other podcast directories.
Take some time to compare the features, storage limits, and pricing before making a decision. Many providers offer free plans or trial periods, giving you the opportunity to explore the platform before committing.
Choose a hosting service that matches both your current needs and your future goals. As your podcast grows, you’ll want a platform that can grow with you without making it difficult to switch later.
A reliable hosting platform keeps your episodes organized, simplifies publishing, and reduces technical problems. That gives you more time to focus on creating valuable content for your listeners.
Pro Tips
- Pick a beginner-friendly hosting platform.
- Check storage and upload limits.
- Ensure automatic RSS feed creation.
- Compare pricing before committing.
Step 3: Upload Your Audio File
Once your hosting platform is set up, log in to your dashboard and upload your recorded episode. Most podcast hosts support MP3 files, making the process quick and straightforward.
Many hosting platforms, including Buzzsprout and Podbean, provide a clear upload button that guides you through the process. Depending on the file size, it may take a few moments for your episode to finish uploading and processing.
After the upload is complete, your episode is stored on your hosting platform and added to your podcast feed. Apple Podcasts doesn’t access files directly from your computer. Instead, it retrieves new episodes through your RSS feed.
Before moving to the next step, listen to your uploaded episode to make sure everything sounds correct. Confirm that the audio plays smoothly and that the entire recording has uploaded successfully.
Taking a few extra minutes to check your episode can help you avoid problems later. A successful upload ensures your listeners receive the best possible experience when your podcast goes live.
Pro Tips
- Name the file clearly before uploading.
- Compress audio for faster uploads.
- Check sound quality before publishing.
- Keep a backup copy of every episode.
Step 4: Add Episode Details
Once your audio has been uploaded, it’s time to add the details that listeners will see. This includes your episode title, description, and optional show notes.
Choose a title that clearly explains what the episode is about. Your description should give listeners a brief overview of the content and encourage them to press play.
Include relevant keywords naturally in your title and description where appropriate. Well-written episode details can improve visibility on Apple Podcasts and help the right audience discover your content.
Most podcast hosting platforms, including Buzzsprout and Podbean, make it easy to add or update this information before publishing. You can also edit your episode details later if needed.
Taking a few extra minutes to write accurate and engaging episode details gives your podcast a more professional appearance. It also helps listeners understand what to expect before they start listening.
Pro Tips
- Use clear, keyword-rich episode titles.
- Keep descriptions informative and easy to read.
- Include relevant keywords naturally.
- Make show notes easy to scan.
Step 5: Publish The Episode
Once your audio and episode details are ready, review everything one final time before publishing. Make sure the correct file has been uploaded and all information is complete.
When you click the publish button, your hosting platform adds the episode to your podcast feed. It also updates the RSS feed connected to Apple Podcasts.
If your show has already been approved, the new episode should appear automatically in Apple Podcasts and other connected directories. However, updates may not appear everywhere immediately.
Check the published episode on your hosting platform to confirm that the audio plays correctly. Review the title, description, artwork, and show notes as they appear to listeners.
Publishing carefully helps prevent avoidable corrections after the episode goes live. It also creates a smoother experience for listeners across every platform where your podcast appears.
Pro Tips
- Review every detail before publishing.
- Confirm that the audio is the final version.
- Check the title and description for accuracy.
- Publish on a consistent schedule.
Step 6: Copy Your RSS Feed Link
Copying your RSS feed link is the next step after publishing your episode. This link connects your podcast to directories such as Apple Podcasts and allows new episodes to appear automatically.
Your podcast hosting service generates the RSS feed for you. It contains important information about your podcast, including your episodes, titles, descriptions, and artwork.
If you’re new to podcasting and want to understand how RSS feeds work, read our How Do RSS Feeds Work? A Beginner’s Guide before continuing. It explains the basics and why your RSS feed is essential for publishing your podcast.
Copy your RSS feed carefully and store it in a safe place. You’ll need it when submitting your podcast to Apple Podcasts and whenever you connect your show to other podcast directories.
Without a valid RSS feed, Apple Podcasts won’t be able to display or update your episodes. Keeping your feed secure and accessible will make managing your podcast much easier over time.
Pro Tips
- Always copy the RSS feed link carefully.
- Save it in a secure location.
- Test the feed in your browser.
- Never edit the RSS feed manually.
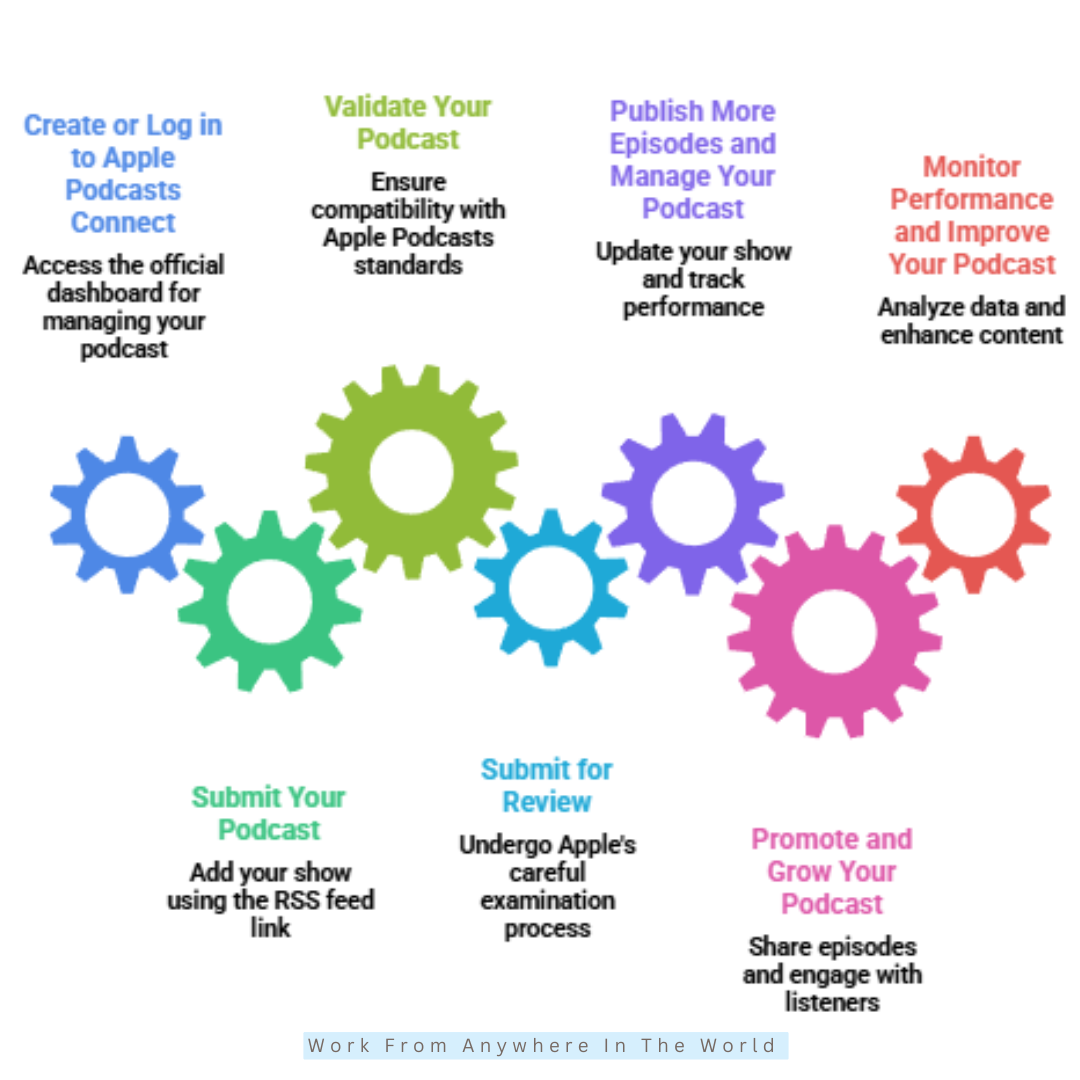
Step 7: Create Or Log In To Apple Podcasts Connect
Before you can submit your podcast, you’ll need to access Apple Podcasts Connect. This is Apple’s official platform for submitting and managing podcasts.
Sign in using your Apple ID, or create one if you don’t already have an account. Once you’re logged in, you’ll be taken to your Apple Podcasts Connect dashboard.
From there, you can add a new podcast, submit your RSS feed, and manage your show after it’s has been approved. You’ll also be able to update your podcast information whenever needed.
Before continuing, check that your account details are correct and that your email address has been verified. Keeping your account secure will help you manage your podcast without interruptions.
With your account set up and verified, you’re ready to submit your podcast to Apple for review. Completing this step carefully helps avoid unnecessary delays and keeps the approval process moving smoothly.
Pro Tips
- Use an active, verified Apple ID.
- Keep your login credentials secure.
- Verify your email address before submitting.
- Take a few minutes to explore the dashboard.
Step 8: Submit Your Podcast
Once you’ve signed in to Apple Podcasts Connect, you’re ready to submit your podcast for review. Click Add Show and choose the option to add your podcast using an RSS feed.
Paste the RSS feed link you copied from your podcast hosting platform. Apple Podcasts will automatically import your podcast details, including your title, description, artwork, and available episodes.
Take a few moments to review the imported information before continuing. Check that everything is displayed correctly and that no important details are missing.
If you’re satisfied with the information, submit your podcast for review. Apple will examine your submission to ensure it meets its guidelines before making it available to listeners.
Submitting accurate information the first time can help prevent unnecessary delays. Once your podcast is approved, future episodes will be delivered automatically through your RSS feed.
Pro Tips
- Paste the RSS feed link carefully.
- Double-check all podcast details before submitting.
- Make sure your artwork meets Apple’s requirements.
- Submit your podcast only when everything is ready.
Wealthy Affiliate – Mini Review
If you’ve ever thought about turning your blog, passion, or niche into an online business,
Wealthy Affiliate (WA) is one of the most beginner-friendly platforms I’ve used.
It combines step-by-step training, website hosting, AI-powered tools,
keyword research, and an active community all in one place.
What I like most is that you can start free (no credit card needed), explore the platform,
test the tools, and connect with other entrepreneurs before upgrading.
WA isn’t a “get rich quick” scheme — success comes from consistent effort
and applying what you learn over time.
Step 9: Validate Your Podcast
After submitting your RSS feed, Apple Podcasts Connect will automatically validate your podcast. During this process, Apple checks that your feed meets its technical requirements.
The system reviews your RSS feed, artwork, episode information, and metadata to make sure everything is formatted correctly. This helps prevent errors before your podcast is published.
If Apple detects any problems, you’ll receive warnings explaining what needs to be fixed. Most issues can be corrected through your podcast hosting platform before you resubmit your feed.
Take the time to review each warning carefully and resolve every issue before continuing. Even small errors can delay approval or prevent your podcast from appearing correctly.
Once the validation is complete and all requirements have been met, your podcast is ready for Apple’s approval process. A successful validation gives you the best chance of a smooth and timely publication.
Pro Tips
- Fix any errors as soon as they appear.
- Make sure your artwork meets Apple’s size requirements.
- Check your RSS feed for formatting issues.
- Keep your episode information accurate and consistent.
Step 10: Wait For Apple To Review Your Podcast
After submitting your podcast through Apple Podcasts Connect, Apple will review your RSS feed, metadata, artwork, and content before making your show available to listeners.
During the review process, Apple checks that your podcast meets its publishing guidelines. Although your podcast may pass validation, it must also comply with Apple’s content and technical requirements before it is approved.
You can monitor the status of your submission through Apple Podcasts Connect while your podcast is under review. Most reviews are completed within a few days, although processing times may vary.
If Apple identifies any issues, make the necessary changes through your podcast hosting platform and resubmit your podcast. Addressing any feedback promptly can help speed up the approval process.
Pro Tips
- Double-check every detail before submitting your podcast.
- Follow Apple’s podcast publishing guidelines.
- Make sure your artwork and metadata are accurate.
- Monitor your submission status in Apple Podcasts Connect.
Step 11: Publish More Episodes And Manage Your Podcast
Once your podcast has been approved, you won’t need to submit each new episode to Apple Podcasts. Instead, your podcast hosting platform updates your RSS feed whenever you publish new content.
As you upload new episodes, Apple Podcasts retrieves the latest information from your RSS feed and adds it to your show. This keeps your podcast current without requiring another submission.
You can use Apple Podcasts Connect to manage your podcast, monitor listener analytics, and update your show details whenever necessary. Reviewing your performance can help you understand what resonates with your audience.
Publishing episodes on a regular schedule helps build trust with your listeners and encourages them to return for new content. Consistency can also strengthen your podcast’s long-term growth.
Continue creating valuable episodes and refining your content over time. A well-managed podcast is more likely to attract loyal listeners and continue growing.
Pro Tips
- Publish new episodes on a consistent schedule.
- Monitor your listener analytics regularly.
- Keep your branding and podcast details consistent.
- Focus on creating valuable content for your audience.
Step 12: Promote And Grow Your Podcast
Once your podcast is live on Apple Podcasts, it’s time to focus on growing your audience. Publishing great episodes is only the beginning. Promoting your podcast consistently helps more people discover your content.
Share each new episode across your social media channels, website, email newsletter, and other online communities where your target audience spends time. Most podcast hosting platforms also provide shareable links that make promotion quick and easy.
You can also embed podcast episodes into blog posts or other website content to reach additional listeners. Repurposing highlights into short videos, quotes, or graphics can help attract even more attention.
Encourage your audience to leave ratings and reviews on Apple Podcasts. Positive feedback can improve your podcast’s visibility and build trust with potential new listeners.
Building relationships with other podcasters through guest appearances, interviews, or collaborations can also expand your reach. Consistent promotion and valuable content are the keys to long-term podcast growth.
Pro Tips
- Share every new episode on social media.
- Encourage listeners to leave ratings and reviews.
- Collaborate with other podcasters in your niche.
- Repurpose episodes into videos, graphics, or short clips.
Step 13: Monitor Performance And Improve Your Podcast
After your podcast is live, make it a habit to review its performance regularly. Apple Podcasts Connect provides valuable insights into how listeners are engaging with your episodes.
Use the available analytics to monitor key metrics, such as listeners, plays, audience retention, and overall engagement. Many podcast hosting platforms also offer additional reports that can help you better understand your audience.
Review your most successful episodes to identify the topics, formats, and publishing schedules that resonate with listeners. Looking for patterns can help you make informed decisions about future content.
If certain episodes aren’t performing as expected, consider adjusting your topics, episode length, or presentation style. Small improvements over time can make a noticeable difference.
Successful podcasts continue to evolve as their audience grows. Regularly reviewing your performance and applying what you learn can help you build a stronger podcast over the long term.
Pro Tips
- Review your podcast analytics regularly.
- Identify your best-performing episodes.
- Improve topics or formats that receive less engagement.
- Use audience insights to guide future episodes.
Step 14: Keep Learning And Growing Your Podcast
Launching your podcast is only the beginning. Building a successful show takes time, consistency, and a willingness to learn from your experiences.
Continue experimenting with new topics, episode formats, and promotional strategies to discover what resonates most with your audience. Small improvements made over time can lead to meaningful long-term results.
Stay informed about podcasting trends, new tools, and updates from Apple Podcasts and your hosting platform. Keeping your knowledge up to date will help you make better decisions as your podcast grows.
Most importantly, continue publishing valuable content on a regular schedule. Consistency helps build trust with your audience and encourages listeners to return for future episodes.
Every successful podcast starts with a single episode and improves over time. Stay committed to creating quality content, listen to your audience, and enjoy the journey as your podcast continues to grow.
Pro Tips
- Continue publishing on a consistent schedule.
- Keep learning about podcasting best practices.
- Listen to audience feedback and make improvements.
- Focus on long-term growth rather than quick results.
Frequently Asked Questions
Q1: Can I Upload Audio Directly To Apple Podcasts?
No. Apple Podcasts doesn’t host audio files. You’ll need a podcast hosting platform that generates an RSS feed, which Apple uses to display and distribute your podcast episodes.
Q2: Do I Need A Podcast Hosting Platform?
Yes. A podcast hosting platform stores your audio files, creates your RSS feed, and delivers your episodes to Apple Podcasts and other podcast directories.
Q3: How Much Does It Cost To Publish A Podcast On Apple Podcasts?
Publishing a podcast on Apple Podcasts is free. However, you’ll usually need a paid or free podcast hosting service to store your audio files and generate your RSS feed.
Q4: Can I Edit My Podcast After It Has Been Published?
Yes. You can update episode titles, descriptions, artwork, or audio through your podcast hosting platform. Apple Podcasts will display the changes after your RSS feed has been refreshed.
Q5: How Often Should I Publish New Podcast Episodes?
The best publishing schedule depends on your goals and available time. Whether you publish weekly, bi-weekly, or monthly, consistency helps build trust and keep your audience engaged.
Q6: Can I Publish My Podcast On Other Platforms Too?
Yes. Most podcast hosting platforms distribute your podcast to multiple directories, including Spotify, Amazon Music, and other popular podcast apps, using the same RSS feed.
Conclusion
Learning how to upload audio to Apple Podcasts is easier than it may seem. Once you understand the process, you can publish your podcast with confidence.
By choosing a reliable hosting platform and submitting your RSS feed through Apple Podcasts Connect, you’ll have everything you need to share your episodes with listeners around the world.
Growing a successful podcast takes time and consistency. Creating valuable content and publishing new episodes regularly will help you build trust and grow your audience.
Whether you’re launching your first podcast or improving an existing one, Apple Podcasts is an excellent platform to expand your reach. Stay consistent, keep learning, and enjoy the journey of building your podcast.
I trust you enjoyed this article on How To Upload Audio To Apple Podcasts: 14 Practical Steps. Please stay tuned for more insightful blogs on affiliate marketing, online business, and working from anywhere in the world.
Take care!
— JeannetteZ 🌍✨
💬 Your Opinion Is Important To Me
Do you have thoughts, ideas, or questions? I’d love to hear from you. Please leave your comments below or email me directly at Jeannette@WorkFromAnywhereInTheWorld.com.
📚 More Work From Anywhere Reads
🚀 Ready to Build a Business You Can Run from Home
Or from Anywhere in the World?
Imagine creating income on your terms — from home, a cozy café, or wherever life takes you.
With the right tools, training, and community support, it’s entirely possible.
Start your own online business for free — no credit card needed.
Disclosure
This post may contain affiliate links. As an Amazon Associate and participant in other affiliate programs, I earn from qualifying purchases at no extra cost to you. Please read my full affiliate disclosure.