
8 Smart Ways To Convert A Desk Into A Standing Desk
Learning how to convert a desk into a standing desk can give you more flexibility without replacing your existing workstation. Several practical options can help you create a setup that allows you to work comfortably while standing.
Some solutions require only a simple desk converter or adjustable laptop stand. Others involve raising the existing desk, building a riser, or repurposing furniture you already have.
The right approach depends on your available space, equipment, budget, and preferred working height. Your existing desk design will also influence which conversion methods are practical.
Comfort and stability are just as important as gaining additional height. Your computer, keyboard, monitor, and other equipment should remain secure and easy to use after the conversion.
This guide explores several ways to convert a desk into a standing desk and explains how to choose and set up the option that works best for your workspace.
How To Convert A Desk Into A Standing Desk
There are several ways to transform an existing desk into a more flexible workstation. The best approach depends on the desk you already have, your equipment, available space, and how often you plan to stand.
Some options require very little modification. A desk converter or adjustable laptop stand can provide additional height while allowing you to keep your current desk.
Other methods involve raising the entire desk or creating a separate elevated work surface. These approaches can work well when you want a more permanent standing setup without replacing your existing furniture.
Stability and comfort should remain priorities regardless of the method you choose. Your computer and other equipment need to remain secure while your keyboard and monitor are positioned at comfortable working heights.
The following eight methods offer practical ways to convert a desk into a standing desk, from simple accessories to more customized solutions.
1. Add A Height-Adjustable Desk Converter
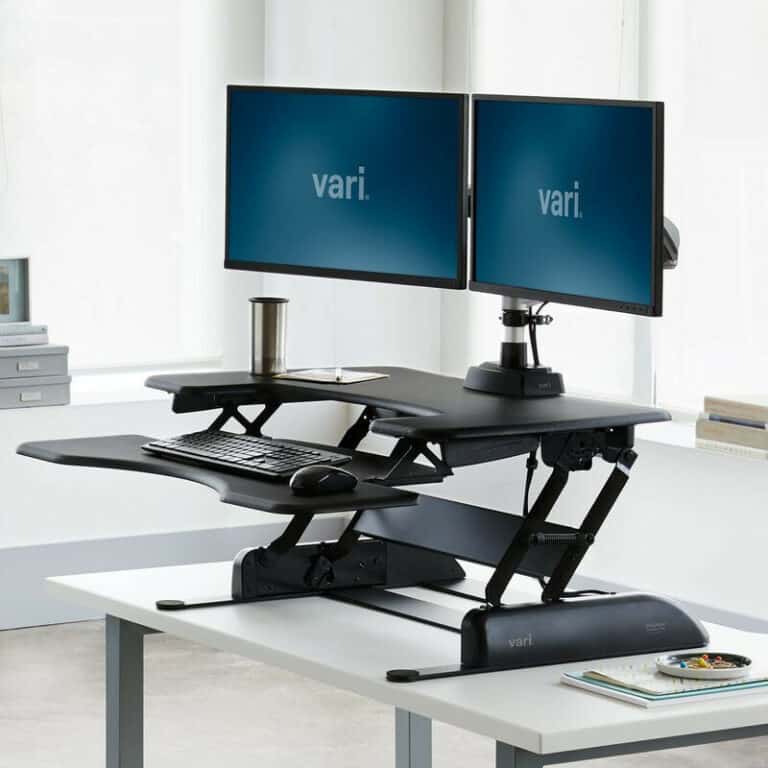
A height-adjustable desk converter is one of the simplest ways to convert a desk into a standing desk without replacing your current furniture. It creates an elevated work surface that can be raised or lowered whenever you want to change positions.
Most converters provide separate areas for your monitor and keyboard. Depending on the design, they may use springs, gas-assisted mechanisms, or electric controls to move between different heights.
One advantage is that your existing workspace remains largely unchanged. You can lower the converter when you want to sit and raise it when you prefer to work while standing.
Consider the available surface area before choosing a model. Your monitor, keyboard, mouse, and other frequently used equipment should fit comfortably without making the platform feel crowded.
Also check how much weight the converter can safely support. Monitor arms, multiple screens, and other equipment can add considerably more weight than expected.
The converter should also remain stable at different heights. A secure platform helps prevent unwanted movement while typing, using a mouse, or adjusting your equipment.
Key Points
- Easy sit-to-stand adjustment
- No permanent modifications
- Multiple size options
- Suitable for different computer setups
- Check equipment weight capacity
2. Build A DIY Standing Desk Riser
A DIY standing desk riser can turn an ordinary desk into a raised workstation without requiring specialized furniture. It also gives you more control over the size and height of the finished setup.
The basic idea is to create a stable elevated surface for your monitor, keyboard, and mouse. A sturdy shelf, thick wooden board, or similar material can provide the main work surface.
Choose supports that can safely hold both the platform and your equipment. The finished riser should remain level and secure when you type, move your mouse, or adjust your monitor.
Height is another important consideration. Measure your existing desk and determine how much additional height you need before building the riser.
Keep the design practical rather than overly complicated. Enough width and depth for your essential equipment can provide a more comfortable workspace without taking over the entire desk.
Test the completed riser with your actual equipment before using it regularly. Make sure everything remains balanced and that the platform does not shift during normal tasks.
A DIY approach also allows you to customize the dimensions for your particular workspace. This can be especially useful when standard desk converters do not fit your existing furniture.
Key Points
- Low-cost conversion option
- Customizable height and dimensions
- Uses readily available materials
- Requires a strong, stable platform
- Test carefully with your equipment
3. Raise The Desk With Strong Risers Or Blocks
Raising the entire desk is another simple way to create a standing workstation. Instead of adding a platform to the desktop, this method increases the height of the furniture itself.
Sturdy furniture risers or other suitable supports can provide the additional height. This approach works particularly well with desks that have separate legs and a strong, stable frame.
Measure your current desk height before choosing the risers. Then determine how much additional height you need to position your keyboard and mouse comfortably while standing.
The supports must fit the desk legs securely and handle the combined weight of the desk and equipment. Stability is especially important because raising the furniture can change its balance.
Keep in mind that the desk will remain elevated when you want to sit. You may need a taller or adjustable chair to maintain a comfortable seated position.
For this reason, desk risers are generally more practical for a dedicated standing workstation. They are less convenient if you frequently switch between sitting and standing.
Key Points
- Raises the entire existing desk
- Simple and affordable conversion
- Works best with sturdy desk frames
- Requires secure, weight-rated supports
- Better suited to fixed standing setups
4. Use A Wall-Mounted Standing Workstation
A wall-mounted workstation can transform an unused section of wall into a practical standing work area. It can be particularly useful when floor space is limited.
Instead of adding a full-size desk, the work surface attaches directly to the wall. This can help create a functional workspace in a small office, bedroom, or other compact area.
Depending on its size and construction, the surface may accommodate a laptop, monitor, keyboard, and basic accessories. Cable management can also help keep the small workspace organized.
Installation requires careful planning. The wall, mounting hardware, and work surface must be capable of safely supporting your equipment.
Follow the manufacturer’s installation requirements and use mounting hardware appropriate for the wall construction. The workstation should remain secure during normal computer work.
Position the surface at a comfortable working height before installation. A surface that is too high or low can make typing and using your computer uncomfortable.
A wall-mounted workstation can provide a permanent standing area without taking up valuable floor space. It also offers a clean and compact alternative to a traditional desk.
Key Points
- Saves valuable floor space
- Creates a dedicated standing area
- Suitable for compact workspaces
- Requires secure wall mounting
- Height must be planned carefully

5. Convert A Shelf Into A Standing Workstation
A sturdy shelf can provide a practical standing workstation without requiring a traditional desk. This approach can also make use of shelving or storage furniture you already have.
Open shelving units, bookcases, and heavy-duty shelves may provide enough space for a laptop or monitor. The available depth will determine how much equipment you can comfortably accommodate.
Make sure the shelf can safely support the weight of your computer equipment. Freestanding units should also remain stable and be secured when necessary.
A two-level arrangement can provide additional flexibility. The upper surface can hold your monitor, while a lower shelf provides a separate area for your keyboard and mouse.
Check the working height before committing to the setup. Spend some time standing at the shelf to make sure your monitor and keyboard can be positioned comfortably.
One advantage of this conversion is the storage space underneath the workstation. Shelves can continue holding office supplies, equipment, or other items while providing a dedicated area for standing work.
Key Points
- Makes use of existing shelving
- Suitable for compact workspaces
- Two-level setups offer flexibility
- Provides additional storage space
- Check stability, depth, and height
6. Use An Adjustable Laptop Stand
An adjustable laptop stand can create a simple standing workstation using very little desk space. It is particularly useful when a laptop is your primary computer.
Raising the laptop helps position the screen at a more comfortable viewing height. However, it also raises the built-in keyboard, which can make typing uncomfortable.
Pair the stand with an external keyboard and mouse. This allows you to position the screen and input devices independently for a more comfortable setup.
Choose a stand that provides enough height and adjustment for both sitting and standing positions. It should also remain stable while supporting your laptop’s size and weight.
This setup is easy to move or rearrange when your workspace changes. It can be especially convenient if you work from different locations rather than using one permanent home office.
An adjustable laptop stand also takes up considerably less space than a full desk converter. This makes it a practical option for smaller or flexible workspaces.
Key Points
- Compact standing desk solution
- Separates screen and keyboard positioning
- Requires an external keyboard and mouse
- Easy to move between workspaces
- Uses minimal desk space
7. Create A Standing Setup With A Monitor Arm
A monitor arm can provide greater flexibility when positioning your screen for standing work. It allows the monitor to move independently rather than remain at a fixed height on the desktop.
Height-adjustable arms can raise the screen when you stand and lower it when you sit. You can combine one with a raised keyboard platform or desk converter to create a more flexible workstation.
Monitor arms can be particularly useful with multiple screens. Depending on the design, each monitor may be adjusted separately to create a comfortable viewing arrangement.
This approach also allows your existing desk to remain at its original height. It can be useful if you want to experiment with standing before making more substantial changes to your workspace.
Check that the monitor arm is compatible with your display before buying. Verify the mounting pattern, monitor size, and weight capacity recommended by the manufacturer.
Remember to check your cables as well. They need enough length and slack to move freely with the monitor without pulling on connections.
Key Points
- Flexible monitor positioning
- Works with single or multiple screens
- Keeps the existing desk unchanged
- Check mounting and weight compatibility
- Allow enough cable length for movement
8. Repurpose A Tall Table Or Countertop
An existing tall surface can provide one of the simplest ways to create a standing workstation. It requires little or no modification to your current furniture.
A kitchen counter, drafting table, workbench, or console table may already provide a suitable working height. This can be especially useful when you want to try standing before buying additional equipment.
Make sure the surface provides enough room for your computer and everyday accessories. You should also have sufficient legroom to stand naturally without leaning against the furniture.
Laptop users may benefit from adding an external keyboard and mouse. Desktop setups may require more attention to monitor height, equipment placement, and cable routing.
This approach can also create a useful secondary workstation. Your regular desk remains available for seated work, while the taller surface provides another place to work standing.
Before settling on a surface, spend some time working there. This can help you determine whether the height, available space, and overall setup are comfortable enough for regular use.
Key Points
- Uses furniture you already have
- Requires little or no modification
- Useful for testing standing work
- Creates a secondary workstation
- Check height, space, and legroom

How To Choose The Best Conversion Method
The best way to convert your desk depends on your existing furniture, available space, equipment, and working habits. A solution that works well in one home office may be impractical in another.
Start by considering how often you want to switch between sitting and standing. Some conversion methods make frequent changes easy, while others are better suited to a fixed standing workstation.
Your computer setup also plays an important role. A laptop requires much less space than multiple monitors, speakers, and other equipment.
Consider how much you want to modify your existing workspace as well. Renters or people using shared spaces may prefer solutions that can be easily removed or rearranged.
The following factors can help you compare the different conversion methods and choose an option that fits comfortably into your workspace.
1. Consider Your Desk Height
Your current desk height determines how much additional elevation you need. Measure from the floor to the desktop before choosing a conversion method.
Next, consider the height you need while standing. Your keyboard and mouse should be positioned comfortably without requiring you to raise your shoulders or bend forward.
Even a small difference in height can affect how comfortable the workstation feels. This becomes more noticeable when you spend longer periods working at the desk.
If your existing desk is considerably lower than your preferred standing height, a larger riser or adjustable converter may be more practical. Raising individual accessories may not provide enough adjustment.
2. Consider Your Equipment
The equipment on your desk should influence the conversion method you choose. A laptop requires much less surface space than a workstation with several monitors and accessories.
Make a list of the equipment you plan to raise. Include monitors, speakers, keyboards, docking stations, and anything else that will sit on the elevated surface.
Consider both the size and combined weight of these items. Your chosen platform or converter needs enough room and weight capacity to support everything safely.
Multiple monitors may require a wider converter or a combination of monitor arms and raised surfaces. This can provide greater flexibility without overcrowding your workspace.
Planning around your equipment from the beginning can help you avoid a conversion that looks practical but does not provide enough usable space.
3. Consider Your Budget
Your budget can help narrow down the most practical conversion methods. However, creating a useful standing workstation does not necessarily require an expensive solution.
A sturdy DIY riser or existing shelf can provide an affordable starting point. These options may work particularly well if you already have suitable materials or furniture available.
A height-adjustable converter generally offers greater convenience and flexibility. It may be worth the additional investment if you plan to switch between sitting and standing regularly.
Consider which features will make the greatest difference to your daily work. Stability, easy adjustment, and durable construction are usually more valuable than extras you may rarely use.
Choose a solution that fits both your budget and working habits. Long-term value often matters more than simply selecting the lowest-cost option.
Wealthy Affiliate – Mini Review
If you’ve ever thought about turning your blog, passion, or niche into an online business,
Wealthy Affiliate (WA) is one of the most beginner-friendly platforms I’ve used.
It combines step-by-step training, website hosting, AI-powered tools,
keyword research, and an active community all in one place.
What I like most is that you can start for free (no credit card needed), explore the platform,
test the tools, and connect with other entrepreneurs before upgrading.
WA isn’t a “get rich quick” scheme — success comes from consistent effort
and applying what you learn over time.
4. Consider Whether You Need Sitting And Standing
Think about whether you want to work exclusively while standing or alternate between sitting and standing. This decision can quickly narrow down the most suitable conversion methods.
A fixed-height setup can work well for a dedicated standing workstation. However, it offers less flexibility when you want to change positions during the day.
An adjustable desk converter makes switching between sitting and standing much easier. Other movable platforms can also provide flexibility without permanently changing your existing desk.
Consider how you normally work throughout the day. Meetings, computer tasks, writing, and other activities may feel more comfortable in different positions.
Choose a conversion method that supports the way you prefer to work. Easy position changes can make the finished workstation more practical for everyday use.
5. Consider Available Space
The size and layout of your room can influence which conversion method will work best. A spacious desk can accommodate more equipment, while a compact workspace requires a more efficient solution.
A larger desktop may have enough room for a full-size converter, multiple monitors, and other accessories. Make sure the added equipment does not leave your working surface feeling crowded.
Smaller spaces may benefit from a laptop stand, compact converter, or wall-mounted workstation. These options can provide standing height without taking up unnecessary floor or desktop space.
Measure your available area before choosing a conversion method. Consider the width and depth of your desk as well as the space surrounding it.
The finished setup should make your workstation more functional rather than more difficult to use. Making efficient use of your available space can help create a comfortable and organized work area.

Fine-Tune Your Converted Standing Desk
Once your standing desk conversion is complete, a few adjustments can make the workstation more comfortable and practical. The height of the desk is only one part of creating a well-functioning setup.
Your monitor, keyboard, and mouse should be positioned so you can use them comfortably without unnecessary reaching or awkward movements. Small adjustments can make a noticeable difference during longer work sessions.
You should also consider the space around your workstation. Cables, floor space, and frequently used equipment can all affect how easily you move and work while standing.
Take some time to test the setup before deciding it is finished. The following steps can help you fine-tune your converted standing desk for everyday use.
1. Position The Monitor At Eye Level
Position your monitor so you can view the screen comfortably without repeatedly tilting your head downward. The upper portion of the screen can generally serve as a starting point for determining a comfortable viewing height.
Screen size and viewing distance can affect the ideal position. Adjust the monitor until you can look at the screen while keeping your head and neck in a relaxed position.
If you use a monitor arm, experiment with its height, tilt, and distance adjustments. These features can make it easier to fine-tune the screen after converting your desk.
2. Keep The Keyboard At A Natural Height
Position your keyboard so your elbows can remain close to your body while you type. Your shoulders should feel relaxed rather than raised.
Your forearms should rest comfortably without requiring you to reach upward for the keyboard. This may require adjusting the height of your converter or keyboard platform.
If the converter raises your keyboard too high, consider using a separate keyboard tray or lower platform. This allows the monitor and keyboard to sit at different heights.
3. Position The Mouse Within Easy Reach
Keep your mouse close to the keyboard so you can use it without repeatedly reaching forward or to the side. Maintaining a comfortable reach can also help keep your arm in a more natural position.
Place the mouse at approximately the same working height as the keyboard. Leave enough surface space to move it naturally without bumping into other equipment.
If you use a large mousepad, make sure it does not push the mouse too far from the keyboard. You should be able to use it comfortably without stretching or leaning.
4. Give Your Feet Room To Move
Leave enough space beneath and around the workstation to move comfortably. Avoid arranging equipment or storage in a way that forces you to remain in one position.
You may naturally shift your weight or change your stance while working. Keeping the floor area clear makes these movements easier.
An anti-fatigue mat can provide additional cushioning on hard flooring. A small footrest can also give you another position to use occasionally while standing.
5. Manage Your Cables Before Raising The Desk
Check your cables carefully if your converted workstation includes adjustable or moving components. Power, monitor, USB, and charging cables need enough length to accommodate any height changes.
Leave sufficient slack for equipment to move without pulling on connections. At the same time, avoid leaving long cables hanging where they could become tangled or create clutter.
Cable clips, sleeves, or other cable management solutions can help keep everything organized. Test the cables through the full range of movement before using the workstation regularly.
6. Test The Setup Before Settling In
Spend some time using your converted desk before considering the setup complete. Type, use your mouse, read from the monitor, and reach for the equipment you use regularly.
Pay attention to whether the monitor, keyboard, and mouse feel naturally positioned. Also check whether you have enough room to move comfortably around the workstation.
Small adjustments to height, distance, or equipment placement can make a noticeable difference. Testing the setup with real work is one of the best ways to identify what still needs changing.

Frequently Asked Questions
Q1: Can I Make A Standing Desk Without Buying A New Desk?
Yes. You can convert an existing desk into a standing desk using a desk converter, raised platform, adjustable laptop stand, or another elevated surface.
The best option depends on your desk, available space, equipment, and whether you want to alternate between sitting and standing.
Q2: Is A DIY Standing Desk Safe?
A DIY standing desk can work well when the platform is sturdy, level, and properly supported. It also needs to handle the combined weight of your computer and other equipment.
Test the completed setup carefully before using it regularly. Make sure nothing shifts, wobbles, or becomes unstable during normal work.
Q3: Can I Permanently Convert A Sitting Desk Into A Standing Desk?
Yes. Depending on the desk’s construction, you may be able to raise the entire desk using suitable supports or replace its existing legs with taller alternatives.
A permanent conversion works best when you primarily want to stand. If you regularly switch positions, an adjustable solution may offer more flexibility.
Q4: Do I Need An Anti-Fatigue Mat?
An anti-fatigue mat is not essential, but it can provide additional cushioning when standing on hard flooring. It can also make the area beneath your standing workstation feel more comfortable.
It may be particularly useful if you spend longer periods at your standing workstation. Comfortable footwear and regular position changes can also make standing more comfortable.
Q5: Can I Convert A Small Desk Into A Standing Desk?
Yes. A small desk can often be converted using a compact desk converter, adjustable laptop stand, or another raised surface that fits within the available workspace.
Measure the desk carefully before adding equipment. You still need enough room for your computer, keyboard, mouse, and other essentials without overcrowding the surface.
Q6: Can I Use A Standing Desk Converter With Two Monitors?
Yes, provided the converter is large and strong enough to accommodate both monitors. Check its available surface area and weight capacity before setting up your equipment.
A dual-monitor arm can also help free up desktop space and make screen positioning more flexible. Make sure both the arm and converter are compatible with the size and weight of your monitors.
Conclusion
There are many practical ways to convert a desk into a standing desk without replacing your entire workstation. From desk converters and DIY risers to laptop stands and repurposed furniture, the right solution depends on your space, equipment, and working habits.
A successful conversion starts with accurate measurements and a stable work surface. Your monitor, keyboard, mouse, and other equipment should also be positioned comfortably and remain easy to use.
Consider whether you want a permanent standing workstation or the flexibility to alternate between sitting and standing. This can help you choose a conversion method that fits naturally into your daily routine.
You do not need an elaborate setup to create a more versatile workspace. With a few thoughtful adjustments, your existing desk can support both sitting and standing while allowing you to change positions throughout the workday.
I trust you enjoyed this article on the 8 Smart Ways to Convert A Desk Into A Standing Desk. Please stay tuned for more insightful blogs on affiliate marketing, online business, and working from anywhere in the world.
Take care!
— JeannetteZ 🌍✨
💬 Your Opinion Is Important To Me
Do you have thoughts, ideas, or questions? I’d love to hear from you. Please leave your comments below or email me directly at Jeannette@WorkFromAnywhereInTheWorld.com.
📚 More Work From Anywhere Reads
🚀 Ready to Build a Business You Can Run from Home
Or from Anywhere in the World?
Imagine creating income on your terms — from home, a cozy café, or wherever life takes you.
With the right tools, training, and community support, it’s entirely possible.
Start your own online business for free — no credit card needed.
Disclosure
This post may contain affiliate links. As an Amazon Associate and participant in other affiliate programs, I earn from qualifying purchases at no extra cost to you. Please read my full affiliate disclosure.