Snagit Review And How It Works
Introduction To How to Use Snagit
In this article, we will give a comprehensive review of the application called ‘Snagit.’ This review comprised of several sections as follows:
- What is ‘Snagit’? (A complete review on the application, its uses, and advantages & disadvantages)
- A close review of the application Setup and How to use it (we will show this part with images taken from PC)
- Users’ review and rating about ‘Snagit’ (taken from popular review websites, e.g., Trust Radius)
Ultimately, we finish this blog post with a conclusion. We hope that the information will be beneficial. So, let’s see what this application is and how we can benefit from it.
1.1 – To Captures Video Display And Audio Output Using ‘Snagit.’
You may think of several screenshot applications in the market, such as Screenpresso, Ashampoo Snap, Snagit, etc., all of which have their own perks. What makes Snagit more superior than the other applications?
We know that users are looking for a simple yet powerful tool to do their things, and taking a screenshot from your monitor should not be that complex. It is easy and fast if you are using a good application. Snagit offers these exact features that all users require. Not only is it simple to use, but also considered a powerful application. By using Snagit, you can control everything. For example, you can
- Capture the entire windows screen or the desired area.
- You can also start a particular program or page and capture that part by pressing a single button.
- You can edit the images after you captured them using Snagit's own tools.
- And ultimately, you can either save them on your computer or send them to social media within the application itself.
It is truly an all-in-one application. You can honestly say goodbye to all problems in creating images and videos by using Snagit.
1.2 – Can You Trust Snagit With Your Computer? Does It Contain A Virus?
To answer this question, you must make sure that the application package was downloaded from a safe source and not just any website that can potentially harm your computer. The installation package is not that large (almost 300 megabytes). Any package with less or more weight can be a potential danger and contain viruses or malware. Well, in this case, you better have a good anti-virus or Malware software installed on your computer.
However, if the package was downloaded from a reliable source, e.g., the Windows OS own store, you have nothing to worry about. All the files will be checked by OS security or any anti-malware software you use. In our test using ESET NOD32 on the PC, there was no issue found with the app.
1.3 – Bad News: Snagit Is Not Available For Free
Well, we don’t really expect companies to offer their product for free, don’t we? If you are one of those who always think about the legitimacy of things they are doing on their computer, you better not do anything illegal by downloading the application's cracked version.
Better, once the application is downloaded, you can use the application for 15-days without any limitations on any tools. However, you must buy the full version of this application, which costs USD 49.95 (more will be discussed later in this article).
1.4 – Benefits Of Using Snagit
We were not kidding when we were told that Snagit is an all-in-one application. You will have more options than just capturing videos and images. For example, some of the other uses of this software are mentioned below. For example, you will be able to:
- Extract the text from the captured pictures
- Extract and save a pdf version of the web pages
- Document and capture online account issues and program error message
- Edit non-desirable image elements
- Increase or decrease the size of the image
- Convert an image format to another (e.g., jpeg to gif), etc.
These are just a small portion of the application tools. If you are a computer nerd like me and want to find out more, you better install the application right now.
In general, we can divide the advantages and disadvantages of this application as follows:
Advantages
- Easy use and simplicity
- Ability to capture real-time data from any region in the screen (using the mouse pointer to grab information from the screen) or even fullscreen.
- Ability to edit the images (size, colour, resolution, etc.) right after the image was captured
- 15-days of full use of the application before the request for buying the premium version of the application
It seems that some users have voiced their lack of satisfaction due to the following reasons:
- Poor quality images were captured from full pages
- Limitation on the size of the screen. Some reported that the images captured were half complete, and full pages were not captured.
- Some reported that using the application can be quite confusing due to having many tools and functions.
1.5 – Review Of Snagit
In this part, we will see different sections of the application and try to give you the best description of all of them.
1.5.1 – Downloading And Installing The Application
The size of the software we download was 290 megabytes, considered a light application compared to photoshop (more than 4 gigabytes even without plugins). You can easily download it with any connections and internet types today. In the following image taken from the installation process on Windows OS, you can choose other configurations provided by the installation package, e.g.,
- The package features (such as Snagit Printer and My Places)
- And Accessories (such as Microsoft Office Applications, YouTube, etc.)
You can choose the best options that suit your needs and also the applications that you really use. The system already checks the boxes. So if you don’t use any of the applications, uncheck them to disable the integrations.
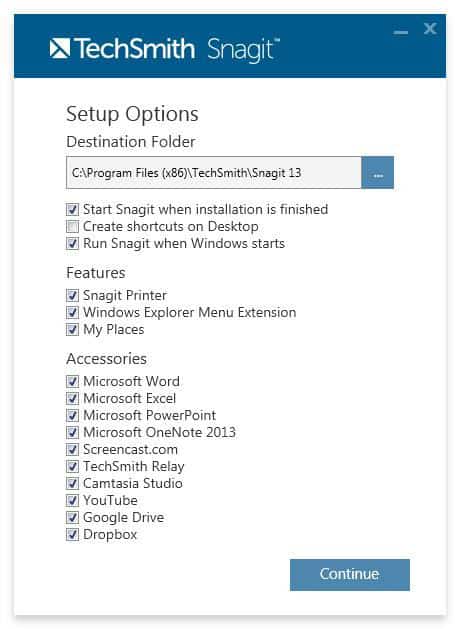
Finish the setup by changing the destination folder (your choice). Now the application is ready.
1.5.1.1 – Trial Version Or Premium Version
After the installation is complete, click on the icon and play the application. As we have mentioned, you will have two choices at first. You can either use the trial version for 15 days or start your premium account by entering the software key.
Since we didn’t intend to buy Snagit at first, we checked the trial version, and next, the application required us to log in or sign up to TechSmith’s (the software designers) account. Well, there is no other choice in this step. You will be directed to the application website, where you have entered the information.
Here, you must either enter your previous account (if you have already signed up for the premium) or create a new one by clicking on ‘Create a new account.’ Enter your information or use your g-mail account or Apple ID to enter the application by clicking on ‘Continue with Apple’ and ‘Sign Up with Google’, respectively.
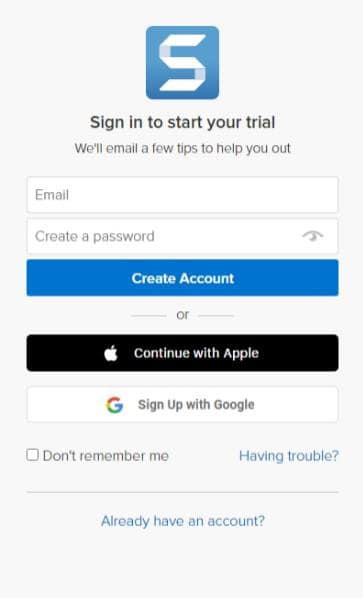
Next, you have to enter your purposes for using this application by checking the options from ‘What are you most hoping to accomplish with TechSmith Snagit?’ in the following image:
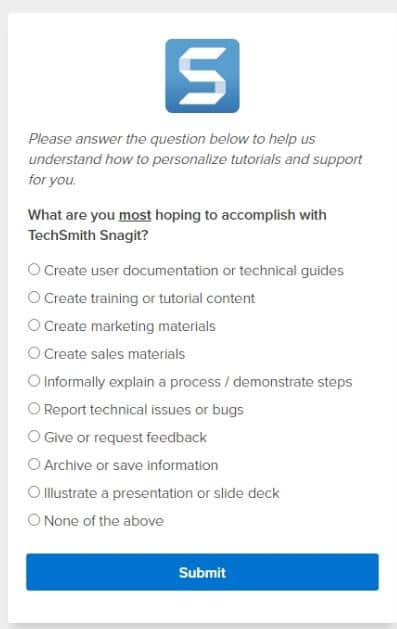
Now the setup is all finished, and you can start using Snagit and capture what you need. But how, you might ask?
1.5.2 – How To Capture
To capture a page, program, website, etc., the Snagit has broken down this part into three sections as follows: All-in-one, Image, and Video. Look at the following image.
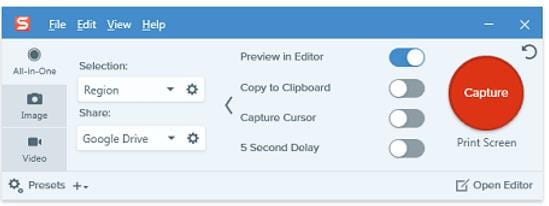
It is worth mentioning that you cannot use any technique to capture the image or video of the application itself (I guess for security purposes or whatever the company was thinking of while creating this feature). The pictures were taken by our phone camera or images that could be found on the internet).
1.5.2.1 – Option One: All-In-One Capture Mode
The application already starts in the ‘All-in-one’ option. As the names suggest, it is considered one of the most flexible options in this tool. In the above image, it is worth mentioning that if the application didn’t show ‘Selection’ or ‘Share’ sections, click on the arrow icon, and they will appear.

The options can be explained as follows:
- Selection: By clicking on this section, you will be able to capture in three modes:
- Region: You will choose a section where you want to capture by moving the mouse pointer. Once you chose the section, you can change the resolution size.
- Window: You will be able to capture an image at the size of your screen. It is predefined for your monitor (for example, my screen size was 1600*900).
- Fullscreen: I guess you know what this means. You will be able to capture the whole screen with ease.
- Share: By clicking on this section, you will choose where you want to send the result to be uploaded. For example, we choose Google Drive and, therefore, signed in to our Gmail account.

When you captured something, not only the image or video will be saved onto your computer, but it also will be uploaded into the Google Drive account in a specific folder you chose. You will also be able to choose several multiple share locations easily. All the above processes are so straightforward to perform and trouble-free.
Before concentrating on the other two sections, let’s say that All-in-One contains everything you, the user, want. If we want to express briefly, you have the tools at your disposal in this section to define the place where you want your captures to save. You have to determine the area of interest by click on the screen automatically or by click on three options of ‘Region,’ ‘Window,’ and ‘Fullscreen.’ It is interesting to know that the captured area will also change based on the application on the screen, enabling you to choose only the section you want to capture. Pretty useful and easy.
Now, the ‘All-in-One’ section is about capturing a picture and recording a video with your voice. Once you chose the region, you have to press capture, and in the next part, you either click on the ‘Camera’ or ‘Video Camera’ icon based on what you want. Using the video camera icon, you can capture a video of the screen and talk to the microphone to record your video, which is pretty useful for presentations (especially students).
The last option in the All-in-One section that we forgot to mention is ‘Panoramic Capture.’ This option can be useful for capturing an image of things that don’t fit the sizes mentioned above. After you pressed capture, you have to click on the icon at the right side of the ‘Video Camera’ icon and then scroll through the content. This way, all the content will be captured. It can be pretty handy in capturing websites or large photographs.
1.5.2.2 – Option Two: Image Capture Mode
Just like the All-in-One mode, you can capture images of your screen using this option. However, this section is only dedicated to capturing an image, and also you will have more options in the ‘Effects’ section. Look at the following image:
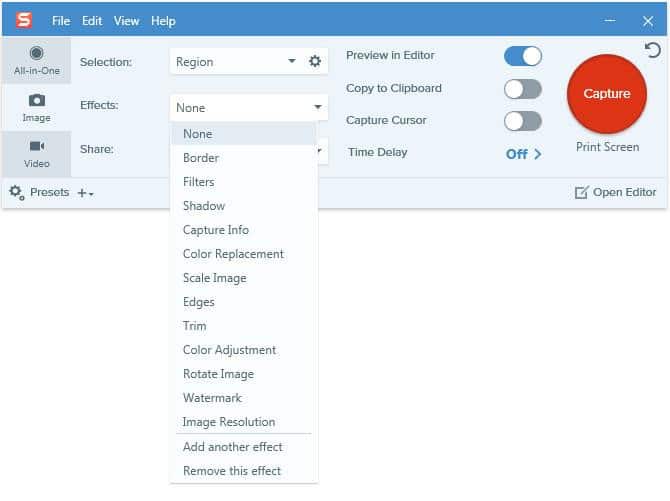
In the next sections, we will review some of these effects. There is a major difference between the ‘All-in-One’ and ‘Image’ sections lacking printing options in All-in-One mode. Also, in All-in-One mode, there is no share option with e-mail.
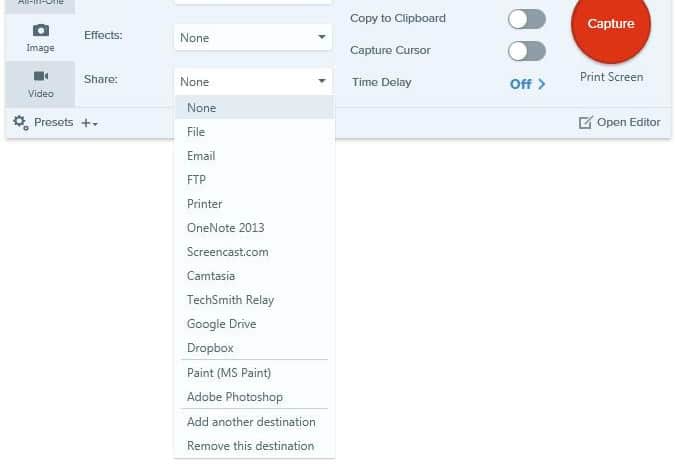
1.5.2.3 – Option Two: Video Capture Mode
Just like the ‘All-in-One’ mode, you can record a video from your screen and your voice directly from the webcam attached to your computer or headphone (I used a headphone instead of the webcam to record my voice).
You can also use this option to create videos for your YouTube channel by sharing your own videos online on YouTube and improving the number of subscriptions. To activate the webcam, click on ‘Off,’ and you will see the two options ‘start with webcam’ and ‘name of your webcam’ in that section will appear. Whatever option you use, they are both easy to work with.

Once you tried one of the above modes, a section called editor will appear. But what can it be used for?
1.5.3 – Editor
We want to remind you that this section only works for images captured by the application. If you are looking to edit your videos with this application, you chose the wrong one. For video editing purposes, you can use other applications.
However, for images, ‘Snagit’ can be quite useful. How does it work? You capture an image from the screen, and then the following Snagit Editor will appear.
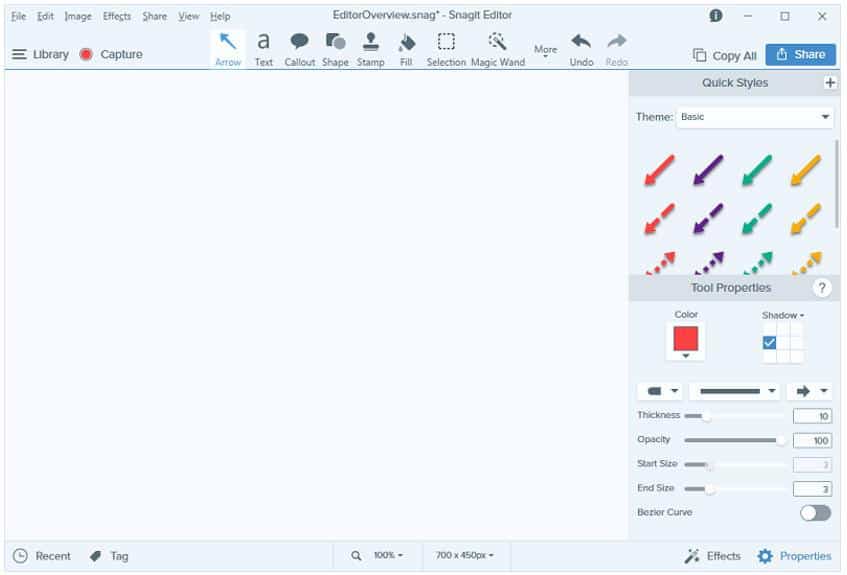
In the Snagit Editor, you can see all the images and videos captured by you at the bottom of this Editor. Although you won’t be able to edit the videos, you can review them one by one. For the pictures, however, the Editor is equipped with different editing options such as:
- Arrows that are available in different colours and shadows, thickness, opacity (visibility), and sizes
- Text overlays
- A large range of stamps to choose from. To see more stamp shapes, you need to change the type of stamp you need. For example, there are stamp categories such as ‘Emoji,’ ‘Food and Drink,’ ‘Business,' etc.
- Speech bubbles
- Shapes, etc.
- Capability to cut part of the picture
You can see all of these editing options above and on the right side of this editor. These will help save energy and time by not looking for another application for editing purposes, e.g., Photoshop, which I am sure not every person is acquainted with.
If you have forgotten to add effects to your captured picture before the Snagit Editor section, don’t worry. Snagit Editor gives you the ability to add effects to your image. In the lower right corner, click on the effects, and you can choose a variety of effect options that appeared.
Once all your edits are finished, all you need to do is click on ‘Share’ located on the upper part of the Editor and choose what you want to do with your image or videos. You can also save that content on your computer by clicking ‘File.’
1.6 – How To Buy A Premium Version After 15 Days?
After 15 days, your access to Snagit will be denied, and you can not use it until you buy the premium version. For this, you must enter the TechSmith website with the following link:
>>>https://www.techsmith.com/screen-capture.html<<<
Next, click on ‘Buy Now’ located in the upper right corner, and then you will be directed to the Snagit Store, where you can click on ‘Add to Cart,' and the cart will appear showing that one item is added to the cart. Click on ‘Review Cart and Checkout,’ add your e-mail, and ultimately, click on ‘Checkout.’ Enter your credit or debit card information and pay the bill.
After all the above processes, you will download the application and a code to activate your account forever.
1.7 – A Comparison Between Snagit And TechSmith Capture (Formerly Known As Jing)
Both Snagit and Jing were designed and published by the ‘TechSmith’ company for Screen Capturing purposes. However, it seems that Snagit offers a more balanced combination of features. In the following paragraphs, we will briefly compare these two programs.
1. The two applications are available for PC. Unfortunately, we couldn’t find the smartphone or iPad (tablet) version for either application.
2. Both of them are free to use at first. It seems that Snagit has better features than Jing, even in the free mode. Jing has a more limited set of features that are only applicable for capturing quick videos.
3. As you saw in the above paragraphs for Snagit, you can practically do whatever you want with the captured images, and there are many options to work with to create changes in the image. However, Jing is mainly focused on capturing videos and has a limited number of features for images.
4. You can use Snagit to basically share the images and videos to YouTube, e-mail, Google Drive, etc. However, images and videos in Jing can only be shared with the Screencast.com account. This online sharing ability can greatly improve Snagit’s popularity in comparison to Jing.
5. In terms of availability, Jing and Snagit are both available for PC and Mac computers.
6. In terms of monetary issues, Snagit will cost you £43.25 plus taxes (as stated on the website). After buying the premium version, you will have access to Snagit forever (a lifetime license) on your PC or MAC. Besides, you can also add another £10.81 to buy a maintenance upgrade. This will help the user to upgrade and enjoy priority support for free. As for Jing, there is no value stated on the website. However, you were able to buy the previous version of Jing for USD29.95.
1.8 – How Do Users Rate Snagit?
Although several users have complained about the prices for such an application and compared this application with other screen capture software, the overall rating has favoured Snagit's usefulness. The users have described this application as easy to use and quick to learn.
They also voiced their appreciation toward the impressive TechSmith support, the tutorial that can be found online, support articles, and active community forum that Snagit users have formed on social media.
Ultimately, there were some complaints regarding too many options to choose from, and I described using the application tools as overwhelming.
Conclusion
Snagit is an open-source design application that is available for both PC and MAC computers, and you can use it to capture screenshots and videos of the screen. You can also use it to record your own videos using a webcam and share them on different platforms such as e-mail, YouTube, Google Drive, Tweeter, etc.
You can also use Snagit to edit the images captured (but not the recorded videos), and you can view the videos on the Snagit Editor after they are recorded. This application is easy to learn and work with.
Although it is easy to find out what you can do and what you can’t do with the Snagit, we took our time to explain it to you. We wrote an article about the application itself, briefly stating advantages and disadvantages and how to use it. Ultimately, we reviewed the users’ general experience of this tool. We hope this article will help you to use Snagit to its fullest capabilities.
JeannetteZ
I would love to hear from you. Please leave me your questions, experiences, remarks, and/or suggestions about Snagit. You can also email me at Jeannette@WorkFromAnywhereInTheWorld.com.
You might enjoy the following blog posts:
An Honest Wealthy Affiliate Review


