How to Use Canva
Introduction To How To Use Canva
What are the most important obstacles in applying effective content marketing today? That is right, to create engaging content and to produce these contents continuously. Most small companies lack these abilities and, therefore, are failing to compete with those who they were acquainted with at the beginning of the way. However, there are some tools to start with, such as Canva, that knowing how to use them helps the companies to compete easily.
Coming up with effective content can take time and energy, but after learning how to use Canva to create attractive content, you can find more new customers and sell more services and products.
Can You Use Canva For Free?
Before starting the tutorial, let’s just say that Canva is available to you for free. You can use the website or PC version of this platform. You can use every Canva template to create content for free. However, there are several images that will require you to buy them at a price lower than 1 Dollar. Of course, you are not going to quit using Canva just because of one image? Not at all. This platform contains tons of images and designs you can use for free.
For example, I have given you a representation of the variety of content types in the following image that is captured from the app environment from the PC version.

From pre-prepared resumes to invitations, pre-sized social media images, header templates for marketing purposes, documents, presentations, flyers, and many other designs for your needs to choose from. I have only shown a small section of all designs in the above image. However, you can click on the arrow that is shown on the right side, and other designs will appear.
If you can’t find what you are looking for, you can always create your own custom project. I also have good news. Thanks to the brilliant supports and designers of this platform, Canva’s collection of content types is still growing. For example, the category of eBooks and resumes are newly introduced.
Now, let's see how you can use Canva to your advantage and for your company's benefits and discuss features that can be quite beneficial.
A Tutorial On Using Canva
How To Start Using Canva
To start using ‘Canva,' first, you must download the PC version of this platform. You can download this application from the following link:
Canva for Windows Desktop App – Download for Free | Canva (https://www.canva.com/download/windows)
You can also use the website to create your own content. Canva’s website is as follows:
Collaborate & Create Amazing Graphic Design for Free (Canva.com)
Whatever method you use, you must first create a Canva account. Creating this account is straightforward. On the website version, click on ‘Sign Up’ located on the top-right corner of the website next to ‘Sign In,’ and the following page will appear.

You can either use your Google Account, Facebook, or e-mail to sign up to the Canva. If you have already created a Canva account, you just need to click on ‘Sign In.’ I used my g-mail to createe an account, and the following page appeared on the website.

Now you can see the first letter of my g-mail on the top-left corner of the website inside the red circle.
As you can see,
- The top section of the website is dedicated to ‘Design Anything' in which you can see all the categories and their respective graphics template you can use to create your content. To show more templates, you just have to click on the category, and the templates will appear just beneath that section.
- Under the ‘Design Anything’ section, there is a ‘Get Started Videos’ section that the website itself is offering tutorials for the user to watch.
- The last section, ‘Recent Designs,’ will show all the images that you created using this platform. However, if you are using this platform for the first time, there will be no image showing up, just like mine as follow:

As you can see, there is no content in the last section until you create new content. It will be saved, and recent designs will be shown in this part. You can also click on the ‘All Your Designs’ section that is located in the left part of the website to see all the content ever created. However, if you don’t have any, you can click on ‘Create your first design’ to start designing the content you need. Now, it is time to create an image.
Let's Start With Creating A Social Media Graphic
The reason for choosing this option is the popularity of social media in our world, that almost 50% of people around the world are using different social media platforms such as Instagram, Facebook, Twitter.
First, you click on the Social Media category, and the respective template will appear, from which you can choose the one that you like best. Or you can just click on ‘Create Your First Design,’, and the next page will appear, which shows the template more clearly:

Here, you can see different design types. You can see social media posts (for example, Instagram as shown in the above image), Twitter Posts, Social Graphics, Pinterest Graphics, and Tumbler. The size of these pre-designed templates can be changed for the specific social media platform you want to upload the picture on. For choosing more templates, you can scroll down to see templates for logos, A4 documents (to create presentation and documents), the invitation for events, and ads as well. For someone who is going to use this platform for the first time, they will be really impressed.
You couldn’t find the size you are looking for in a design? There is nothing to worry about. To find the size you require, you just have to click on ‘Create a Design’ that is located on the top-right corner of the page, and then ‘Custom Size.’ This will allow you to enter the dimension you require for the image, and you can enter them based on px (pixel), inch (in), millimetre (mm), and centimetre (cm). and then click on ‘Create new design.’ Look at the following images:


As you can see, all the images compatible with the above-stated size will appear on the left side of the page, and you can scroll down to see more templates.
Here, I am going to show you how to use these templates to create a quick, beautiful design for a Facebook post. For this, I am clicking ‘Facebook Post’, and here you either choose one of the templates or click on ‘Create a Blank Facebook Post’ and then, and the editor section opens up where you can do your magic:


Now, if you look at the left side of the page, there are several tabs that include: templates, photos, elements, text, audio, videos, background, etc., and by clicking three dots, you can see other tabs that are appearing:

By clicking the ‘Design' tab, you will have access to all designs that have been provided by the Canva Designers. As you scroll down, you will see that some of these images have ‘free' signs on them, but some don't. Those that don't have this sign will show the image on which you can see lines like the following picture. This means that you have to pay for full access to the image.

And when you click on the download icon, ‘Pay and Download’ will appear:

It is easy to get rid of the paid element. All you need to do is right-click on the element and click on ‘Delete,’, and now the paid image is removed. After that, you can use your own captured photo instead. And now that paid elements are deleted, you can download the image with ease.

In the older version of this platform, dollar signs were showing that this image must be paid in order to download. However, this feature is transferred to another location on the website. All the images are created with paid and unpaid elements. But you can find lots of images containing unpaid elements. Look at the following template:

As you can see, you can download the above image without paying anything. Just remove or pay the elements and use them for your own purpose. It is up to you.
Choosing a design is so easy. It is just a matter of clicking the design, and as before, it will appear on the editing page. If you already have a design on your page, you can replace it by clicking the new design and then replace button.
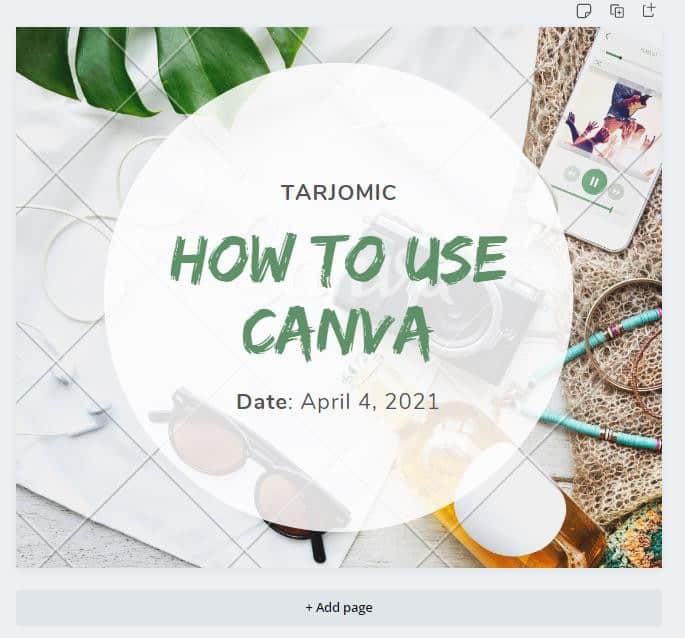
However, if you wish to add more layouts without removing the previous one, click on ‘+ Add Page’ located just under the layout image. Then, another blank page will appear in which you can another design. You can play between these designs by just scrolling up and down. You can delete either of them by options popping out in the upper part of the image after adding another design.

As you can see, I added one more design. Just a quick reminder that I used the section (50%) just below the page on the above image to zoom in or out. You can change the value by clicking on the value.
Now, I am going to tell you how to change the image and text sections to freestyle without using Canva design if you don’t want any of them.
Look at the above image where there is a hamburger picture. I am going to easily edit the Italian text ‘Bistro Italien La Mamma’ to ‘I write this text’ and also ‘Vendredi fries to Delicious Bacon-Beef Burger.’ To do that, click on the text you want to edit, and then replace it with the text you want.
In addition, there are tabs given just above the image once you click on the section. Using these tabs, you can change the appearance of the texts. You can highlight the texts and change the colours, change the font and resize the text by making them bigger and smaller, use document colours or find the colour you want among a variety of colours in the colour wheel, and you can also apply effects on the texts. You can also center-aligned, right-aligned, or left-aligned texts.
You can apply space effects which means it will add more spacing among letters horizontally or vertically. If you have used Microsoft Word before, using these options will be so easy. Look at the following image after the above changes:

There are lots of options to choose from, and I don’t think you will feel tired or overwhelmed while using these options. Give it a try and create your own texts with different styles. I think you will find what you are looking for without the need for another application such as Photoshop.
Now, I am going to choose another design. Look at the following image:

Once you click on the rabbit image, you will see that another section will appear on the upper part of the design.
- § You can change the colour of the rabbits by clicking on the color itself and choose the one you need.
- § By clicking on the ‘Crop,’ you can remove the rabbit image and place it somewhere else just by dragging it away by holding the left mouse button. However, if you can not do that, it means it is part of a group image, and you just need to right-click on the image and click on ‘ungroup.’ Then, you can easily move one of the rabbits. It is easy, as you can see, to choose and change.
- § By clicking on the flip section, you can flip the chosen images horizontally and vertically.
Look at the following image, where I changed the text, colours, and even the positions.

Just play with these options and get the results you want. I did a couple of changes to the designs, which include:
- changing the Italian texts to English and relatable texts such as Easter
- changing the colour of both eggs and rabbits
- And ultimately, changing the position of all images
Look at this part again. We will see the section called elements. By clicking on the ‘elements’ tab, the following items will appear that include lines, shapes, frames, stickers, design for a cause, etc. You can use any of them for your purpose. Use them as you see fit.


Using these shapes is so easy. You either find what you are looking for by going through categories and scrolling up and down or searching the shape by writing things into the ‘search bar. Then, you just have to grab the object while you are holding the left mouse button and throw them on the place you want by
releasing the button. For example, I added another design to the page as follows:

I will remove the cookie section since it is a paid element and replace something with something else (mentioned above). Then, I change the texts written below the image.

As you can see, I change the image by a ‘Salad’ shape. Pretty easy, isn’t it?
Now, look at the following image again:

As you can see, shapes are just one of the categories. You can also frame lines, arrows, circles, etc. If you click on either of the above shapes, you will see different shapes show up at the bottom. Choose the best for your design.
Note that if you are using an old version, you will see that the ‘Photos’ section is also part of elements. However, in the new version, the ‘Photos’ section is separated and has given another tab, as you can see in the image.
Look at the following image after adding more shapes:

The next section is about adding a photo to your design. For this part, I decided to add another design to my page, which is as follows:

This design also contains paid elements, so I am removing it again (follow the respective paragraph for this section.). Then, I am clicking on the ‘Photos’ section, where several images will appear. You can find the picture you want by searching through different images or search the thing you want that the image will be about or contain. For example, I searched ‘Father,’, and the following results appeared:

In this part, I opened a new page and chose the image I wanted. On the first page, I removed the paid image and then cropped the second picture to add it to my first page. I also changed the texts. I got the following result:

Note that the only reason I am deleting the paid elements is to avoid purchasing any image. In addition, I only use the free version of the platform so that I can download the final result since you can take the resulting design without doing any payment. Purchasing or not purchasing it all depends on you.
In addition to the website's own photos, you can add your pictures. To do this, you just need to click on the ‘Uploads’ tab as shown below:

Click on the ‘Upload Media’ and then choose your item, e.g., image, video, or audio, content from the intended device. The item will be placed in the appropriate category based on its type.
Now that you got acquainted with the tools of this platform and studies our article on how to use ‘Canvas, I want to tell you about how to make your own design. This is totally your responsibility, and no images are as instructions, and only the last result will be shown. However, you can follow the instructions given in texts:
- 1. First, upload the image(s) you want to use in your design.
- 2. Use the tools at your disposal (cropping, moving, removing, etc.) to change the appearance of your design.
- 3. If your design contains a certain text, click on the ‘Text’ section located below the ‘Elements’ tab and then choose the form, style, and appearance of texts in the intended section.
You can choose the sizes either based on their position (Heading, or subheading, and a little bit of body text’), writing them down yourself and then, changing them. Also, if you think the text you are looking for exists in a certain category, search for the related texts.
Use the tools until you are finished with your design. If you haven’t used any paid element, you will be able to download the result without paying. My final design was as follows:

All the options and features of Canva have been briefly mentioned throughout this article. In general, we can describe the Canva features as follows:
- Search tab: You can use it to find designs and other needed items,
- Layouts and background tabs. Canva library contains pre-designed layouts and backgrounds to choose from. You can find the right choice based on their category.
- Text tab. You select this tab to write your own or pre-prepared texts in the Canva library.
- Upload tab and download
section. Not only can you enjoy the Canva library, but you will be able to upload the content you required and then download the resulted design. - Canvas or Canva Editor. This is the place where all your magic happens.
- Add and remove one page. If you intend to have more design, you can add or remove one page.
- Support. For more help, you can always use the searchable knowledge base of Canva that is exactly located on the right bottom corner of the Canva editor page.
Conclusion
Whether we accept or not, creating engaging and unique content for social media in order to attract more customers to the newly established companies is of great importance. However, this task must be done consistently. In addition, they have to be created in a way that will help convert followers to potential customers. To create engaging content, there are many applications to choose from.
One of the applications or platforms available for PC and Mac users is Canva. This platform is quite an easy one to work with, and all the options are easy to find, and you won’t feel disoriented while creating your content. For more information, I decided to write this article, giving you a tutorial on how to use Canva. I hope that you found this article educational.
JeannetteZ
I would love to hear from you. Please leave me your questions, experiences, remarks, and/or suggestions about Canva in the comments section below. You can also email me at Jeannette@WorkFromAnywhereInTheWorld.com.
You might also enjoy these blog posts: