How To Work With Mailchimp: 10 Essential Steps
Learning how to work with Mailchimp is one of the first steps many beginners take when exploring email marketing. Although the platform offers a wide range of features, its user-friendly design makes it easy to learn at your own pace.
Whether you want to build an email list, create professional campaigns, automate routine tasks, or track your results, Mailchimp provides the tools to help you achieve your goals.
Everything is managed from one dashboard, making your marketing activities easier to organize. This allows you to spend less time switching between tools and more time connecting with your audience.
Understanding how the platform’s features work together can help you communicate more effectively with your subscribers. It also allows you to save time while building stronger, long-term relationships with your audience.
This guide walks you through the essential Mailchimp features step by step, showing you how to use them with confidence. By the end, you’ll be ready to make the most of the platform and improve your email marketing efforts.
What Is Mailchimp?
Before learning how to use Mailchimp, it’s helpful to understand what the platform does and why so many businesses rely on it. Knowing its core features will make the rest of this guide easier to follow.
Mailchimp is much more than an email marketing tool. It combines audience management, campaign creation, automation, reporting, and integrations in one easy-to-use platform.
Whether you’re sending newsletters, promoting products, or building long-term customer relationships, Mailchimp provides the tools to support your marketing goals. Its flexibility makes it suitable for beginners as well as experienced marketers.
Understanding what Mailchimp offers gives you a stronger foundation before exploring its features in more detail. It also helps you make better use of the platform as your email marketing needs continue to grow.
Why Use Mailchimp?
Choosing the right email marketing platform can make managing your campaigns much easier. Mailchimp combines practical marketing tools with a user-friendly interface that suits businesses of all sizes.
Whether you’re growing a blog, promoting an online store, or building customer relationships, the platform offers features that support your marketing goals. It helps you stay connected with your audience while keeping your campaigns organized.
From audience management and automation to reporting and integrations, Mailchimp brings together the tools needed to manage your email marketing more effectively. Many of these features work together, helping you save time and improve your results.
The following benefits explain why Mailchimp remains a popular choice for beginners and experienced marketers. They also show how its features can help you work more efficiently while supporting long-term business growth.
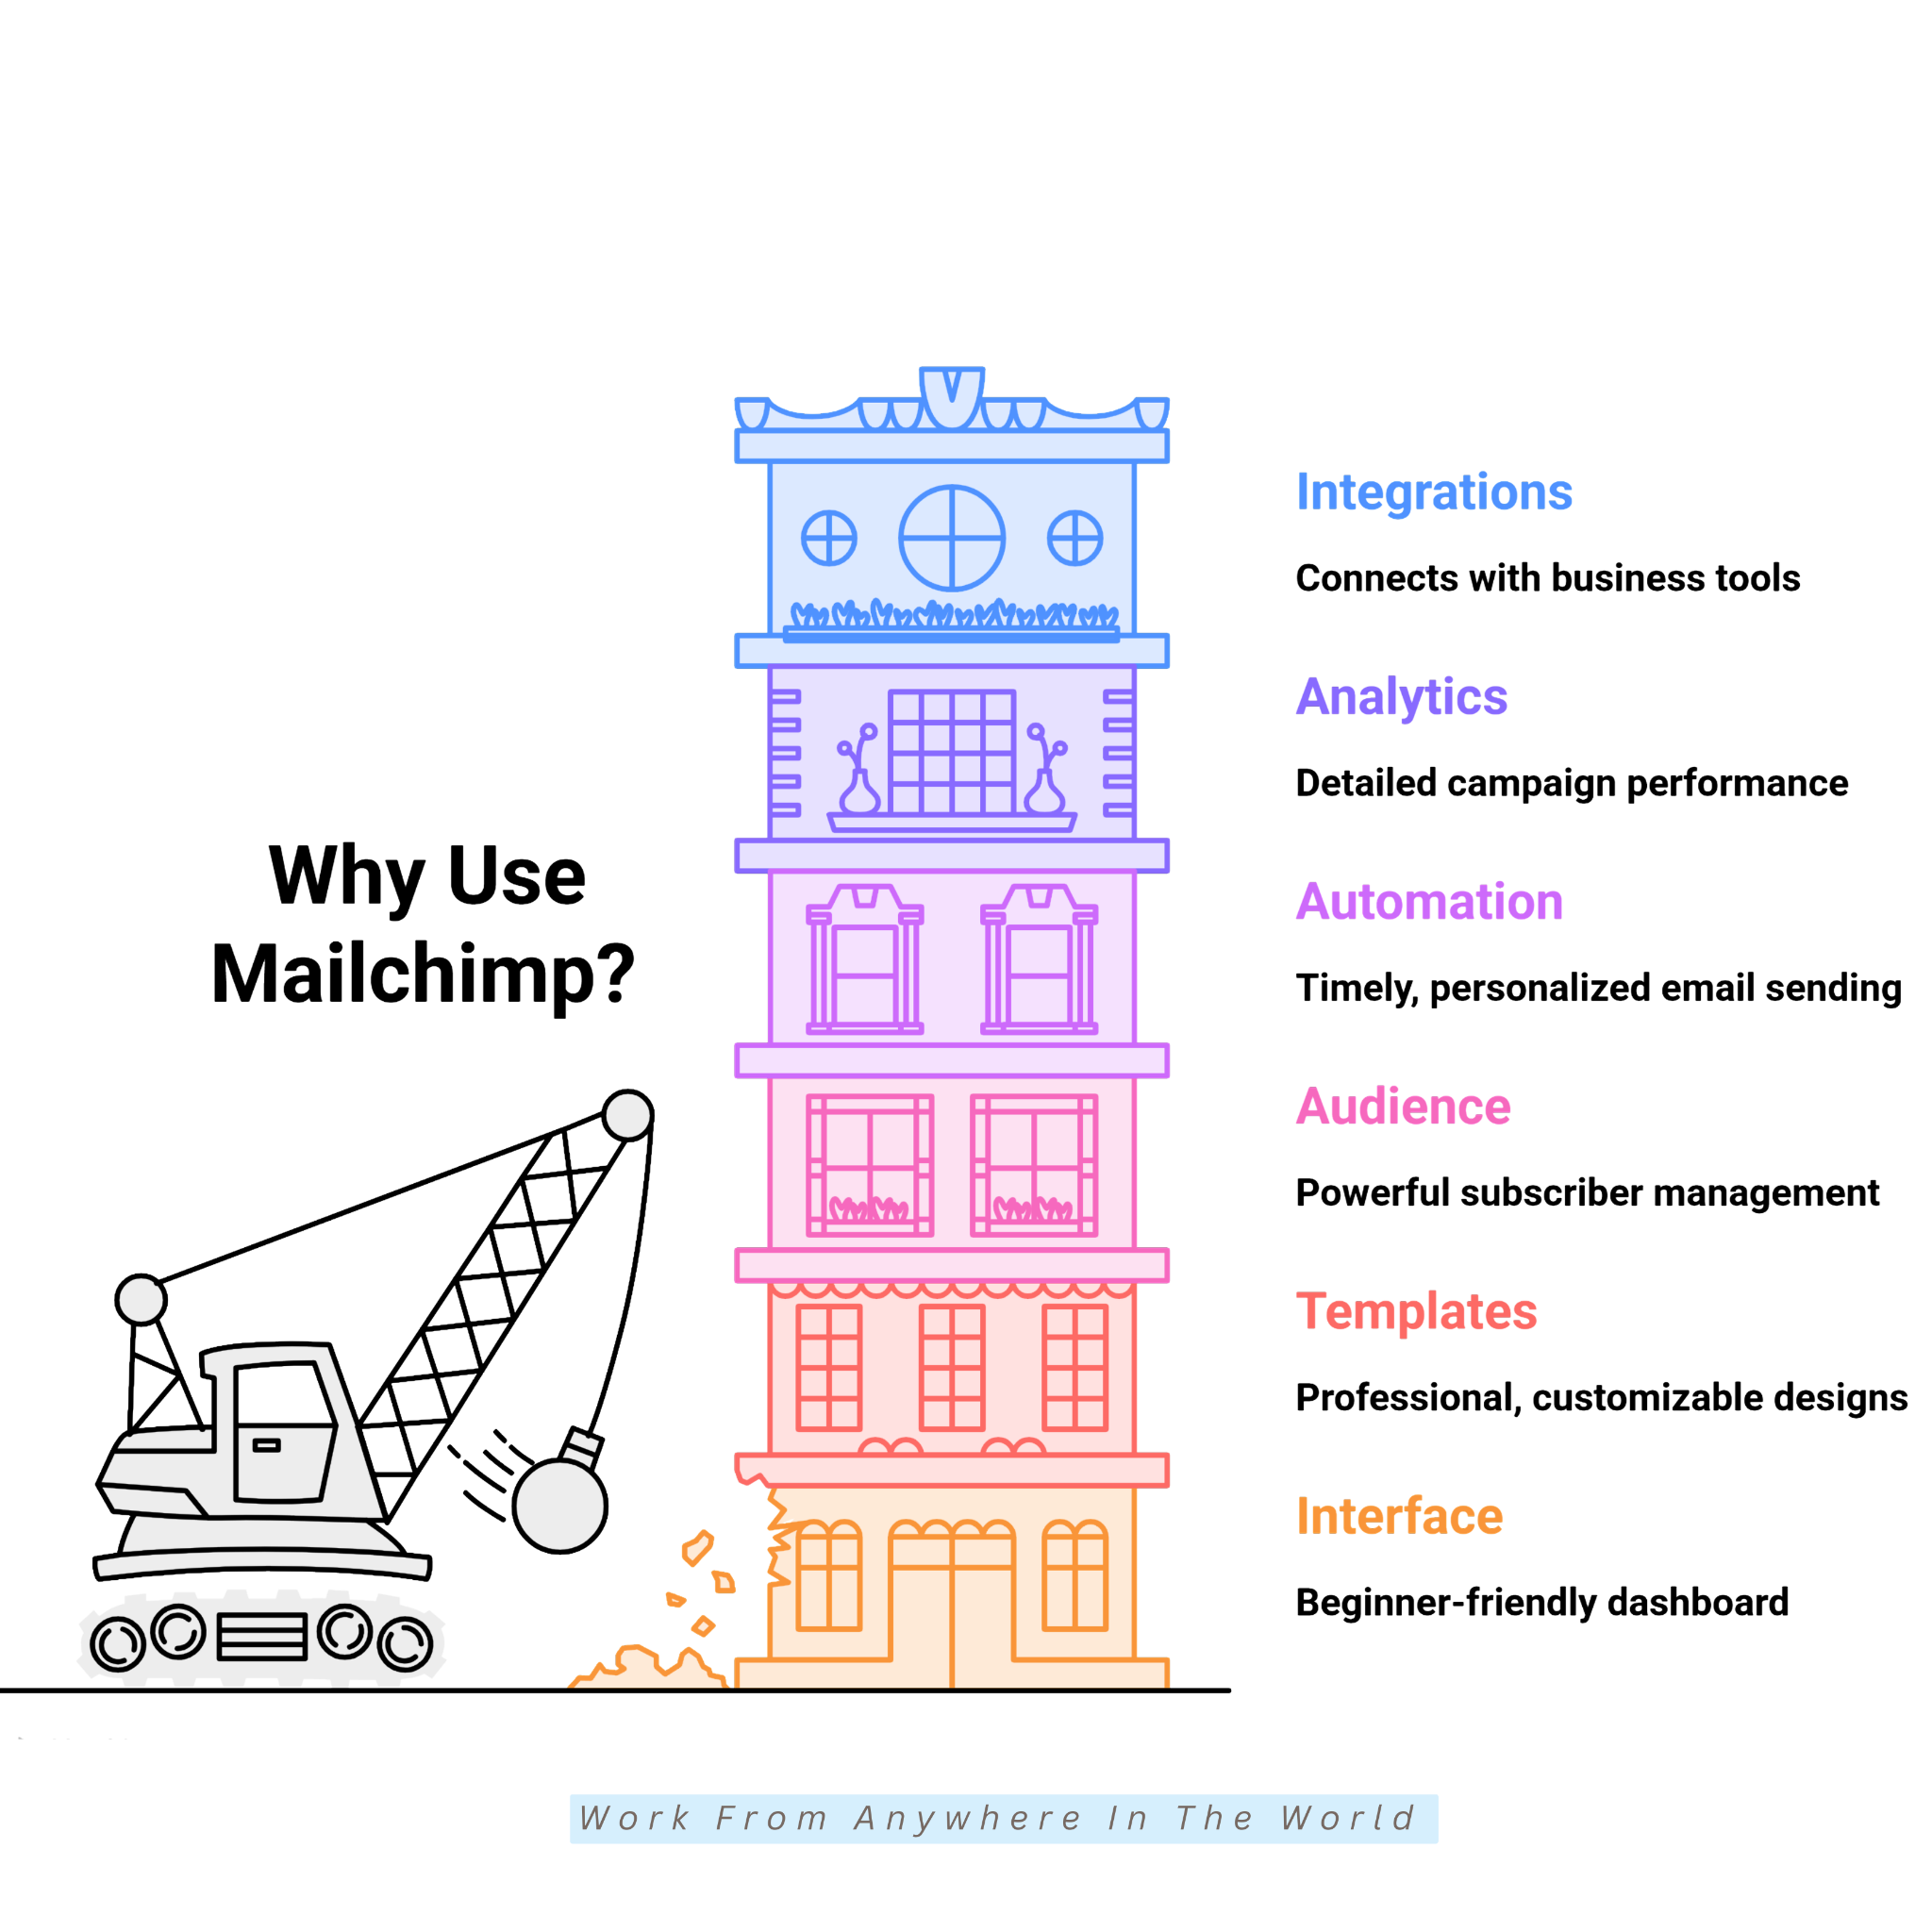
1. Easy-To-Use Interface
Mailchimp makes email marketing less intimidating with its beginner-friendly interface. The dashboard is clean and well organized, with clearly labelled sections for audiences, campaigns, automations, reports, and content.
Most tools are accessible within a few clicks, so you can quickly find what you need. This simple navigation allows you to spend less time learning the platform and more time creating effective email campaigns.
The straightforward layout makes it easier to create, manage, and monitor your email marketing activities. Even first-time users can become comfortable with the platform in a relatively short time.
As your business grows, Mailchimp continues to make everyday tasks easier to manage. This allows you to focus on building stronger relationships with your subscribers instead of learning complicated software.
2. Professional Email Templates
Mailchimp includes a wide selection of professionally designed templates for newsletters, promotions, product launches, event invitations, and more. These templates give you a strong starting point for creating attractive email campaigns.
Every template is fully customizable, allowing you to change colours, fonts, images, and layouts to match your brand. This helps you maintain a consistent look and feel across all your marketing communications.
The templates are also mobile-responsive, ensuring your emails display well on desktops, tablets, and smartphones. Subscribers can enjoy a professional reading experience regardless of the device they use.
Using ready-made templates saves time while helping you create polished and engaging emails. A professional design also strengthens your brand and encourages subscribers to interact with your content.
3. Audience Management
Keeping your subscribers organized is simple with Mailchimp’s powerful audience management tools. You can organize contacts using tags, groups, and segments based on interests, signup sources, purchase history, or engagement levels.
The platform also stores valuable subscriber information, making it easier to personalize future campaigns. Having this information readily available helps you communicate more effectively with different groups of subscribers.
Instead of sending the same message to everyone, you can deliver relevant content to specific audience segments. This makes your email campaigns more relevant and encourages higher engagement.
Well-organized subscriber lists are also easier to manage as your business grows. They help you build stronger customer relationships and create a more personalized email marketing experience.
4. Marketing Automation
Mailchimp’s automation features help you send timely emails without managing every campaign manually. You can build automated workflows for welcome emails, abandoned cart reminders, and follow-up sequences.
You can also automate birthday greetings, product recommendations, and emails based on subscriber actions. This helps ensure your audience receives relevant messages at the right time.
Once activated, these workflows continue running automatically while delivering personalized experiences. They reduce repetitive marketing tasks and help you maintain consistent communication with your subscribers.
As your business and subscriber list continue to grow, automation becomes even more valuable. It saves time, nurtures leads, and helps build stronger customer relationships.
5. Reporting And Analytics
Mailchimp provides detailed reports that help you measure the success of every email campaign. Easy-to-read charts and summaries make it simple to monitor your overall performance.
You can track important metrics such as open rates, click-through rates, bounce rates, unsubscribes, and conversions. These reports show how subscribers interact with your emails and which campaigns perform best.
Reviewing your campaign data regularly helps you identify successful strategies and areas that need improvement. Even small adjustments based on real performance can improve future email campaigns.
Reporting and analytics help you make more informed marketing decisions with confidence. They also help you improve subscriber engagement and achieve better results from your email marketing efforts.
6. Integration Options
Mailchimp integrates with hundreds of popular business tools, making your marketing workflow more efficient. You can connect eCommerce platforms, website builders, CRM software, social media channels, analytics tools, and payment systems.
These integrations automatically synchronize customer information across your connected platforms. This reduces manual data entry and helps keep your marketing data accurate and up to date.
Connecting your business tools also makes it easier to create personalized email campaigns. You can tailor your messages based on customer activity, interests, and purchasing behaviour.
Working with connected tools creates a smoother customer experience from start to finish. It also gives you valuable insights that help you make better marketing decisions and support long-term business growth.
Getting Started With Mailchimp
Getting started with Mailchimp is easier than many beginners expect. The platform guides you through the setup process, allowing you to begin your email marketing journey with confidence.
Before sending your first email campaign, it’s important to set up your account correctly. Spending a little time on the initial setup can help you avoid common mistakes later.
You’ll also want to become familiar with the main features and settings before creating campaigns. Understanding how they work together makes it easier to manage your subscribers and email marketing activities.
The following steps explain how to create your account, configure the essential settings, and prepare your first campaign. Completing each step will give you the knowledge and confidence to use Mailchimp more effectively.
Step 1: Start A New Email Campaign
After logging into your Mailchimp account, open the Campaigns section from the left-hand menu and click Create Campaign. This is where you’ll create and manage your email marketing campaigns.
Mailchimp offers several campaign types, including regular emails, automated emails, landing pages, social posts, and forms. For your first campaign, choose Regular Email (or the standard email campaign option available with your plan).
Next, give your campaign an internal name that helps you identify it later. This name is only visible to you, so choose something descriptive, such as the campaign topic, promotion, or date.
Using clear campaign names keeps your dashboard organized as your list of campaigns grows. It also makes it easier to find previous campaigns when reviewing your results or planning future email marketing activities.
Step 2: Select The Right Audience
The next step is choosing who will receive your email. If you have multiple audiences or saved segments, Mailchimp lets you select the most appropriate one for each campaign.
For example, you might send a newsletter to all subscribers or a special promotion only to recent customers. Choosing the right audience helps ensure your message reaches the people most likely to respond.
You can also filter recipients using tags, groups, locations, signup dates, or purchase history. These filtering options help you create targeted campaigns without manually sorting your subscriber list.
Sending relevant content to the right audience often increases engagement because subscribers receive information that matches their interests and previous interactions with your business.
This can lead to better open rates, higher click-through rates, and stronger customer relationships. Subscribers are also more likely to engage with emails that reflect their interests and needs.
Step 3: Configure Sender Information
Your sender information tells subscribers who the email is coming from. Enter a recognizable From Name, such as your business name or personal brand, along with a professional email address whenever possible.
Using consistent sender details helps build familiarity and trust with your readers. Subscribers are more likely to open emails when they recognize the sender.
Mailchimp may ask you to verify your email address before sending campaigns. Completing this verification confirms that you own the email address and helps protect your account.
Accurate sender information also improves email deliverability and makes it easier for subscribers to recognize your messages in crowded inboxes.
A professional sender profile creates a positive first impression and encourages subscribers to trust your emails. It also helps strengthen brand recognition and build long-term customer relationships.
Step 4: Write An Engaging Subject Line
The subject line is often the first thing subscribers notice when your email arrives. A clear and engaging subject line can encourage more people to open your email.
Keep it short, specific, and relevant to the content of your email. Let readers know what they can expect without making misleading promises or using clickbait.
You can also add preview text, which appears next to the subject line in many email applications. It gives subscribers additional information before they decide whether to open your email.
Mailchimp includes tools that help you evaluate subject lines before sending your campaign. Testing different subject lines helps you learn what your audience responds to and improve future email campaigns.
Step 5: Choose And Customize An Email Template
Mailchimp offers professionally designed templates for newsletters, promotions, product launches, announcements, and more. Choose a template that best matches the purpose of your campaign.
Once you’ve selected a template, you can personalize it using the drag-and-drop editor. Add your logo, images, text, buttons, social media icons, and brand colours to reflect your brand identity.
You can also rearrange content blocks to create a layout that suits your message and audience. This flexibility makes it easy to create professional-looking emails without any design experience.
Every template is mobile-responsive, ensuring your email looks polished on desktops, tablets, and smartphones. This helps provide a consistent reading experience across different devices.
If you regularly use the same design, you can save your customized template for future campaigns. This saves time and helps maintain a consistent brand appearance across your email marketing.

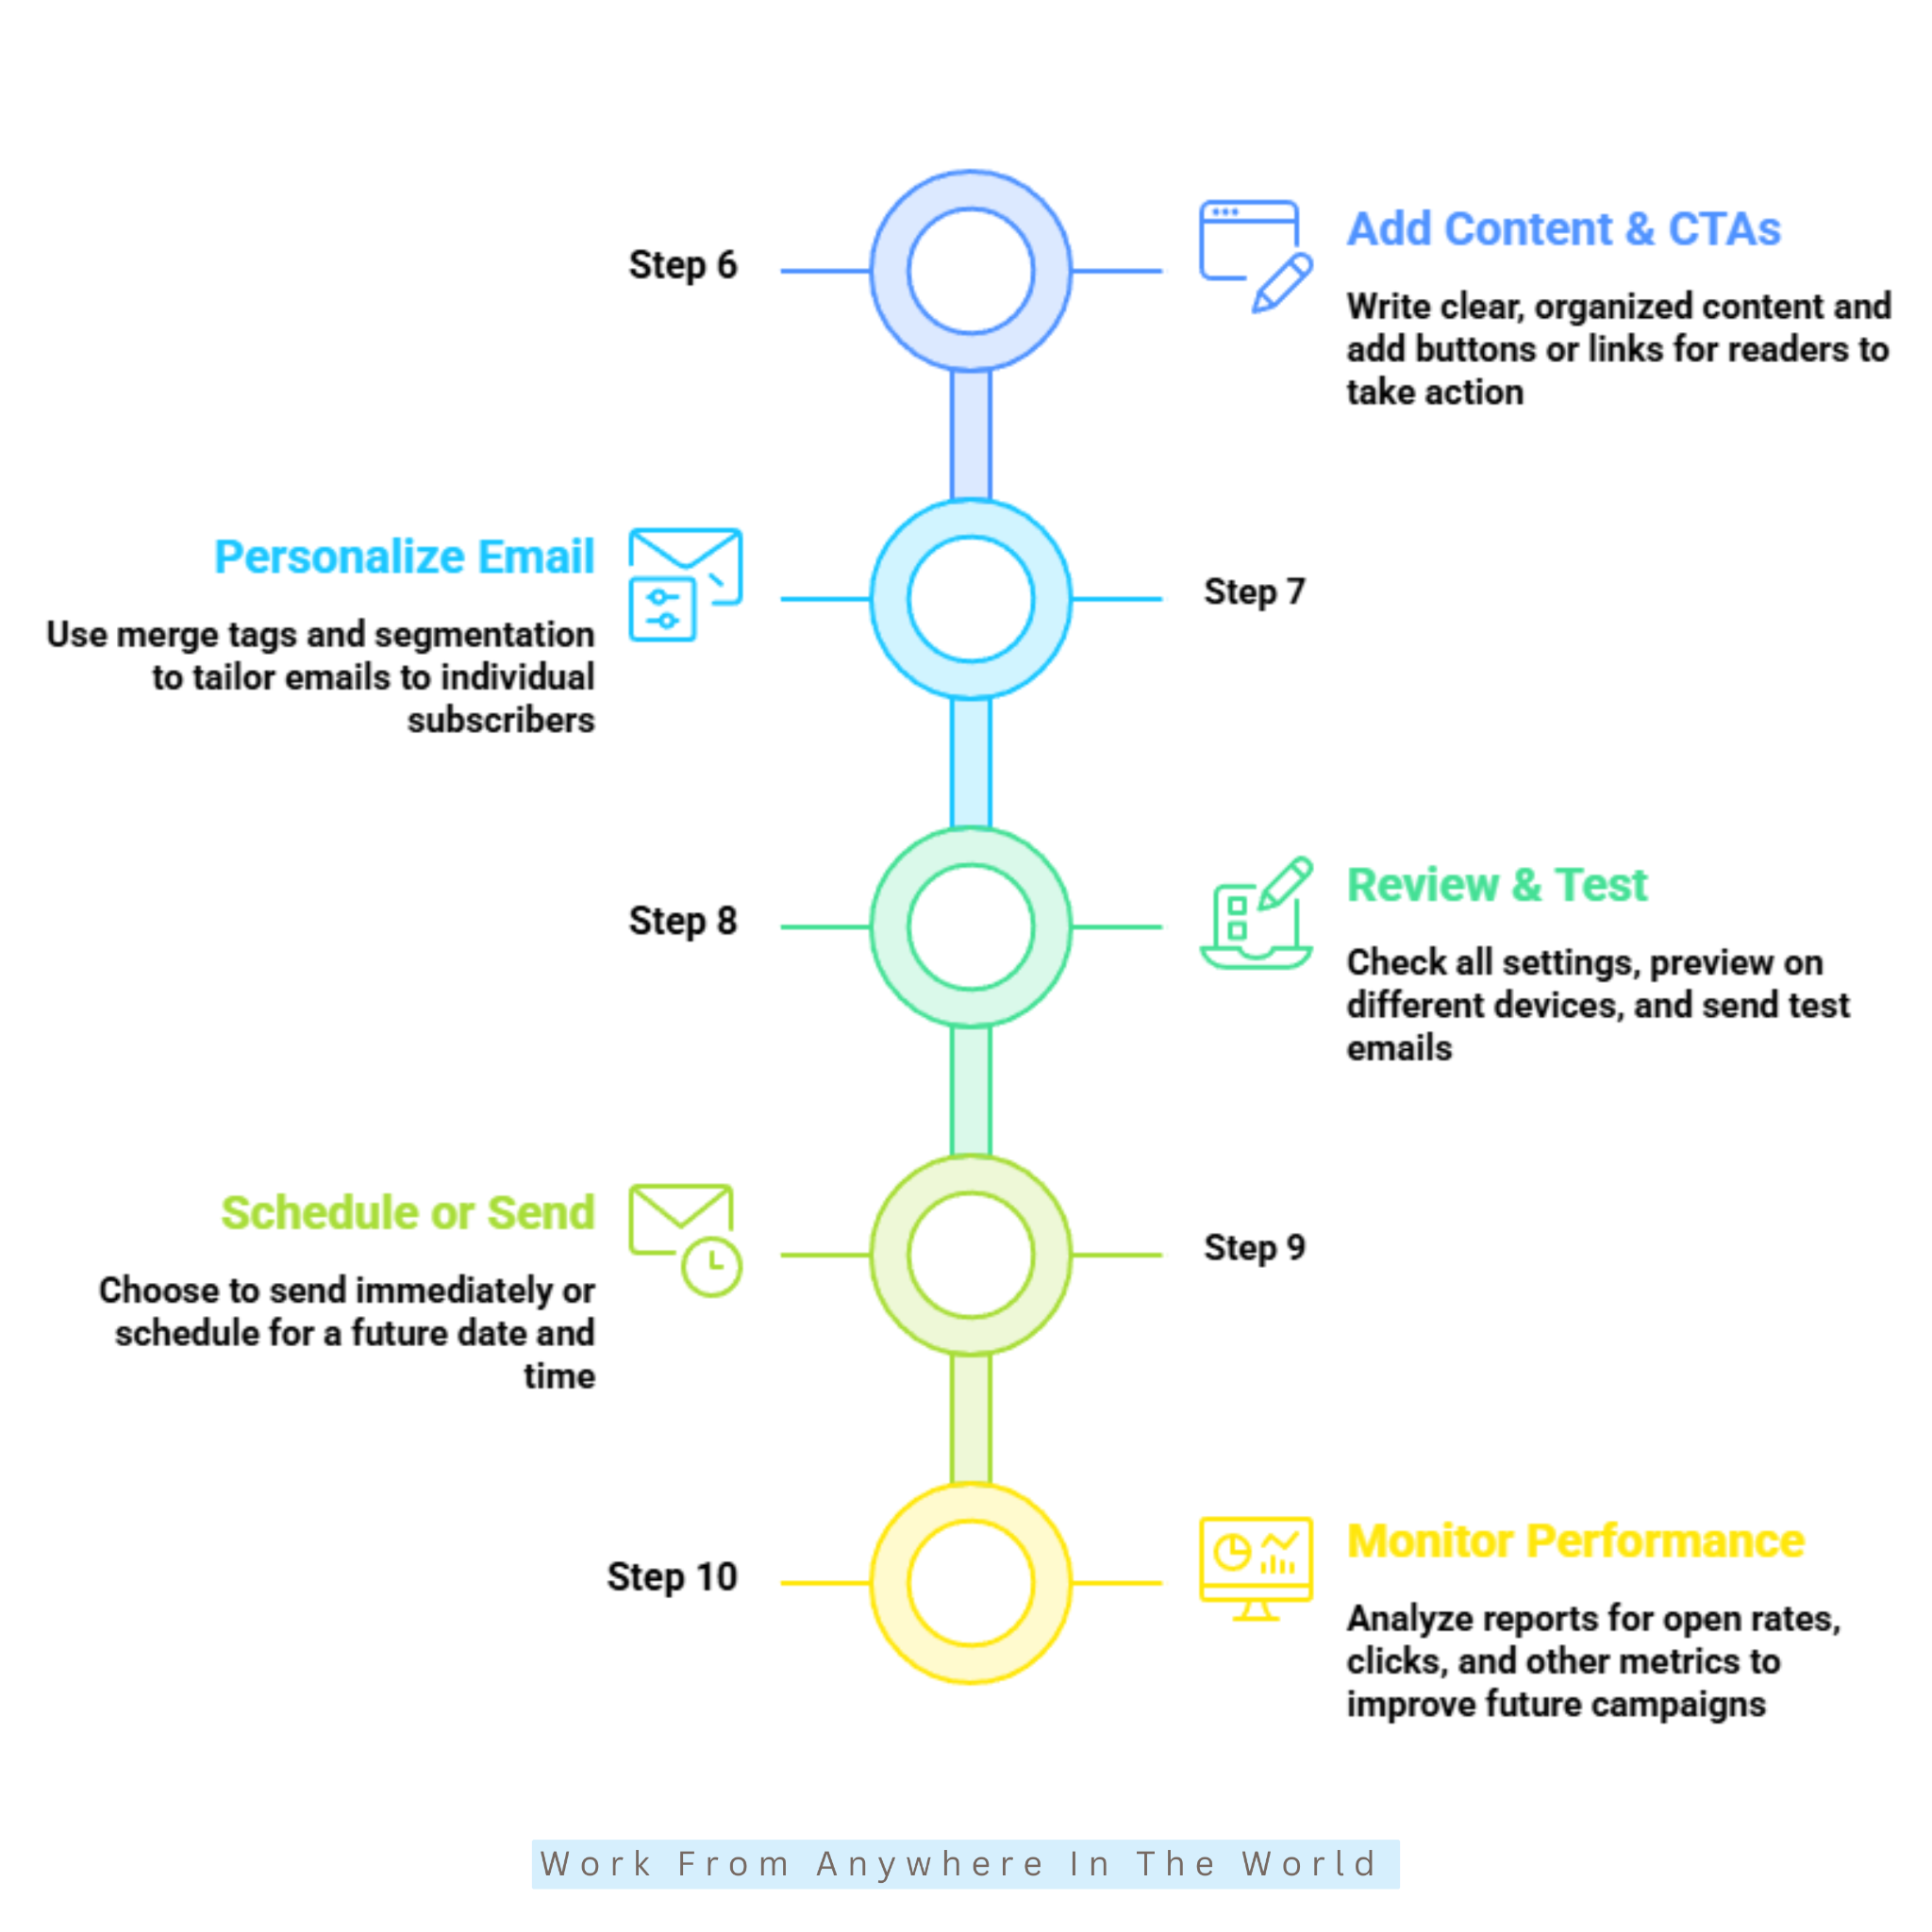
Step 6: Add Content And Calls To Action
Write clear, valuable content that matches the purpose of your email. Begin with a friendly introduction that lets subscribers know what they can expect.
Organize your message using short paragraphs, headings, images, and useful information. A well-structured email is easier to read and keeps subscribers engaged.
Once your content is in place, add a clear call to action using a button or linked text. Make it obvious what you want readers to do next.
Your call to action might encourage readers to visit your website, read a blog post, download a resource, shop for products, or register for an event. Choose an action that supports the goal of your campaign.
Place your calls to action naturally within the content instead of forcing them into every section. A well-placed call to action can improve engagement and encourage more readers to take the next step.
Step 7: Personalize Your Email
Mailchimp offers several personalization features that make your emails more relevant to each subscriber. Adding personal details helps create a more engaging experience for your audience.
You can use merge tags to automatically insert information such as the recipient’s first name, company name, or other details stored in your audience list. This allows each email to feel more personal without extra work.
If you’ve organized your subscribers into different segments, you can also tailor your content to each group. This makes it easier to send information that matches their interests, purchase history, or engagement levels.
Personalized emails often receive better responses because readers are more likely to engage with content that reflects their needs and interests. Small personal touches can make your emails feel more relevant and meaningful.
Taking a few extra minutes to personalize your emails can strengthen customer relationships and improve your campaign results. It also helps create a better experience for your subscribers from the very first email.
Step 8: Review, Preview, And Test Your Email
Before sending your campaign, review all your email settings carefully. Check the selected audience, sender details, subject line, preview text, tracking options, and reply-to address.
Make sure your images display correctly, and every link works as expected. Taking a few minutes to check these details can help you avoid common mistakes.
Mailchimp’s preview feature lets you see how your email will appear on desktops, tablets, and smartphones. This helps you confirm that your layout looks professional on different devices.
It’s also a good idea to send a test email to yourself or a colleague before sending it to your subscribers. A test email makes it easier to spot formatting, spelling, or layout issues that might otherwise be missed.
A careful review before sending gives you confidence that everything is working properly. It also helps create a positive experience for your subscribers from the moment your email arrives.
Step 9: Schedule Or Send Your Campaign
Once everything is ready, decide whether to send your email immediately or schedule it for a future date and time. Mailchimp gives you the flexibility to choose the option that best suits your campaign.
Scheduling can be useful when your audience is most active or when you’re coordinating with a product launch, promotion, or special event. Sending emails at the right time can help improve visibility and engagement.
After confirming your selection, Mailchimp processes and delivers your campaign to the selected recipients. The platform handles delivery, allowing you to focus on monitoring the results.
You can track your campaign’s delivery progress directly from the Mailchimp dashboard. This makes it easy to confirm that your email has been sent successfully and monitor its performance.
Congratulations! You’ve now completed the basic steps for creating and sending a Mailchimp email campaign. With practice, you’ll become more confident using the platform and its many email marketing features.
Step 10: Monitor Campaign Performance
Sending your email is only part of the process. After your campaign has been delivered, open the Reports section to review its performance.
Mailchimp provides detailed metrics, including open rates, click-through rates, bounce rates, unsubscribes, link activity, geographic data, and device usage. These reports show how subscribers responded to your email.
Reviewing your campaign results helps you understand what worked well and where improvements can be made. This information makes it easier to plan more effective email campaigns in the future.
Comparing reports from different campaigns can also help you identify patterns in subscriber behaviour. You may discover which subject lines, content, or calls to action generate the best response.
Monitoring your campaign performance regularly helps you continue improving your email marketing skills. The more you learn from each campaign, the more confident you’ll become when creating the next one.
Common Mailchimp Mistakes And How To Avoid Them
Even with a user-friendly platform like Mailchimp, small mistakes can reduce the effectiveness of your email marketing campaigns. Taking a little extra care before sending emails can help you avoid many common problems.
Some mistakes affect email deliverability, while others reduce open rates, click-through rates, or subscriber engagement. Learning to recognize these issues makes it easier to improve future campaigns.
Many of these problems are easy to fix once you know what to look for. Simple changes to your setup, content, or sending process can often make a noticeable difference.
The following mistakes are among the most common when using Mailchimp. Avoiding them will help you create more professional campaigns and build stronger relationships with your subscribers.
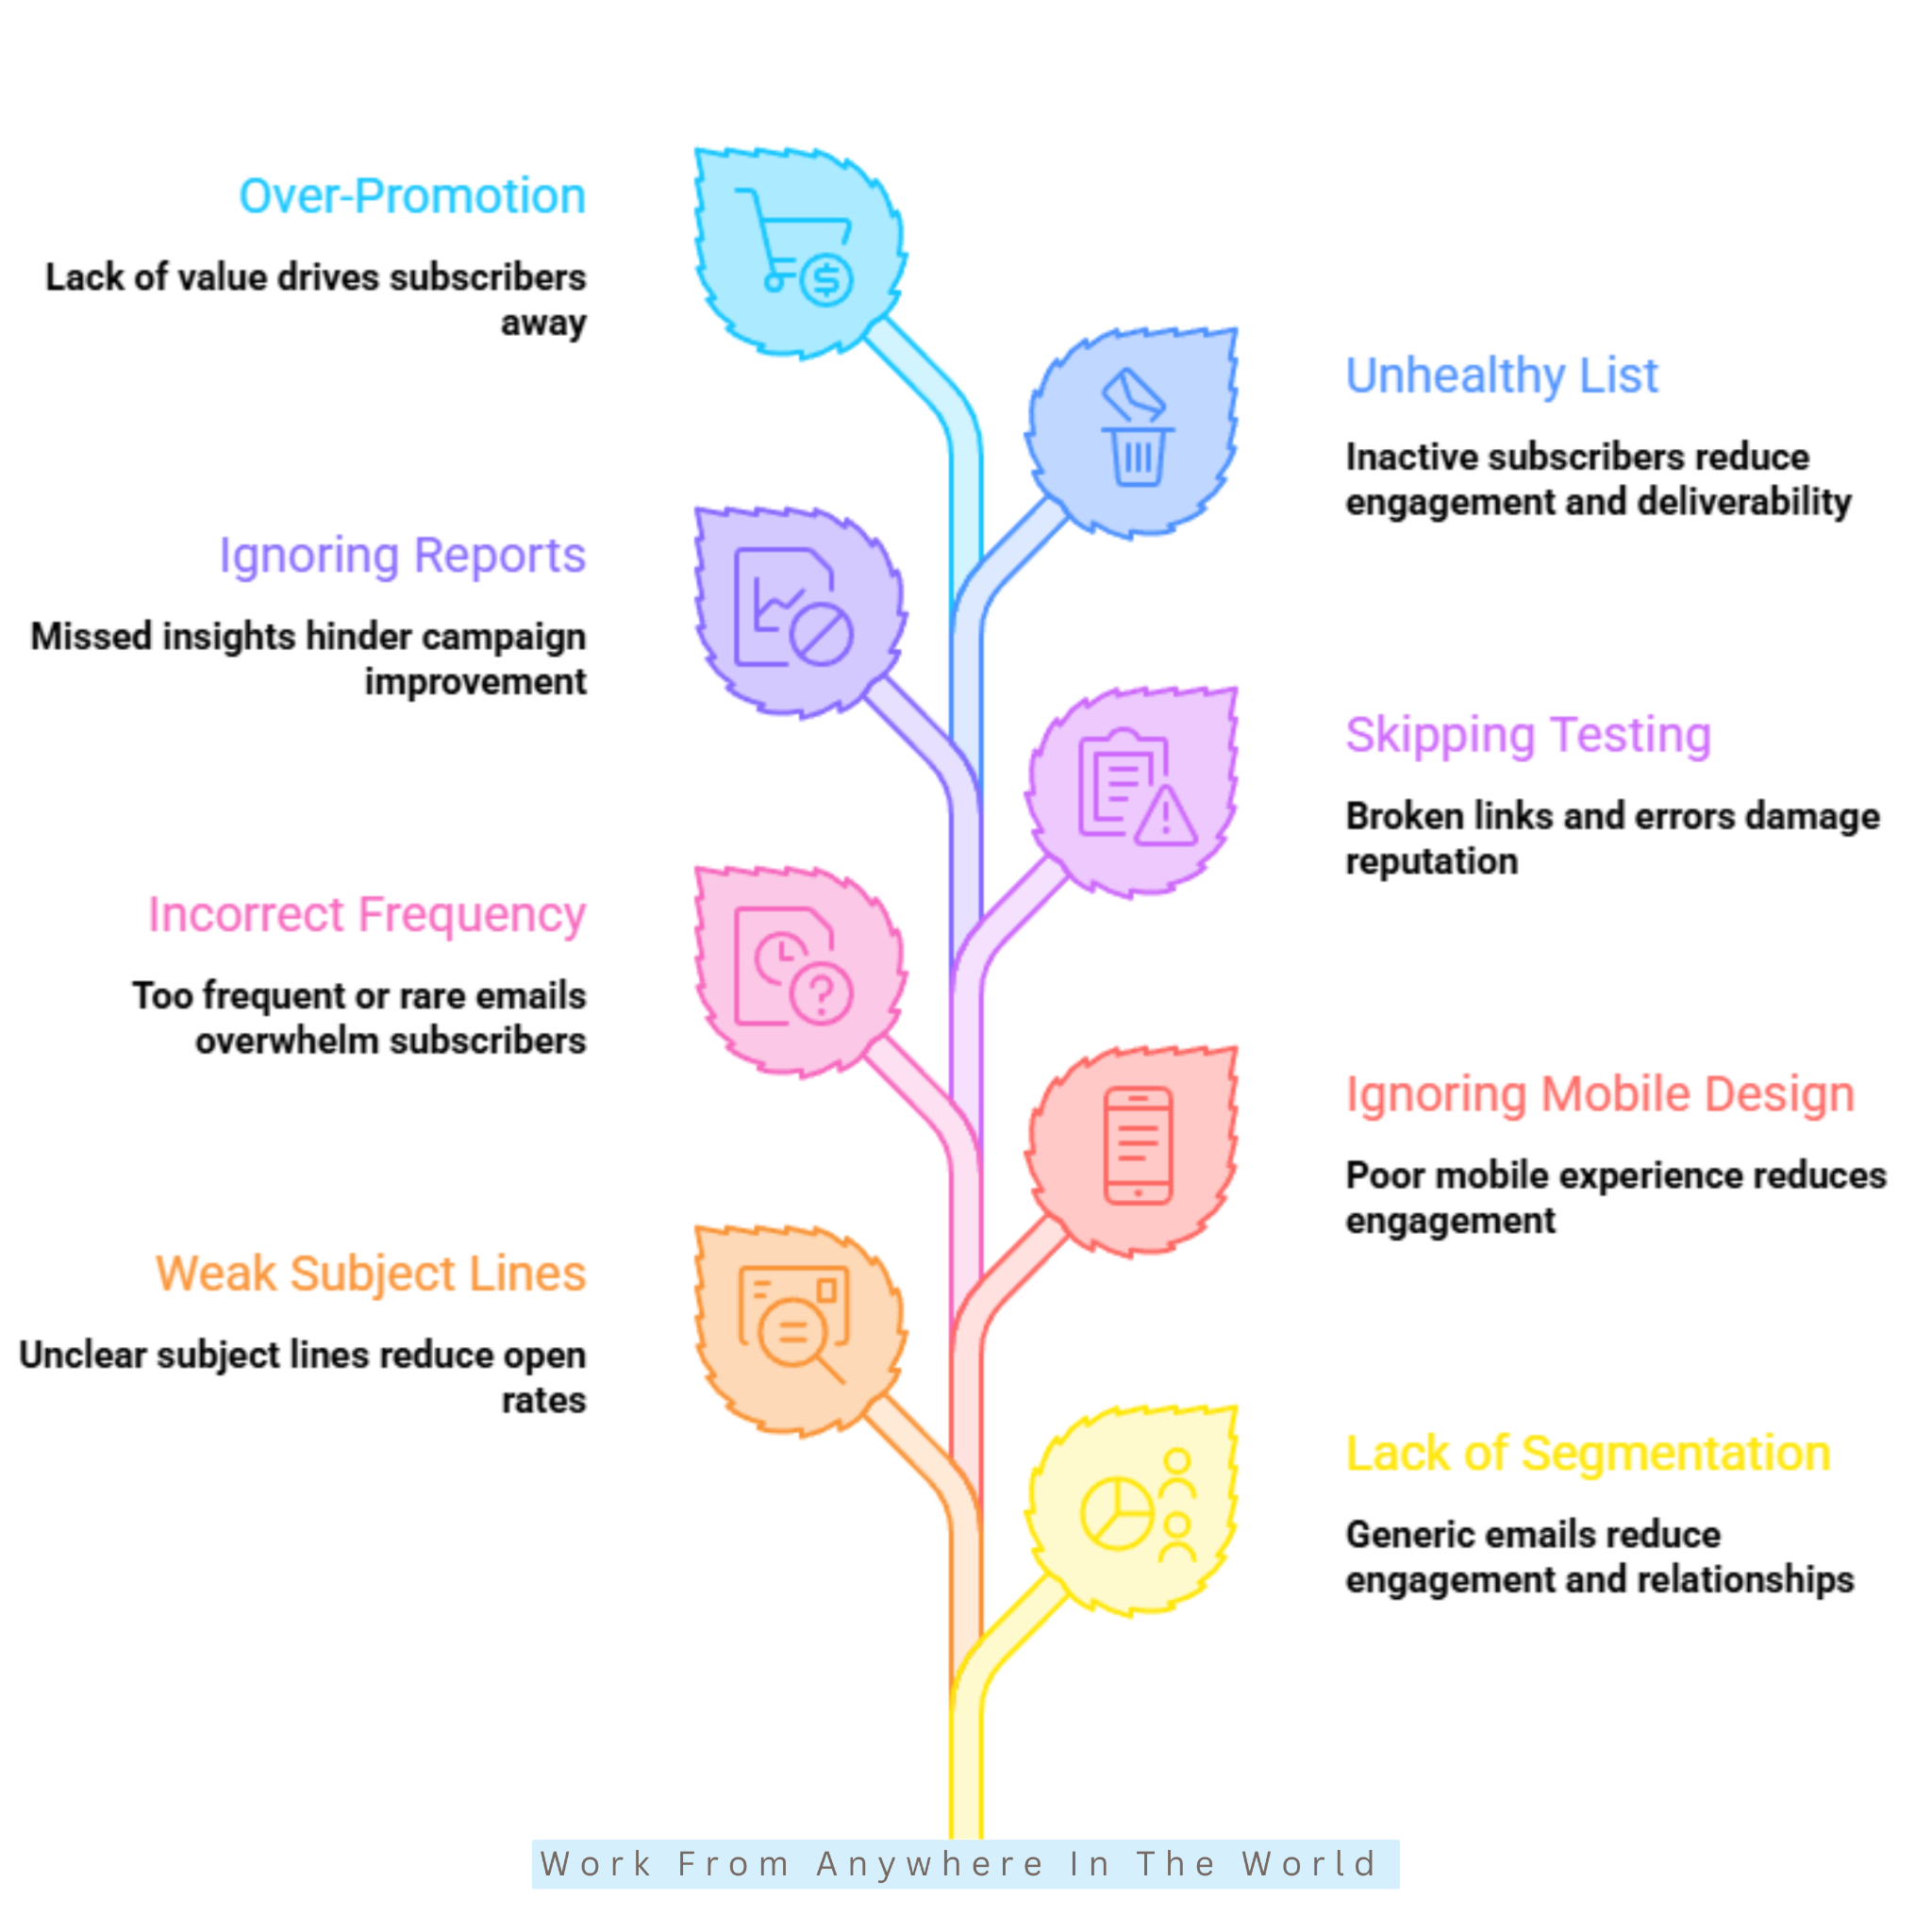
1. Sending Emails Without Segmenting Your Audience
Sending the same email to every subscriber may seem like the easiest approach. However, people often join your email list for different reasons, so a generic message may receive fewer opens and clicks.
Mailchimp makes it easy to organize contacts using tags, groups, and segments based on interests, purchase history, or subscriber behaviour. This allows you to send more relevant content to different groups of subscribers.
Instead of sending one email to everyone, divide your audience into smaller segments based on their interests or activity. Targeted campaigns are more likely to capture attention and encourage engagement.
Taking the time to segment your audience helps create a more personalized email marketing experience. It can also strengthen customer relationships and improve the overall performance of your campaigns.
2. Writing Weak Subject Lines
Your subject line is often the first thing subscribers notice when your email arrives. A long, unclear, or overly promotional subject line may discourage people from opening your email.
Instead, write short, clear subject lines that tell readers what they can expect. Giving subscribers a good reason to open the email often leads to better results.
You can also add preview text to provide additional information before the email is opened. Together, the subject line and preview text create a stronger first impression.
Mailchimp lets you test different subject lines to see which ones perform best. Regular testing can improve open rates and help you create more effective email campaigns.
3. Ignoring Mobile-Friendly Design
A large percentage of subscribers read emails on smartphones, yet many campaigns are still designed with desktop users in mind. Images may appear too large, buttons can become difficult to tap, and text may feel crowded on smaller screens.
Before sending any campaign, preview it on different devices using Mailchimp’s built-in preview tools. This allows you to identify formatting issues before your subscribers see them.
Keep paragraphs short, use readable font sizes, and include buttons that are easy to tap. A clean layout makes your emails easier to read and navigate on any device.
Taking a few extra minutes to review your email on a mobile device can improve the reader’s experience. It also helps ensure your message looks professional from the moment it arrives.
4. Sending Emails Too Frequently Or Too Rarely
Finding the right email schedule can take a little trial and error. Sending emails too often may overwhelm subscribers, while waiting too long between emails can cause people to forget your brand.
Choose a schedule that matches your audience’s expectations and the type of content you share. Whether you send emails weekly, biweekly, or monthly, consistency is more important than frequency.
Focus on providing useful content every time you contact your subscribers. Regular communication helps build trust and keeps your audience engaged.
Monitor your campaign reports to see how subscribers respond to your sending schedule. Their engagement can help you decide whether it’s time to send emails more or less often.
5. Forgetting To Test Emails Before Sending
Even experienced marketers occasionally overlook broken links, spelling mistakes, missing images, or formatting issues. Testing your email before sending helps you catch these problems while there’s still time to fix them.
Fortunately, Mailchimp includes preview and test email features that make checking your work simple. Using these tools can prevent small mistakes from reaching your subscribers.
Send a test email to yourself or a colleague before every campaign. Review it on both desktop and mobile devices, click every link, and read the content carefully.
Spending a few extra minutes testing your email can prevent avoidable mistakes. It also helps ensure your subscribers receive a professional, error-free email.
6. Not Monitoring Campaign Reports
Sending your email is only the beginning of the process. Reviewing your campaign reports helps you understand what worked well and where improvements can be made.
Mailchimp provides reports showing open rates, click-through rates, unsubscribes, bounce rates, and audience engagement. These reports give you a clear picture of how subscribers responded to your email.
Compare the results of each campaign and look for patterns in subscriber behaviour. If one campaign performs better than another, examine the subject line, content, or call to action to identify possible reasons.
Using this information helps you make better marketing decisions and improve future email campaigns. The more you learn from your reports, the more effective your email marketing can become.
7. Growing An Unhealthy Email List
A large subscriber list may seem impressive, but quality is far more important than quantity. Adding contacts without permission or keeping inactive subscribers for years can reduce engagement and affect email deliverability.
Instead, focus on growing your email list through signup forms, lead magnets, and voluntary subscriptions. Subscribers who choose to join your list are more likely to engage with your emails.
Review your audience regularly and remove inactive contacts when appropriate. Keeping your subscriber list up to date also improves the accuracy of your campaign reports.
Maintaining a healthy, permission-based email list helps improve open rates, strengthens your sender reputation, and increases the chances that your emails will reach interested subscribers.
8. Focusing On Promotions Instead Of Providing Value
Promotional emails play an important role in email marketing, but they shouldn’t be the only type of message you send. Subscribers also appreciate content that educates, informs, or helps solve a problem.
Sharing helpful articles, tutorials, industry news, tips, checklists, or exclusive resources helps build trust with your audience. It also keeps subscribers engaged between promotional campaigns.
A balanced email strategy encourages subscribers to stay connected with your business instead of only hearing from you when you’re selling something. This approach can strengthen long-term customer relationships.
Providing value consistently often leads to higher engagement and better email marketing results. When subscribers find your emails useful, they are more likely to open future campaigns and interact with your content.
Frequently Asked Questions
Q1: Is Mailchimp Free To Use?
Yes. Mailchimp offers a free plan with limited features and subscriber allowances. Paid plans unlock advanced automation, additional marketing tools, and higher subscriber limits for growing businesses.
Q2: Is Mailchimp Good For Beginners?
Yes. Mailchimp is well known for its beginner-friendly interface and straightforward campaign-building tools. Most users can learn the basics quickly without needing advanced technical skills.
Q3: Can I Schedule Emails In Mailchimp?
Yes. Mailchimp allows you to send campaigns immediately or schedule them for a future date and time. Scheduling emails helps you reach subscribers when they are most likely to engage with your content.
Q4: Does Mailchimp Support Automation?
Yes. Mailchimp includes automation tools for welcome emails, abandoned cart reminders, re-engagement campaigns, and customer journey sequences. These features help you communicate with subscribers automatically while saving time.
Q5: Can Mailchimp Integrate With My Website?
Yes. Mailchimp integrates with many popular platforms, including WordPress, Shopify, WooCommerce, and various CRM systems. These integrations make it easier to synchronize customer data and manage your marketing activities.
Q6: How Often Should I Send Emails Through Mailchimp?
The ideal sending frequency depends on your audience and marketing goals. Whether you choose weekly, biweekly, or monthly campaigns, maintaining a consistent schedule is usually more important than sending emails frequently.
Conclusion
Learning how to work with Mailchimp can help you build stronger connections with your audience through effective email marketing. Its user-friendly features make it easy to create campaigns, manage subscribers, automate routine tasks, and measure your results.
As your confidence grows, you can explore advanced features such as audience segmentation, personalization, and automation. These tools help you deliver more relevant content and improve the overall performance of your campaigns.
The key to success is staying consistent and providing value with every email you send. Regularly reviewing your campaign results will help you continue refining your email marketing strategy.
Whether you run a blog, a small business, or an online store, Mailchimp provides the tools to support your goals. Start with the basics, keep learning, and you’ll be well on your way to building stronger relationships with your subscribers.
I trust you enjoyed this article on How to Work With Mailchimp: 10 Essential Steps. Please stay tuned for more insightful blogs on affiliate marketing, online business, and working from anywhere in the world.
Take care!
— JeannetteZ 🌍✨
💬 Your Opinion Is Important To Me
Do you have thoughts, ideas, or questions? I’d love to hear from you. Please leave your comments below or email me directly at Jeannette@WorkFromAnywhereInTheWorld.com.
📚 More Work From Anywhere Reads
🚀 Ready to Build a Business You Can Run from Home
Or from Anywhere in the World?
Imagine creating income on your terms — from home, a cozy café, or wherever life takes you.
With the right tools, training, and community support, it’s entirely possible.
Start your own online business for free — no credit card needed.
Disclosure
This post may contain affiliate links. As an Amazon Associate and participant in other affiliate programs, I earn from qualifying purchases at no extra cost to you. Please read my full affiliate disclosure.