How To Create A Landing Page In Squarespace
Creating a landing page doesn’t have to be complicated or overwhelming. If you’re wondering how to create a landing page in Squarespace, the good news is that the platform makes it surprisingly simple — even if you’re a beginner.
With its intuitive drag-and-drop editor, beautifully designed templates, and built-in marketing tools, Squarespace allows you to create focused, high-converting landing pages without touching a line of code.
Whether your goal is to promote a product, collect email sign-ups, or highlight a special offer, a well-designed landing page can help you capture attention and guide visitors toward action.
In this guide, you’ll learn exactly how to create a landing page in Squarespace that looks professional, aligns with your brand, and supports your business goals.
What Is A Squarespace Landing Page?
Squarespace is a user-friendly website builder that creates professional-looking landing pages without coding. It offers beautifully designed templates, drag-and-drop editing, and built-in tools for marketing, SEO, and analytics.
Whether launching a product, collecting emails, or promoting a service, Squarespace lets you quickly build a focused, one-page site.
You can add forms, videos, buttons, and more with ease. Its mobile-responsive design ensures your landing page looks great on any device.
Plus, with built-in integrations for email marketing and social media, it's easy to connect with your audience.
Steps Of Creating A Landing Page In Squarespace
Creating a landing page in Squarespace is simple and effective—follow these steps to design, customize, and optimize a high-converting page for leads, promotions, or product launches.
Step 1: Choose The Right Template
Start by logging into your Squarespace dashboard and browsing through the template options. While any template can be customized, some are better suited for landing pages due to their simplicity and flexibility.
Look for clean, minimalist designs like Rally, Hawley, or Paloma—these focus attention on your message and call to action. Click “Use This Template” to start building your site or add a new page to an existing website.
Templates in Squarespace 7.1 are universal, meaning you can customize sections without being locked into rigid layouts, making them perfect for one-page designs like landing pages.
Step 2: Add A New Page
In your website editor, click on Pages in the left-hand panel. Under the Not Linked section (which keeps pages out of the main site navigation), click the “+” button.
Select Blank Page to start from scratch or choose Page Layouts > Landing Pages if you want a premade layout to modify. Name your page appropriately (like “Signup” or “Free Guide”).
Keeping it “Not Linked” ensures the page isn’t accessible from the main menu, which is ideal for dedicated traffic from ads or emails. Click “Done” to create the page, then “Edit” to begin customizing it.
Step 3: Set Up The Page Layout
Click “Edit” on the page to enter layout mode. Squarespace uses Sections to structure pages vertically. Start by clicking “Add Section” to choose from layouts like “Headline”, “Image with Text”, or “Form”. For a landing page, a typical structure is a hero section with a CTA, features or benefits, testimonials, and a final CTA.
Keep navigation hidden by removing any site headers or footers using Section Settings. Use Spacer blocks to adjust padding and Divider blocks to separate content. Arrange content clearly from top to bottom, guiding visitors naturally toward your call to action.

Step 4: Customize Fonts, Colours, And Branding
Go to Design > Site Styles and customize typography, button styles, and colours to match your brand. Choose legible and modern fonts—Sans-serif fonts work well for clarity.
Stick to a limited colour palette (2–3) to maintain focus and cohesion. Set your CTA button colour to stand out against the background. Add your logo in the hero section, and use consistent design elements throughout.
Upload brand images by clicking on image blocks and replacing the default with your media. Ensure all visuals align with your landing page’s purpose and branding guidelines.
Wealthy Affiliate – Mini Review
If you’ve ever thought about turning your blog, passion, or niche into an online business,
Wealthy Affiliate (WA) is one of the most beginner-friendly platforms I’ve used.
It combines step-by-step training, website hosting, AI-powered tools,
keyword research, and an active community all in one place.
What I like most is that you can start free (no credit card needed), explore the platform,
test the tools, and connect with other entrepreneurs before upgrading.
WA isn’t a “get rich quick” scheme — success comes from consistent effort
and applying what you learn over time.
Step 5: Add A Strong Headline And Sub-Headline
A great headline grabs attention and clearly states the benefit of your offer. Click into a Text Block in the top section to enter your headline, e.g., “Get Your Free eBook Today!”
Below that, add a sub-headline that explains the offer further, such as “Learn 10 proven ways to grow your email list in just one week.” Keep text concise, benefit-driven, and centred.
Use heading styles (H1 for the headline, H2 or H3 for subheadings) for consistency. This section sets the tone and should entice users to scroll further or take immediate action by clicking your CTA.
Step 6: Insert A Call-To-Action Button
Click Add Block, select the Button block, and place it below your headline. Edit the button text to reflect your CTA, such as “Download Now” or “Start Free Trial.”
Link the button to a signup form, an external link, a product page, or a file download, depending on your goal. Use a bold colour and large font for visibility. Center-align the button and ensure it contrasts with the background.
Repeating your CTA at the top and bottom of the page increases conversions. Test the button link after saving to ensure it leads to the correct destination.

Step 7: Add A Signup Or Contact Form
To capture emails or leads, click Add Block > Form. Drag the form into your desired section. Customize the form by adding fields like “Name” and “Email” (avoid too many fields to increase submissions).
Under Storage, connect the form to your email marketing tool (Mailchimp, Squarespace Email Campaigns, or Zapier). Set up a thank-you message or redirect to a custom thank-you page.
You can also connect Google Sheets for data collection. Always test the form before publishing. Add a short message above the form to reassure visitors about privacy and spam-free communication.
Step 8: Add Supporting Content And Visuals
Use Image Blocks to add visuals such as product images, illustrations, or mockups. Place them near relevant text for context. Add Text Blocks to highlight features or benefits using bullet points for clarity.
Quote Blocks or Testimonial Blocks are great for social proof—include real names and photos if possible. Keep sections short and focused.
You can also embed a Video Block (from YouTube or Vimeo) for product demos or introductions. Break long content with Spacer Blocks or background colour changes in each section to improve readability and visual flow.
Step 9: Optimize For Mobile Devices
Click the Mobile Preview icon (phone symbol) in the top editor menu to view your landing page on mobile. Ensure all content stacks vertically, buttons are large enough to tap, and images scale appropriately.
Resize text blocks to prevent overflow and reduce padding where necessary. Avoid using side-by-side columns as they may appear cramped. Test forms and CTAS on mobile to ensure functionality.
Make adjustments directly within the editor if spacing or alignment looks off. Since over 50% of users browse on mobile, this step is essential to ensure a professional, responsive landing page.

Step 10: Configure SEO And Page Settings
Click the gear icon next to your landing page in Pages > Not Linked to open Page Settings. Write a clear, keyword-rich page title and description in the SEO tab in search engine results.
In URL Slug, enter something short and memorable like /signup or /free-guide. Under Social, upload a custom social sharing image for better presentation on platforms like Facebook or Twitter.
Uncheck “Hide from Search Engines” only if you want the page to be indexed. Otherwise, leave it hidden for exclusive campaigns like email promotions or paid ads.
Step 11: Connect A Custom Domain Or Subdomain
To give it a polished appearance, link your landing page to a custom domain. To buy a new domain or link an existing one, go to Settings > Domains.
If you want the landing page to be a subdomain (e.g., promo.yoursite.com), set it up with your domain provider and point it to Squarespace using A and CNAME records.
Once the domain is connected, you can map your landing page by assigning the correct URL path. This setup is well-suited for branded marketing campaigns, ad tracking, and improved link memorability.
Step 12: Enable Analytics And Conversion Tracking
Integrate Google Analytics and Meta Pixel to monitor performance by going to Settings > Advanced > External Services. Paste your tracking ID or pixel code into the appropriate field.
You can add conversion events to your form's post-submit settings or use tools like Google Tag Manager for advanced tracking. Tracking helps you see which traffic sources convert best if you use paid ads.
Squarespace’s built-in analytics show page views, traffic sources, and form conversions, but third-party tools provide deeper insights. Always test your tracking setup using browser extensions like Google Tag Assistant or Facebook Pixel Helper.

You might also want to explore our Ultimate Guide To Squarespace For Website Success.
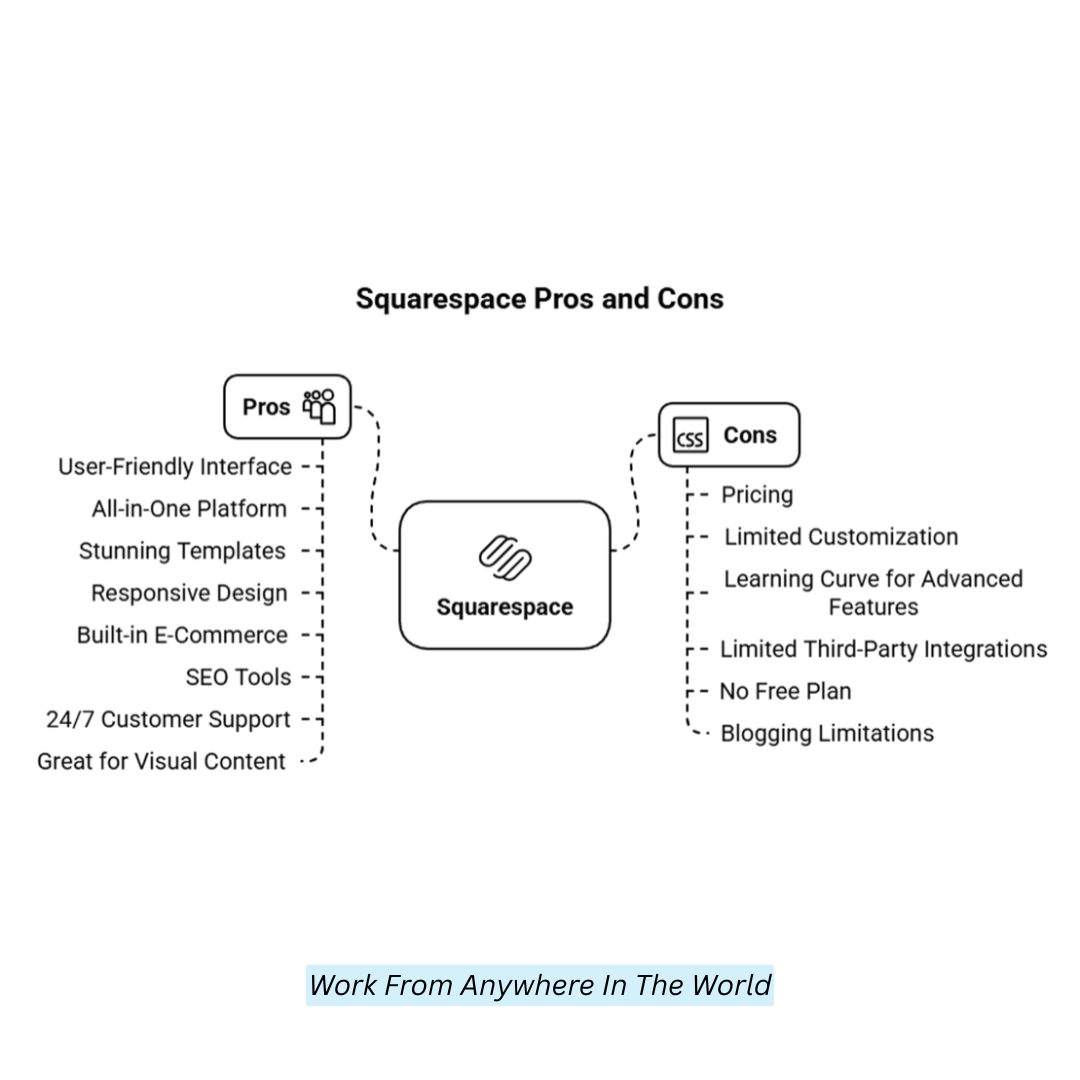
Squarespace Pros And Cons
Squarespace offers an intuitive, all-in-one website builder with stunning templates, strong e-commerce features, and solid SEO tools. Still, its pricing, customization limits, and third-party integrations might not suit all users.
Squarespace Pros
1. User-Friendly Interface
Squarespace’s drag-and-drop interface is incredibly intuitive, making it a top choice for beginners without coding experience.
HTML, CSS, and JavaScript are not required to build a functional, aesthetically pleasing website. By bypassing the complexities of traditional web development, its simplicity streamlines the design process and lets you focus on the creative aspects of your website.
2. All-in-One Platform
Squarespace stands out by providing everything you need for website creation, including hosting, domain services, and SSL certificates, all bundled together. This means you don’t have to juggle multiple third-party services or worry about integration issues.
Everything is streamlined in one platform, from website building to ongoing maintenance, offering convenience and a unified experience for users, especially those new to web design.
3. Stunning Templates
Squarespace offers an extensive collection of professionally designed templates ideal for various industries and creative needs.
Whether you’re creating a portfolio, blog, or e-commerce store, the templates are high-quality, modern, and visually appealing.
The design is ideal for consumers who value their website's aesthetic appeal without requiring design knowledge because it is visually focused and pays close attention to detail.
4. Responsive Design
With Squarespace's fully adaptable layouts, your website will adjust its layout and style to match various screen sizes on desktop and mobile devices.
This is crucial in today’s mobile-first world, where more users browse and shop via smartphones. With this built-in responsiveness, you can be confident your website delivers an optimal user experience on any device.
5. Built-In E-Commerce
Squarespace offers robust e-commerce functionality, making it a solid choice for those looking to build an online store.
With features including product management, inventory tracking, secure payment processing, and customizable product pages, users can effectively operate a full-fledged online store.
It’s especially appealing to small businesses or independent creators who need a user-friendly platform without the complexity of more advanced e-commerce solutions.
6. SEO Tools
Squarespace has several search engine optimization tools to assist you in making your website more search engine-friendly.
It offers customizable page titles, meta descriptions, image alt text, and more, making it easier to improve your website’s visibility.
Additionally, Squarespace’s architecture is built with SEO in mind, which can improve your chances of ranking higher in search results and drive more organic traffic to your site.
7. 24/7 Customer Support
One of Squarespace’s standout features is its round-the-clock customer support. You can get help via live chat, email, or their extensive knowledge library, whether you are experiencing technical difficulties or have questions about customization.
This ensures you’re never stranded when problems arise, and their customer support team is highly praised for its responsiveness and helpfulness in resolving issues.
8. Great For Visual Content
Squarespace excels for users such as photographers, painters, and designers who rely heavily on visual content. The platform’s templates are optimized for high-quality image display, showcasing your visuals in a stunning, gallery-like format.
Whether you’re sharing a portfolio or promoting your products, the design and presentation of visual content are top-notch, making Squarespace a favorite for creatives who want their work to stand out.
Squarespace Cons
1. Pricing
Compared to other website builders, Squarespace is on the pricier side. Its plans range from basic to advanced, with higher tiers offering features such as expanded e-commerce capabilities and additional storage.
While the quality of the platform justifies the price for many users, small businesses or individuals on a tight budget may find Squarespace’s pricing less affordable than alternatives like Wix or WordPress, which offer lower-cost options.
2. Limited Customization
While Squarespace is known for its ease of use, its customization options can be somewhat restrictive compared to WordPress. Although you can add custom code to your site, doing so requires technical knowledge of HTML, CSS, and JavaScript.
If you need extensive control over every aspect of your site’s design and functionality, you might find Squarespace limiting in terms of flexibility.
3. Learning Curve For Advanced Features
For beginners, Squarespace is simple to use for basic website creation. However, features such as e-commerce setup, custom integrations, and advanced design adjustments may require a steep learning curve.
As a result, those new to website building may initially struggle with specific functions and require time to explore the platform’s depth and learn its more complex features.
4. Limited Third-Party Integrations
While Squarespace offers essential integrations, its third-party app and plugin ecosystem is smaller than WordPress's. This may limit the flexibility of your website if you need specific features not supported by Squarespace’s built-in tools.
Users with highly specialized needs, such as advanced analytics or niche e-commerce plugins, may find Squarespace less adaptable to their unique requirements.
5. No Free Plan
Unlike other website builders offering a free tier, Squarespace does not provide a free plan, only a 14-day trial. You must subscribe to one of their paid plans to continue using the platform beyond the trial.
Users who wish to test the site out before committing to a paid subscription up front may find this a drawback, even though the plans are affordable given their features.
6. Blogging Limitations
Although Squarespace offers blogging tools, some users may find them less robust than those from dedicated blogging platforms such as WordPress.
Squarespace’s blogging features, while solid, can be limiting in terms of advanced customization and flexibility.
For example, it may not offer as many theme options or post-editing features, which can be restrictive for bloggers who want more control over their content’s presentation and functionality.
Here is our detailed Review Of Squarespace For Building Stunning Websites.
FAQs
Q1: What Elements Should I Include On A Landing Page?
Key elements typically include a strong headline, a clear call to action (CTA), an eye-catching image or video, concise copy, and a conversion form or button (e.g., sign-ups or purchases).
Q2: Can I Use My Domain For A Landing Page?
Connecting it to your custom domain can make a Squarespace landing page look more polished and consistent with your brand.
Q3: Can I Make My Landing Page Mobile-Friendly?
Yes, Squarespace landing pages are automatically responsive, meaning they display well on desktop and mobile devices.
Q4: Can I Modify My Landing Page Once It Has Been Published?
Absolutely! Squarespace allows you to make changes at any time, whether updating your landing page's content, design, or structure.
Conclusion
Now that you know how to create a landing page in Squarespace, you’re ready to build a page that looks professional and drives results.
With the right layout, clear messaging, and thoughtful design, your landing page can turn visitors into customers or subscribers.
Keep testing and refining to achieve optimal performance. Ready to get started? Open Squarespace and bring your vision to life today!
I trust you enjoyed this article on How To Create A Landing Page In Squarespace. Please stay tuned for more insightful blogs on affiliate marketing, online business, and working from anywhere in the world.
Take care!
— JeannetteZ 🌍✨
💬 Your Opinion Is Important To Me
Do you have thoughts, ideas, or questions? I’d love to hear from you. Please leave your comments below or email me directly at Jeannette@WorkFromAnywhereInTheWorld.com.
📚 More Work From Anywhere Reads
🚀 Ready to Build a Business You Can Run from Home
Or from Anywhere in the World?
Imagine creating income on your terms — from home, a cozy café, or wherever life takes you.
With the right tools, training, and community support, it’s entirely possible.
Start your own online business for free — no credit card needed.
Disclosure
This post may contain affiliate links. As an Amazon Associate and participant in other affiliate programs, I earn from qualifying purchases at no extra cost to you. Please read my full affiliate disclosure.